



In this guide, you’ll build a simple Ubuntu 24.04 mail server using Postfix and Dovecot, then secure it with TLS and DKIM. You’ll learn how to install the mail stack, create a mailbox, test delivery, and connect a mail client. By the end, you’ll have a working email server setup that you can expand on if needed.
The basic server used in this guide had 1 CPU, 2GB of RAM, and 50GB of storage. These specs work for this tutorial, but production environments typically demand greater robustness to support multiple users and essential security layers like anti-virus, e.g. ClamAV and anti-spam, e.g. Rspamd.
Prerequisites:
Before you begin, make sure you have:
- A fresh Ubuntu 24.04 server instance (or compatible Debian-based Linux distribution) with sudo access. While this can be hosted on any cloud provider, we recommend a Kamatera cloud server for its flexibility and performance.
- A registered domain name (like the writesbytes.online we used throughout this guide), where you have full control over DNS management, including the ability to create A, MX, SPF, DKIM (TXT), and DMARC (TXT) records (Note: Kamatera does not provide domain names; you must purchase one from an external registrar like Cloudflare or Namecheap).
- A specific fully qualified domain name (FQDN), e.g. mail.writesbytes.online, that you should keep consistent throughout all configuration files.
- A PTR record (reverse DNS): This is a critical requirement. Contact your hosting provider. e.g., Kamatera, before you start to ensure your server IP has a valid PTR record mapped to your FQDN. Without this, major providers will likely flag your outbound mail as spam (for more information, see Kamatera’s reverse DNS requirements).
- Confirm with your hosting provider that they do not block outbound TCP port 25, which is required for SMTP communication. Many cloud providers restrict this by default to prevent abuse.
Note: The domain writesbytes.online and hostname mail.writesbytes.online used throughout this guide are placeholders. You must replace them with your actual domain and fully qualified domain name (FQDN).
The key values used throughout this setup are described below:
Server configuration
The basic server used in this guide had 1 CPU, 2GB of RAM, and 50GB of storage. While these minimal specifications work for this tutorial, production environments typically demand greater robustness to support multiple users and essential security layers like anti-virus, e.g. ClamAV and anti-spam, e.g. Rspamd.
The key values used throughout this setup are described below:
| Variable | Description | Example Value |
|---|---|---|
| OS | Operating system for the server | Ubuntu 24.04 |
| CPU | Number of virtual CPUs | 1 |
| RAM | Memory allocated to the server | 2 GB |
| Storage | Disk space allocated to the server | 50 GB |
| HOSTNAME | Server hostname | mail.writesbytes.online
(Placeholder) |
| FQDN | Fully qualified domain name | mail.writesbytes.online
(Placeholder) |
| MAIL_DOMAIN | Primary domain used for mail routing | writesbytes.online
(Placeholder) |
| SERVER_IP | Public IP address of the server | your_server_ip |
| MAIL_USER | Test mailbox account created during setup | testuser |
| SMTP_PORT | Port used for outbound submission | 587 |
| IMAP_PORT | Port used for secure IMAP access | 993 |
| CERT_PATH | TLS certificate file path | /etc/letsencrypt/live/mail.writesbytes.online/fullchain.pem (Placeholder) |
| KEY_PATH | TLS private key file path | /etc/letsencrypt/live/mail.writesbytes.online/privkey.pem (Placeholder) |
Why it matters
Understanding why we configure specific components is key to maintaining a secure and reliable mail server:
- Setting the hostname: A correctly configured hostname identifies your Kamatera cloud-hosted server on the network, supports accurate email routing, and helps prevent email providers from flagging your server or its emails as spam.
- Postfix and Dovecot: The backbone of your email system, Postfix, acts as the Mail Transfer Agent (MTA) while Dovecot serves as the Mail Delivery Agent (MDA). The MTA is responsible for sending and receiving emails across the internet while the MDA provides the secure protocols like IMAP that are used to store, organize, and retrieve your emails for client applications.
- Testing local mail delivery: Verify your local delivery pipeline so that Postfix and Dovecot can successfully pass messages to system users.
- Opening the firewall: Configuring your firewall to explicitly allow necessary traffic (such as SMTP and IMAP) is required to enable your server to communicate with the outside world while blocking unauthorized access.
- TLS (transport layer security): Implementing an encrypted connection between your server and external clients or other mail servers is non-negotiable for security. This setup guarantees that your emails and login credentials are not intercepted during transit.
- Connecting OpenDKIM milter: Integrating the OpenDKIM milter with Postfix enables your server to automatically sign outgoing emails, so the cryptographic verification process is applied to every message sent from your domain.
- DKIM (DomainKeys Identified Mail): This adds a cryptographic digital signature to your outgoing emails. This allows receiving servers to verify that the email truly originated from your domain and was not tampered with.
Step 1: Set the server hostname
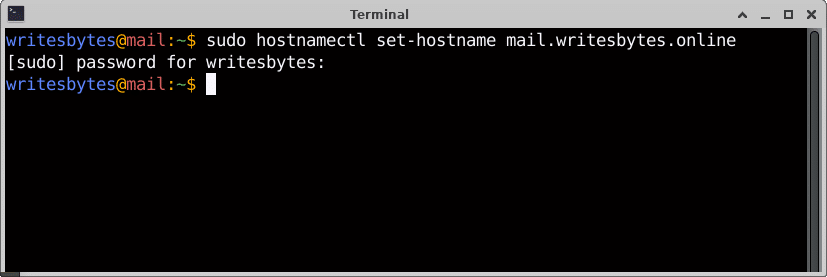
- Start by setting the hostname to match your mail server:
sudo hostnamectl set-hostname <mail.writesbytes.online>.
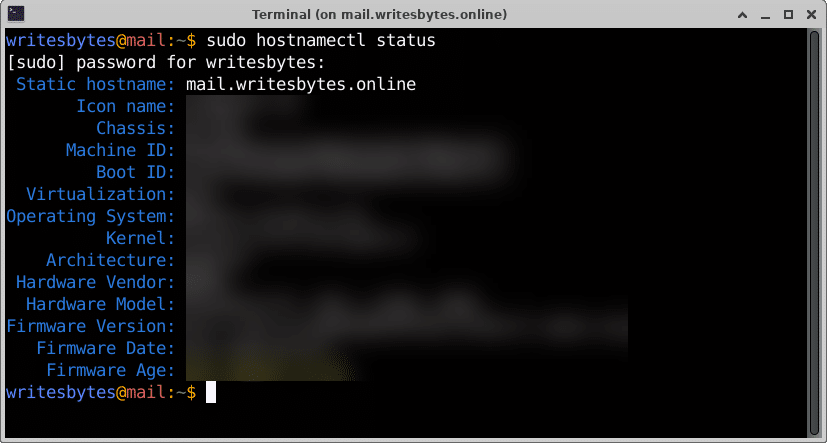
- Verify that the system accepted the change:
sudo hostnamectl status
- Check the fully-qualified domain name:
hostname -f

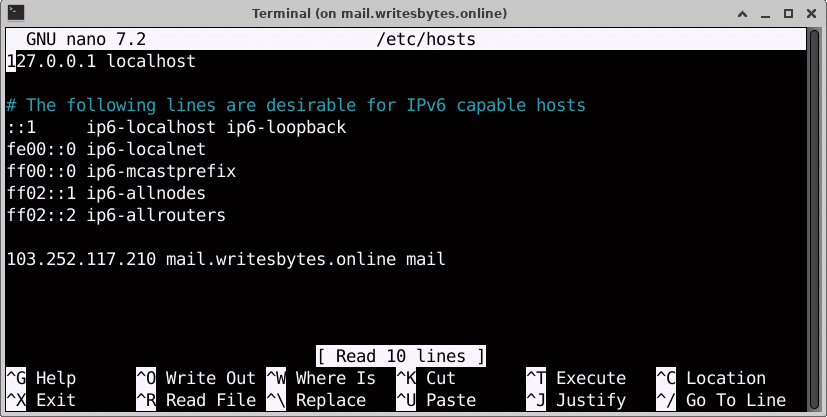
- Open the Hosts file:
sudo nano /etc/hosts
- Add the following line:
your_server_ip mail.writesbytes.online mail
(replace ‘your_server_ip’ with your actual server IP)
The screenshot below shows how I added the FQDN to my server’s Hosts file:
Step 2: Install Postfix and Dovecot
Update your local package index and install the required messaging and IMAP packages:
sudo apt update
sudo apt install -y postfix dovecot-core dovecot-imapd dovecot-lmtpd mailutils
When the Postfix configuration prompt appears on your terminal, click Ok.
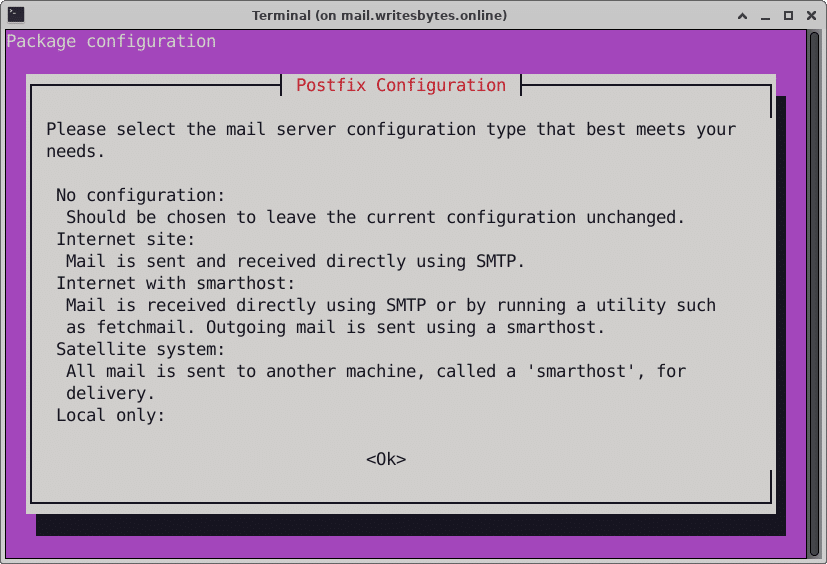
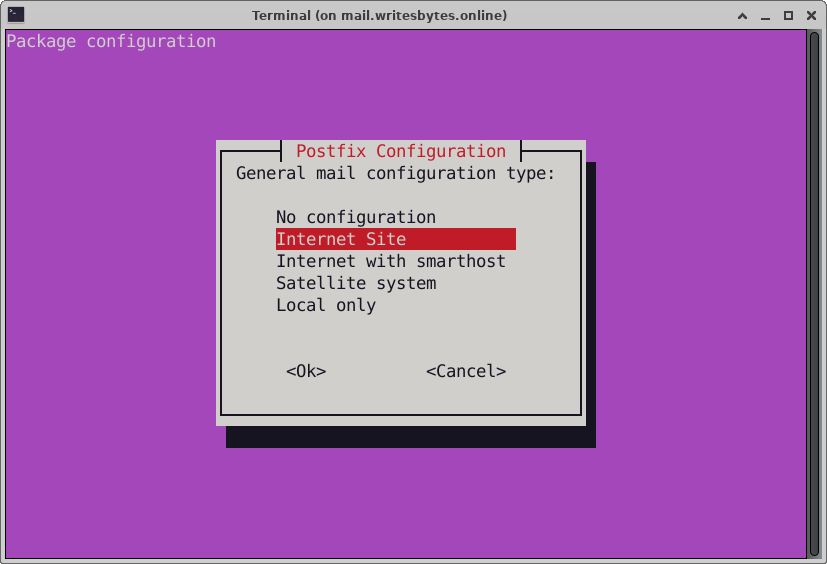
On the next page, choose Internet Site, then click Ok.
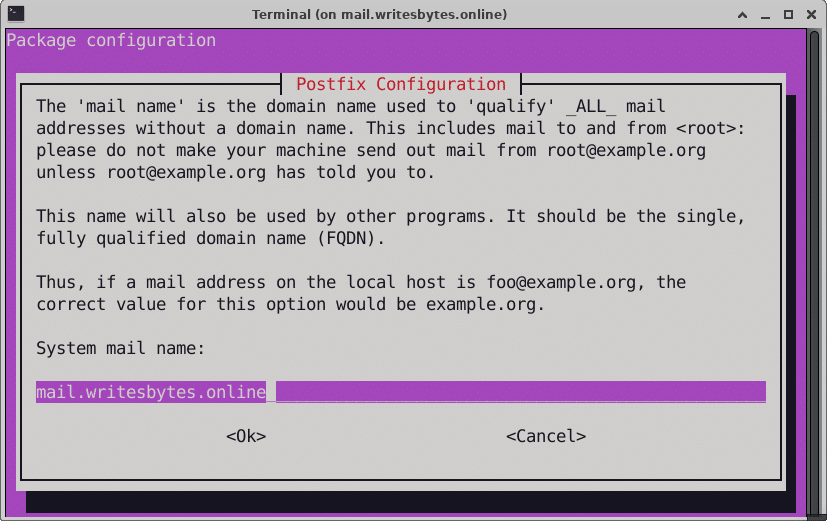
On the final page, the system mail name is configured by default to your FQDN. If not, change it to the FQDN, then click Ok.
Step 3: Configure Postfix (SMTP & SASL Authentication)
Postfix handles SMTP, the component of the email stack responsible for sending and receiving messages.
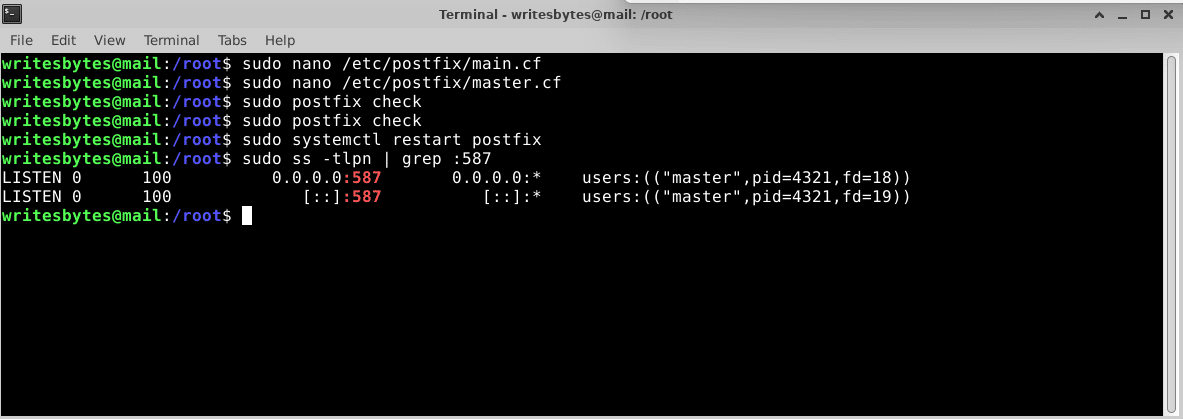
- Edit the Postfix configuration file:
sudo nano /etc/postfix/main.cf
-
- Apply or append the following configuration settings, then save:
myhostname = mail.writesbytes.online
mydomain = writesbytes.online
myorigin = $mydomain
mydestination = $myhostname, $mydomain, localhost.$mydomain, localhost
inet_interfaces = all
inet_protocols = all
home_mailbox = Maildir/
# SMTP TLS Configuration (Secure STARTTLS)
smtpd_tls_cert_file = /etc/letsencrypt/live/mail.writesbytes.online/fullchain.pem
smtpd_tls_key_file = /etc/letsencrypt/live/mail.writesbytes.online/privkey.pem
smtpd_use_tls = yes
smtpd_tls_security_level = may
smtpd_tls_auth_only = yes
# Dovecot SASL Authentication Settings
smtpd_sasl_auth_enable = yes
smtpd_sasl_type = dovecot
smtpd_sasl_path = private/auth
smtpd_recipient_restrictions = permit_mynetworks, permit_sasl_authenticated, reject_unauth_destination#
-
-
- Open the Postfix master configuration file to set up the submission service on port 587:
-
sudo nano /etc/postfix/master.cf-
-
- Uncomment the submission block and specify the parameters to enable authenticated client submissions:
-
submission inet n - y - - smtpd -o syslog_name=postfix/submission -o smtpd_tls_security_level=encrypt -o smtpd_sasl_auth_enable=yes -o smtpd_client_restrictions=permit_sasl_authenticated,reject -o milter_macro_daemon_name=ORIGINATING-
-
- Check that the changes you made to the Postfix configuration files are syntactically correct:
-
sudo postfix check
-
-
- Restart the Postfix service to apply the configuration changes:
-
sudo systemctl restart postfix
-
-
- Verify that port 587 is actually listening:
-
sudo ss -tlpn | grep :587

Step 4: Configure Dovecot
Dovecot provides secure IMAP access so you can authenticate and read mail using a desktop email client like Thunderbird or Microsoft Outlook.
-
-
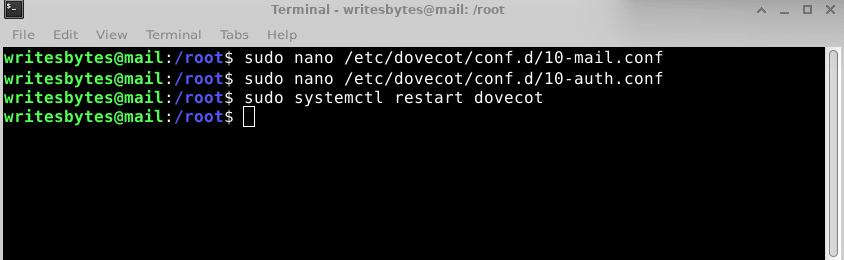
- Set the mailbox format:
- Open the Dovecot mailbox configuration file
- Set the mailbox format:
-
sudo nano /etc/dovecot/conf.d/10-mail.conf
-
-
- Update the storage path
-
mail_location = maildir:~/Maildir
-
-
- Allow basic authentication:
- Open the Dovecot mailbox authentication configuration file:
- Allow basic authentication:
-
sudo nano /etc/dovecot/conf.d/10-auth.conf
-
-
- Configure the authentication mechanism and socket:
disable_plaintext_auth = yes auth_mechanisms = plain - Inside the same file (or within auth-system.conf.ext), ensure the Postfix auth socket is exposed:
- Configure the authentication mechanism and socket:
-
service auth {

  unix_listener /var/spool/postfix/private/auth {

    mode = 0660

    user = postfix

    group = postfix

  }
Make sure not to comment out:
!include auth-system.conf.ext
Restart Dovecot:
sudo systemctl restart dovecot

Note: You must revisit the Dovecot configuration to finalize settings once TLS certificates are active on the server.
Step 5: Create a test mailbox
Create a standard local user account on your Kamatera cloud-hosted Ubuntu server. This account will act as your mailbox destination during tests:
sudo adduser testuser
Make sure to set a password for the user.
Step 6: Verify user and authentication
Before sending test mail, ensure your test account was created and Dovecot can authenticate it.
- Verify user creation:
id testuser
(If successful, you will see user ID information).
- Test Dovecot authentication:
Use either:
sudo doveadm auth test testuser
or
sudo doveadm auth test -x service=smtp testuser YOUR_PASSWORD_HERE
(You should see “auth succeeded” or “password: OK”).
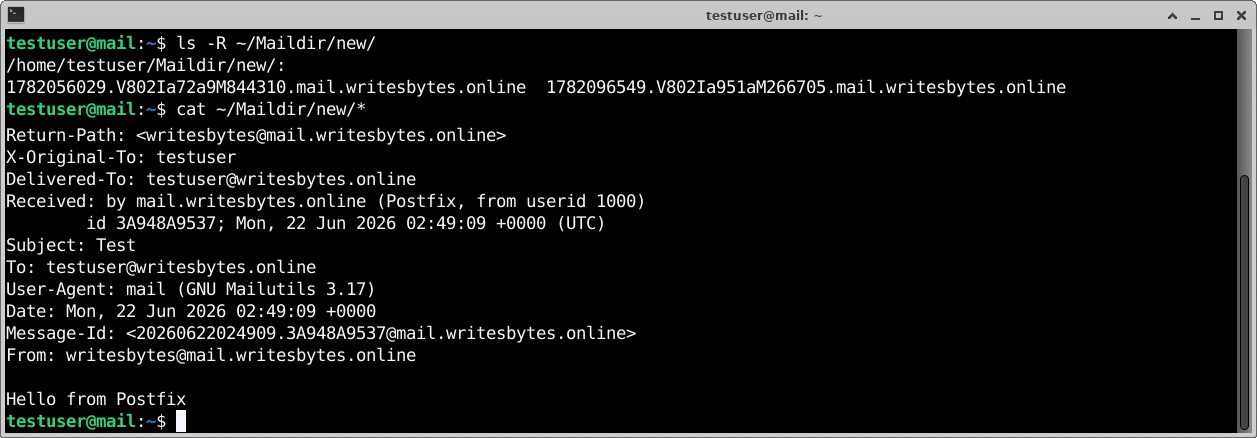
Step 7: Test local mail delivery
Send a test message directly to your newly created local account:
echo "Hello from Postfix" | mail -s "Test" testuser
Switch over to your test user account to read the incoming delivery back:
su - testuser
ls -R ~/Maildir/new/ (If you see a file in this directory, your local delivery pipeline is working perfectly)
cat ~/Maildir/new/*
Step 8: Open the firewall
Ensure your server allows essential traffic through the Uncomplicated Firewall (UFW) by opening the required network ports:
sudo ufw allow OpenSSH
sudo ufw allow 25,587,993/tcp q
>span style="font-weight: 400;" aria-level="1">sudo ufw enable
Note: If you haven’t already done so, remember to configure your Kamatera cloud firewall settings in addition to these steps.
Step 9: Add TLS with Let’s Encrypt
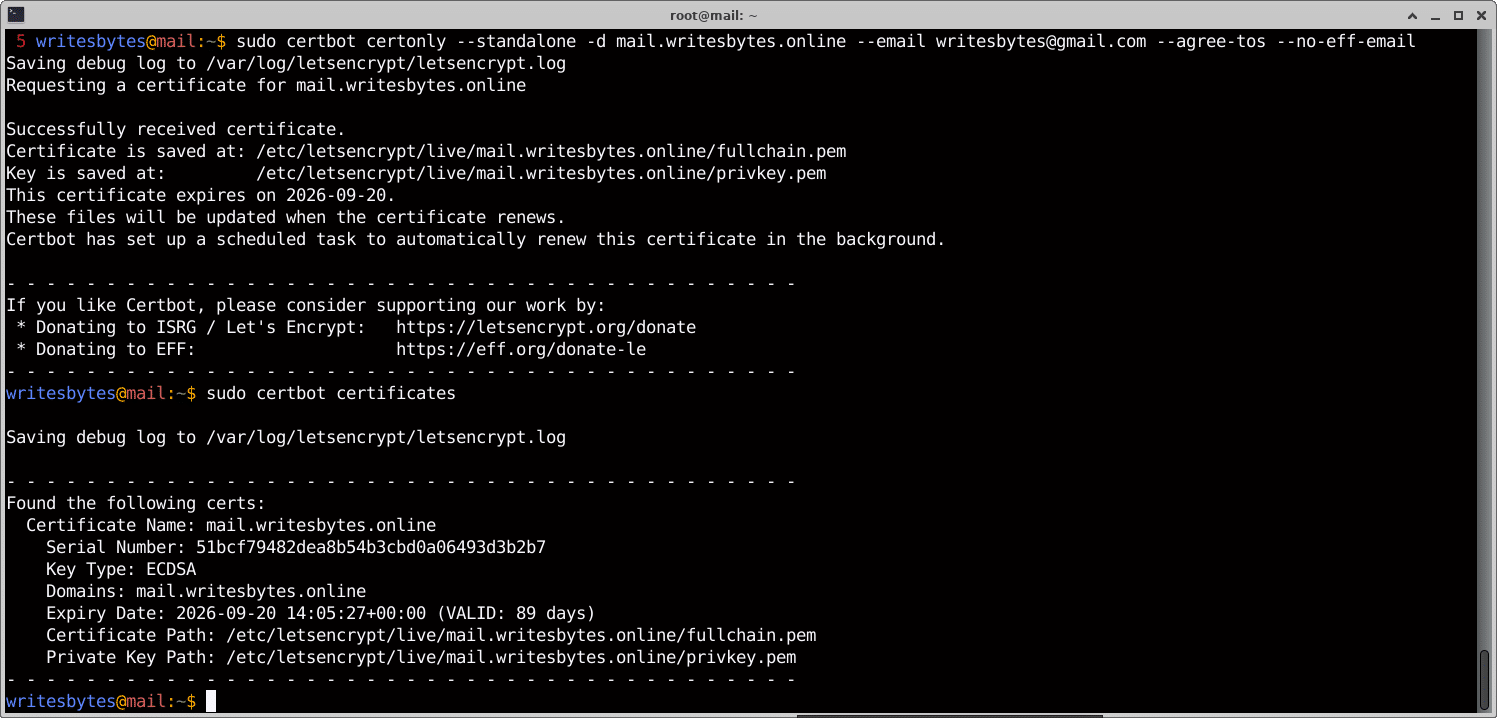
To encrypt mail transmissions, install Certbot and request an SSL certificate for the mail server’s FQDN:
sudo apt install -y certbot
sudo certbot certonly --standalone -d mail.writesbytes.online --email writesbytes@gmail.com --agree-tos --no-eff-email
The newly generated cryptographic certificate files will be safely stored under the following paths:
/etc/letsencrypt/live/mail.writesbytes.online/fullchain.pem
/etc/letsencrypt/live/mail.writesbytes.online/privkey.pem
Automating Certificate Renewal
Let’s Encrypt certificates expire every 90 days. Certbot automatically installs a systemd timer to handle renewals, but you must instruct Postfix and Dovecot to reload when certificates update. Test renewal using:
sudo certbot renew --dry-run
To automate backend reloads, add a deploy hook script in
/etc/letsencrypt/renewal-hooks/deploy/reload-mail.sh and make it executable.
Create the directory (if it doesn’t already exist):
sudo mkdir -p /etc/letsencrypt/renewal-hooks/deploy/
Create the script file:
sudo nano /etc/letsencrypt/renewal-hooks/deploy/reload-mail.sh
-
- Apply or append the following configuration settings, then save:
Copy or paste the following two lines into the script file:
#!/bin/bash
systemctl reload postfix dovecot
Make the script executable by setting the appropriate permissions:
sudo chmod +x /etc/letsencrypt/renewal-hooks/deploy/reload-mail.sh
Verify that the file has been made executable by checking its permissions:
ls -l /etc/letsencrypt/renewal-hooks/deploy/reload-mail.sh
Step 10: Configure Dovecot for SSL
Open /etc/dovecot/conf.d/10-ssl.conf and configure the secure paths:
sudo nano /etc/dovecot/conf.d/10-ssl.conf
Set the following parameters to enable SSL and specify your certificate paths:
ssl = required
ssl_cert = </etc/letsencrypt/live/mail.writesbytes.online/fullchain.pem
ssl_key = </etc/letsencrypt/live/mail.writesbytes.online/privkey.pem
Restart the Dovecot service to implement your updates:
sudo systemctl restart dovecot
Step 11: Add DNS records
To make sure your server can be safely discovered and trusted by external mail applications, publish these standard records within your domain’s DNS provider:
DNS propagation can take anywhere from a few minutes up to 24 to 48 hours. Check that propagation has completed before running external tests.
A Record:
-
- Points
mail.writesbytes.online
-
- directly to the server’s public IP address.
MX Record:
-
- Directs traffic for the apex domain
writesbytes.online
-
- to
mail.writesbytes.online.
SPF Record (TXT):
-
- Specifies authorized outbound IPs to protect against spoofing
(Note: The IP address below is a placeholder. Update the part after the colon with your own server’s IP address):
v=spf1 mx ip4:103.252.117.210 ~all
DKIM Record (TXT): Adds a cryptographic signature to your emails. Follow the instructions in Step 12 to generate and publish this record.
DMARC Record (TXT): Tells receiving servers what to do if an email fails SPF or DKIM checks. Create a TXT record with:
Host/Name:_dmarc
Value:
v=DMARC1; p=none; rua=mailto:admin@writesbytes.online
To configure a Reverse DNS (PTR) record for your server’s network settings, submit a ticket to Kamatera technical support. This will map your server’s IP address to your FQDN to guarantee email deliverability, so external providers don’t mark your messages as spam.
Step 12: Enable DKIM signing
To improve your domain’s reputation and deliverability, configure OpenDKIM to digitally sign outbound headers.
1. Install OpenDKIM Tools:
sudo apt install -y opendkim opendkim-tools
2. Generate DKIM Keys:
sudo mkdir -p /etc/opendkim/keys/writesbytes.online
sudo opendkim-genkey -b 2048 -d writesbytes.online -s mail -D /etc/opendkim/keys/writesbytes.online
sudo chown -R opendkim:opendkim /etc/opendkim/keys/writesbytes.online
3. Configure Main OpenDKIM File:
Open the configuration file:
sudo nano /etc/opendkim.conf
Ensure that the following settings are present:
AutoRestart Yes
AutoRestartRate 10/1h
UMask 002
Syslog yes
SyslogSuccess Yes
LogWhy Yes
Canonicalization relaxed/simple
Mode sv
Socket unix:/run/opendkim/opendkim.sock
KeyTable refile:/etc/opendkim/KeyTable
SigningTable refile:/etc/opendkim/SigningTable
ExternalIgnoreList refile:/etc/opendkim/TrustedHosts
InternalHosts refile:/etc/opendkim/TrustedHosts
Note: Review the settings carefully, commenting out anything that conflicts with those above, and adding anything that isn’t there.
4. Configure the routing maps:
Open the key table:
sudo nano /etc/opendkim/KeyTable
Append the following in a single line:
mail._domainkey.writesbytes.online writesbytes.online:mail:/etc/opendkim/keys/writesbytes.online/mail.private
Open the signing table:
sudo nano /etc/opendkim/SigningTable
Append the following:
*@writesbytes.online mail._domainkey.writesbytes.online
Open the Trusted Hosts file:
sudo nano /etc/opendkim/TrustedHosts
Append the following:
127.0.0.1
localhost
mail.writesbytes.online
writesbytes.online
5. Connect the OpenDKIM Milter to Postfix:
Open the Postfix main configuration file:
sudo nano /etc/postfix/main.cf
Append the following:
milter_protocol = 6
milter_default_action = accept
smtpd_milters = unix:/run/opendkim/opendkim.sock
non_smtpd_milters = unix:/run/opendkim/opendkim.sock
6. Restart Services:
sudo systemctl restart opendkim postfix
7. Publish the DKIM Record with your DNS Provider:
Run the following command to display your public key:
sudo cat /etc/opendkim/keys/writesbytes.online/mail.txt
The command above outputs your public key. To publish the record, go to your DNS provider and create a new TXT record with the following details:
- Host/Name:
mail._domainkey - Value: Paste the entire output string from the
catcommand (everything between the parentheses, starting withv=DKIM1; k=rsa; p=...).
Step 13: Connect a mail client
Link a mail client, e.g. Mozilla Thunderbird, to the mail server using the following server profiles:
| Configuration Setting | Value |
|---|---|
| Incoming IMAP Server | mail.writesbytes.online |
| IMAP Port | 993 (SSL/TLS) |
| Outgoing SMTP Server | mail.writesbytes.online |
| SMTP Port | 587 (STARTTLS / Submission-only Auth) |
| Authentication Username | testuser |
Step 14: Troubleshooting & Common Pitfalls
If email delivery or remote access fails, review the initialization states and current logs first. To effectively isolate errors:
- Check service status:
sudo systemctl status postfix dovecot opendkim
- Examine recent logs:
sudo tail -n 100 /var/log/mail.log
- Debug Service Failures: If a service fails to start, use
sudo journalctl -u <service_name> -n 20
to pinpoint the specific configuration line or syntax error causing the failure.
Common issues
- ‘No such file or directory’ (socket errors): Postfix often runs inside a “chroot jail” (usually /var/spool/postfix). If the OpenDKIM or Auth socket is outside this directory, Postfix cannot access it. Ensure your configuration paths are relative to the jail, e.g., within /var/spool/postfix, or use a bind-mount to map the external directory into the jail, such as
mount --bind /run/opendkim /var/spool/postfix/run/opendkim.
- Syntax errors: Always validate configuration files before restarting services to prevent downtime.
Use
sudo dovecot -n
to validate Dovecot configurations.
Use
sudo postfix
check to validate Postfix configurations.
- Folder subscription (sent folder issues): If your mail client hangs while saving to the Sent folder, this is typically an IMAP subscription issue rather than a delivery failure. Refer to your mail client user manual for help with this.
- General checks:
IMAP/SMTP login errors: Verify that the Linux user credentials exist and match your input exactly.
Firewall and network: If connections are refused, inspect your UFW rules and ensure external listening ports (25, 587, 993) are open.
TLS failures: Cross-reference your certificate paths in the configuration files and verify that the server’s local hostname matches the name on the issued certificate.
DKIM warning logs: Confirm your published DNS TXT record exactly matches the locally generated key string.
Next steps: Production hardening
While this guide establishes a functional mail server with advanced authentication using Dovecot and DMARC, additional layers of security and reliability are required for a production environment. Consider the following enhancements:
-
-
- Implement anti-spam and anti-virus:
- Rspamd: A fast, modular spam filtering system that is highly recommended for modern setups.
- ClamAV: An essential open-source antivirus engine to scan incoming and outgoing emails for malicious attachments.
- Implement protection against common threat surfaces:
- Fail2Ban: Protects SMTP and IMAP ports from brute-force authentication guessing attempts by parsing logs and banning offending IPs.
- Postscreen: A Postfix component that handles early-stage spambot blocking before passing connections to incoming SMTP processes.
- Rate limiting: Use Postfix anvil or specialized milters to enforce limits on maximum outbound connection counts and daily recipient thresholds.
- Open relay prevention: Always ensure
permit_sasl_authenticatedlimits message relaying exclusively to authorized senders to prevent bad actors from abusing your IP space.
- Backup and recovery:
- Establish a backup routine for the
/var/mail/or~/Maildirdirectories and your configuration folders (/etc/postfix//etc/dovecot/
- Establish a backup routine for the
- Monitoring:
- Set up centralized logging or alerts to notify you if services (Postfix/Dovecot) go down unexpectedly.
- Implement anti-spam and anti-virus:
-
Conclusion
Setting up Postfix and Dovecot on your Kamatera cloud server gives you a clear, practical view of how email routing works on Linux. With this basic framework in place, you can expand it with automated spam defenses, content filters, and stricter DMARC rules, for example moving the DMARC policy from “none” to “reject.”
If you want an enterprise-ready solution with advanced collaboration features, Axigen offers a powerful, all-in-one email and groupware suite.