


When you’re running multiple servers, how they communicate matters. Sending traffic over the public internet adds latency, increases bandwidth costs, and creates unnecessary exposure for data that never needs to leave your infrastructure.
Private networks solve this by connecting your servers through an internal LAN, keeping traffic local and off the public internet entirely. A private network in Kamatera allows multiple servers to communicate with each other over an internal Local Area Network (LAN), without exposing traffic to the public internet. Each server connected to a private network is assigned a private IP address, typically within ranges such as 10.x.x.x, which is only accessible within that network.
Kamatera lets you create and manage private networks directly from the control panel, so you can set up internal connectivity between servers without additional configuration overhead. This guide walks you through the full process, from creating a private network to attaching servers and managing the setup over time.
Prerequisites
Before setting up a private network on Kamatera, make sure you have the following in place:
- Active Kamatera account. You’ll need access to the Kamatera console to create and manage servers and networks.
- At least two servers deployed. A private network requires two or more servers to be useful. You’ll use them to create the network connection and verify it’s working.
- Servers in the same datacenter. Kamatera private networks are datacenter-specific. All servers you want to connect must be in the same datacenter location.
- SSH access to each server. You’ll need to connect to each server via SSH to configure network interfaces and confirm connectivity between servers.
Create your server
Step 1: Prepare your servers
To follow along with this guide, you’ll need two active servers in the same datacenter. The examples here use servers with the following setup:
- Ubuntu 22.04 LTS (64-bit)
- Same datacenter location
- Basic instance size (sufficient for testing)
Once your servers are deployed, each will be assigned a public IP address. You can find this in the Kamatera dashboard under your server details.
Use the public IP to connect to each server via SSH:
ssh root@<server-public-ip>
After logging in, confirm the server is active and that network interfaces are available:
ip a
Repeat this for both servers. You’ll use these two systems to configure and test private network communication in the steps that follow.
Step 2: Create a private network
To enable internal communication between your servers, you need to create a private network (VLAN) and attach it as a new network interface on each server.
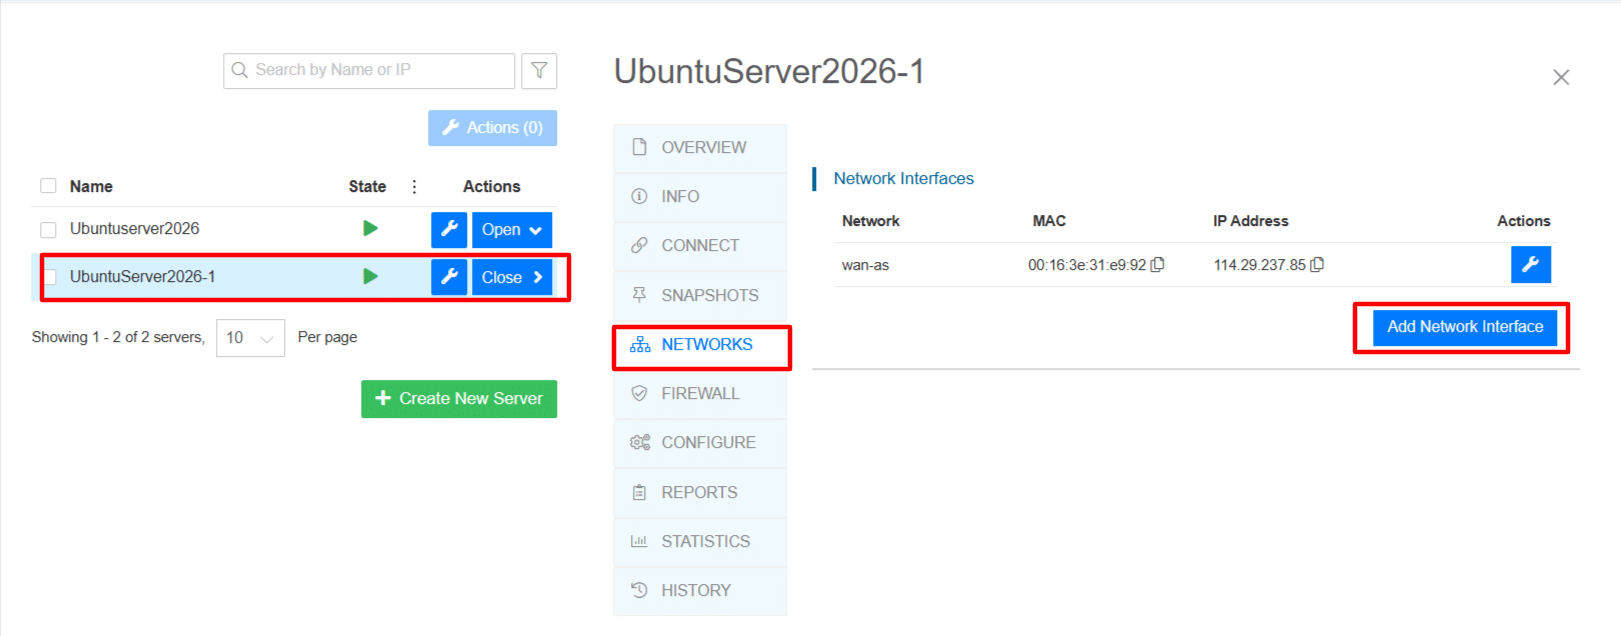
In the Kamatera console, navigate to your server and open the Networks section.
Create a private network
To enable internal communication between your servers, you need to create a private network (VLAN) and attach it as a new network interface on each server.
In the Kamatera console, navigate to your server and open the Networks section. Click Add network interface to open the configuration panel.
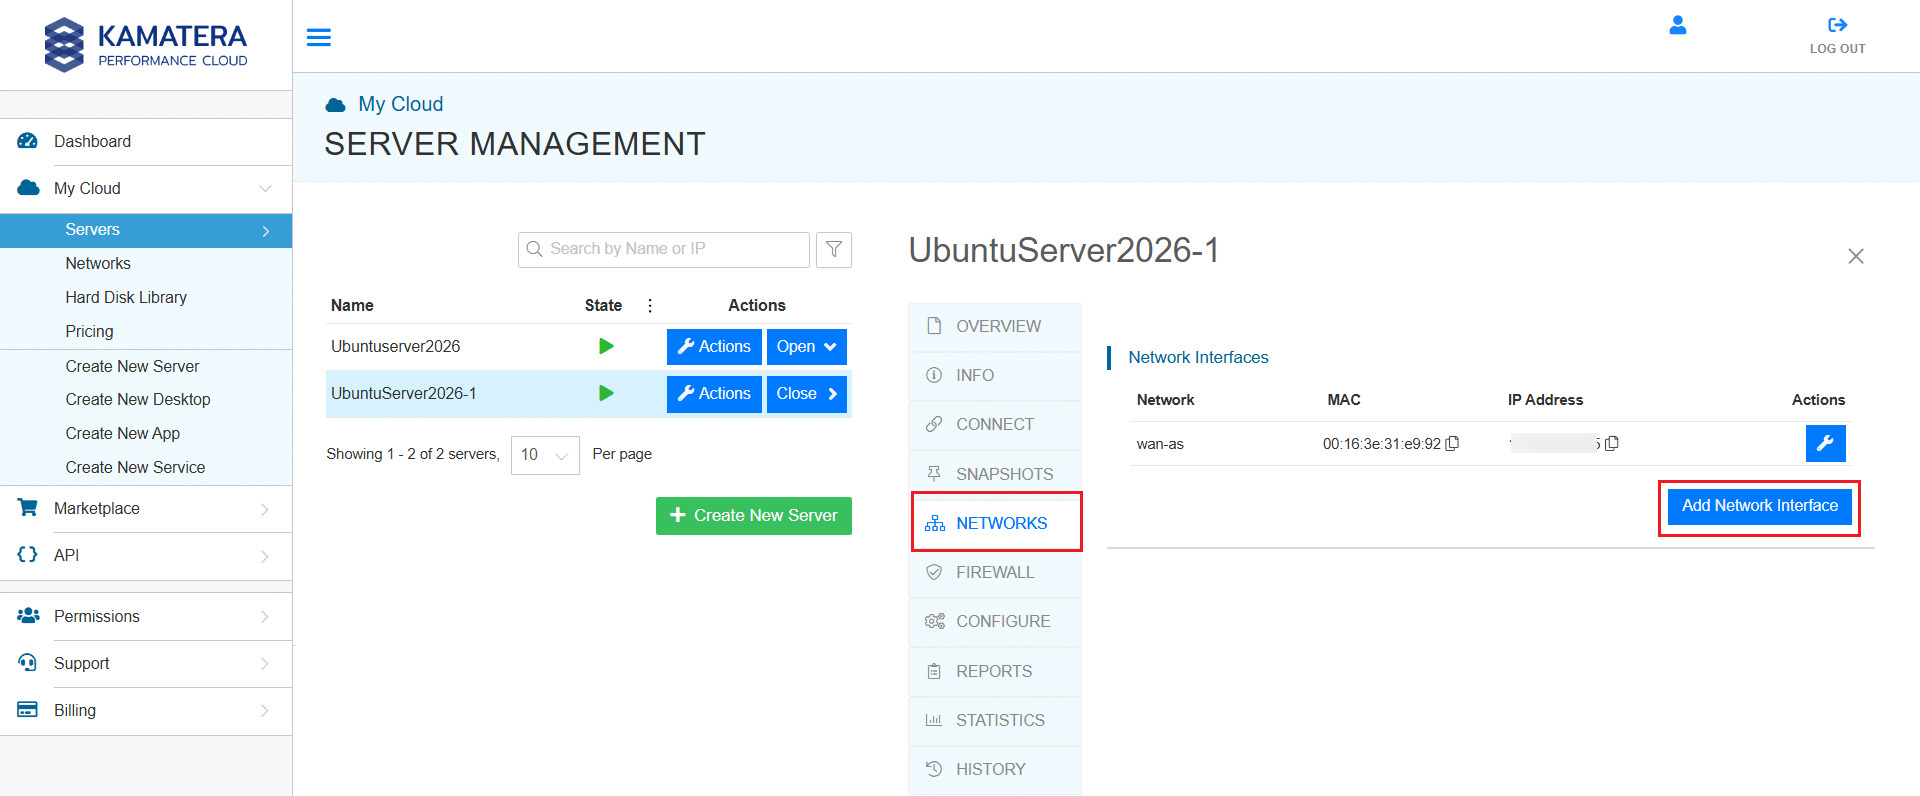
Click on Add Network Interface. This will open the configuration panel for creating or attaching a private network.
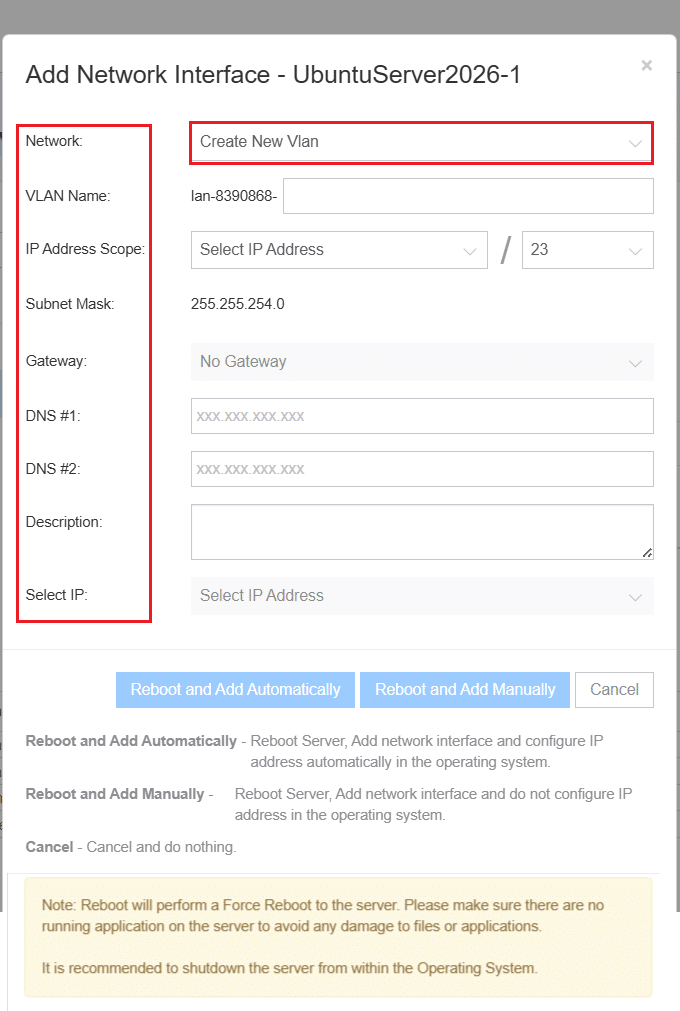
Fill in the following fields:
Network: Select Create new VLAN
VLAN name: Enter a name for the network (for example, private-lan)
IP address scope: Choose a private IP range (typically in the 10.x.x.x range)
Subnet mask: Assigned automatically based on the IP range you select
Gateway: Leave as default unless your setup requires otherwise
DNS: Optional. Can be left blank for internal server communication
Select IP: Choose an available IP from the selected range to assign to this server

Once configured, click Reboot and add automatically. This attaches the new interface and applies the network settings on restart.
After the server comes back up, connect via SSH and confirm the private interface was added:
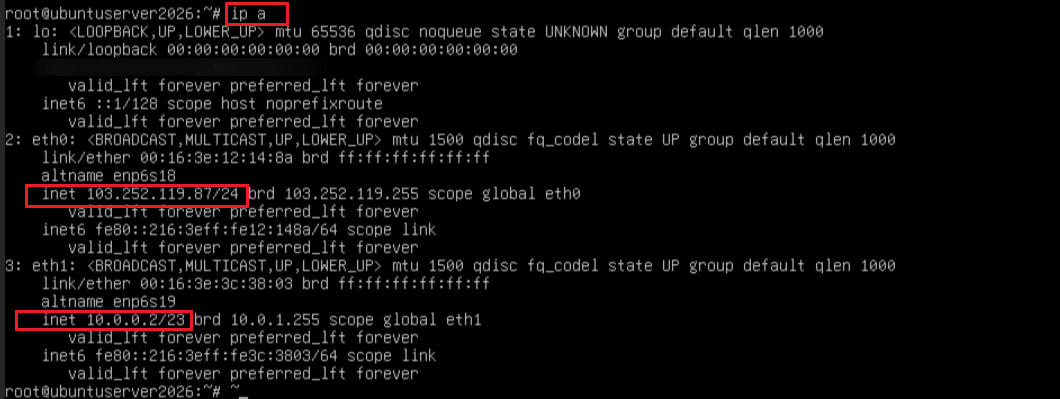
ip a
You should see a new network interface with a private IP address, for example 10.0.0.2. This confirms the server is connected to the private network.
Connecting servers to the private network
Step 3: Connect the second server to the private network
Once the private network is attached to the first server, repeat the process for the second server.
Open the second server in the Kamatera console and navigate to the Networks section. Click Add network interface.
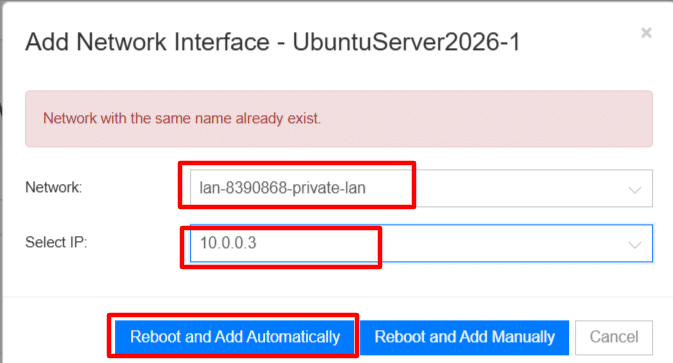
This time, instead of creating a new VLAN, select the existing private network you created in the previous step. Configure the following:
Network: Select the existing VLAN
Select IP: Choose an available IP from the same private range
Leave the remaining settings as default, then click Reboot and add automatically.
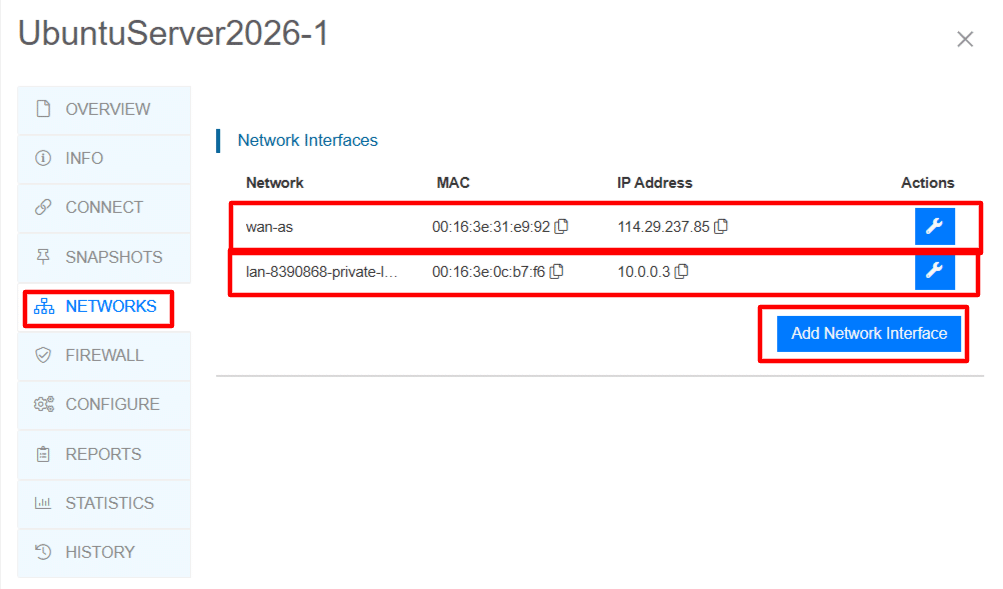 After the server restarts, connect via SSH and verify the interface was added:
ip a
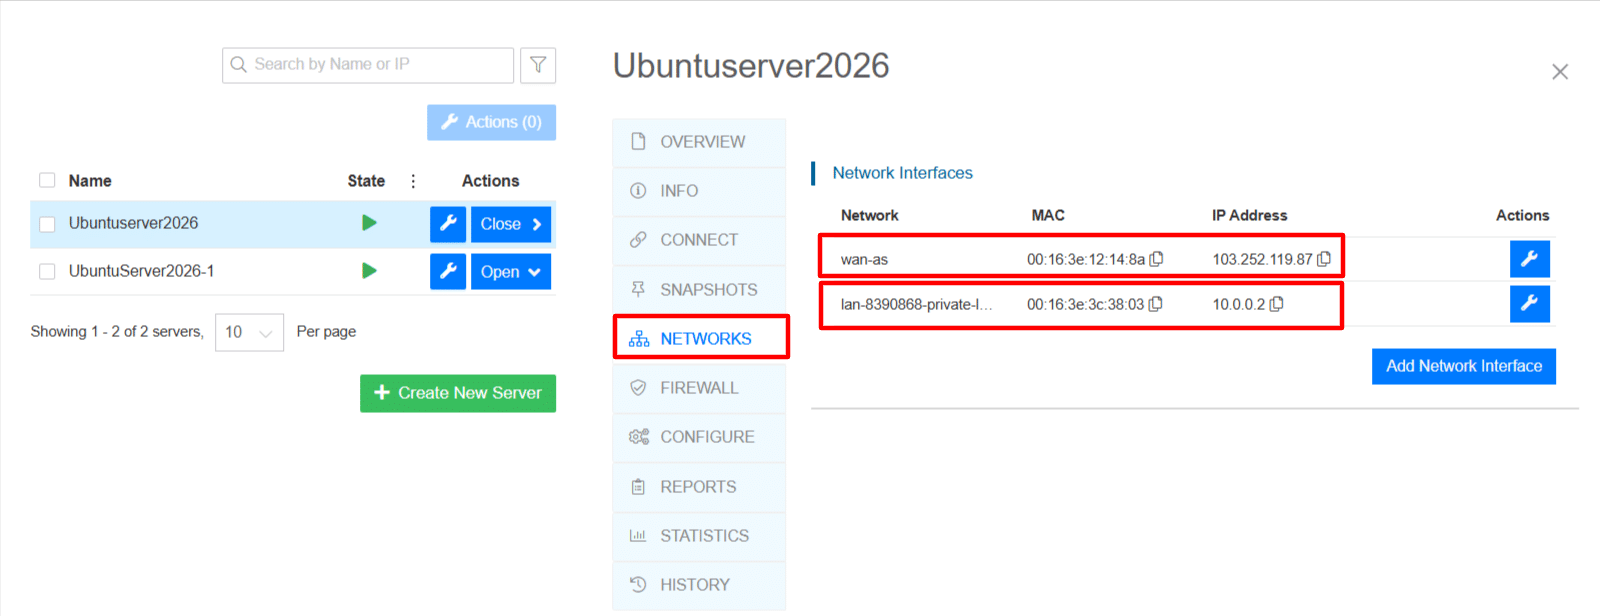
You should see a private IP address in the same range as the first server, for example 10.0.0.3. At this point, both servers are on the same private network.
Verify connectivity between servers
With both servers connected to the private network, confirm they can communicate internally.
On either server, run the following to find its private IP address:
ip a
Look for an interface with a private IP in the 10.x.x.x range. Note the private IP of each server.
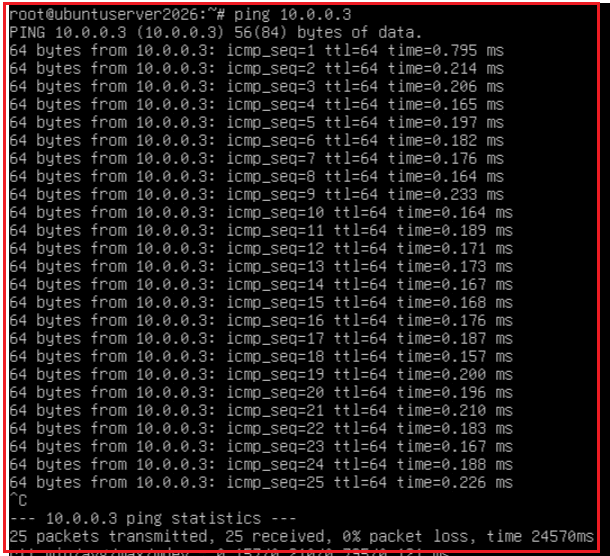
From the first server, ping the second server’s private IP:
ping <private-ip-of-server-2>
Successful responses confirm the two servers can reach each other over the private network. Press Ctrl + C to stop the test.
Run the same check in the other direction from the second server:
ping <private-ip-of-server-1>
Responses in both directions confirm the private network is working correctly and both servers can communicate over the internal LAN.
To stop the ping test, press Ctrl + C.
You can also test connectivity in the reverse direction from the second server:
ping <private-ip-of-server-1>
Successful responses in both directions confirm that the private network is functioning correctly and both servers can communicate over the internal LAN.
Managing and monitoring private networks
Once your private network is set up and verified, routine management keeps communication between servers stable and secure.
From the Networks section of each server in the Kamatera console, you can:
- Add or remove network interfaces
- Attach servers to different private networks
- View assigned IP addresses
For server-level monitoring, use the following Linux commands:
Check active interfaces and IP assignments:
ip a
View routing information:
ip route
Test connectivity between servers:
ping <private-ip>
View active connections in more detail:
ss -tulnp
Checking these periodically helps you catch configuration issues before they affect your workloads.
Best practices for private networking on Kamatera
- Use private IPs for internal traffic. Configure your applications and services to communicate over private IP addresses rather than public endpoints wherever possible.
- Restrict public exposure. Only expose services that genuinely require external access. Databases and backend services should be reachable only over the private network.
- Keep configurations consistent. All servers on the same private network should be in the same datacenter and use compatible IP ranges.
- Monitor interfaces regularly. Periodically run ip a and ping checks to confirm interfaces are up and servers can still reach each other.
- Route server-to-server traffic privately. Keeping internal communication off the public network reduces bandwidth costs and limits exposure.
- Document your network setup. Keep a record of private IP assignments and network configurations. This makes troubleshooting and onboarding significantly easier as your infrastructure grows.
Conclusion
Private networks on Kamatera give you a straightforward way to connect servers through an internal LAN, reducing your reliance on public network traffic and keeping sensitive communication off the open internet.
Once configured, servers can communicate using private IP addresses, which is useful for common setups like application-to-database connections and backend service communication. Combined with the monitoring commands and best practices covered in this guide, you have what you need to keep your private network secure, stable, and cost-efficient as your infrastructure scales.