


Upgrading MySQL from version 5.6 to 5.7 on a CentOS 7 server is essential to ensure continued support, improved performance, security updates, and access to new features. MySQL 5.7 brings enhancements in query performance, replication, security, JSON support, and optimizer improvements.
The upgrade may involve irreversible changes, so first, back up all critical databases and configuration files. We recommend doing this by taking a server snapshot. Here are the step-by-step instructions to create the snapshot.
This guide walks you through the step-by-step process to upgrade MySQL 5.6 to 5.7 safely on a CentOS 7 server installed using the server OS images provided by the Kamatera cloud platform.
Connect to your server
- For this guide, we are using CentOS 7, installed via Kamatera’s Server OS images. You can connect to your server via remote console or SSH.
To connect via remote console, select the server in the Kamatera management console, click on CONNECT in the middle pane, and then choose Open Remote Console as shown in the screen below.
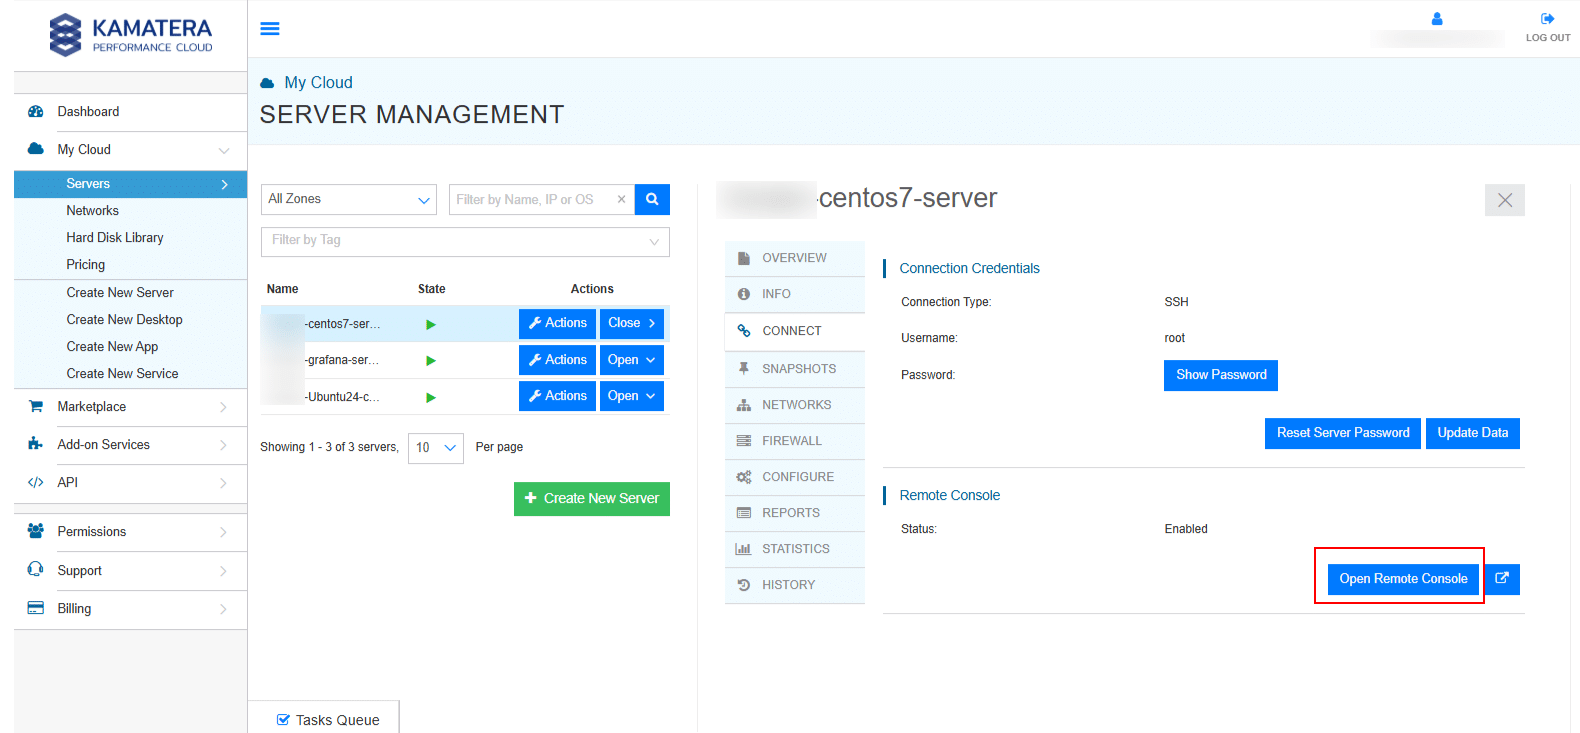
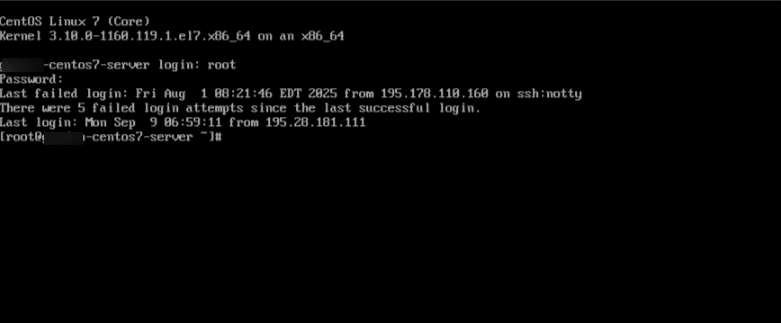
2. Once the remote console is open, log in using your username and password.
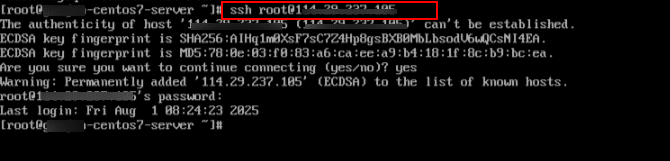
3. Or, you can connect to the server via SSH using the root user and password. To connect that way, enter the following:
Command:
ssh root@<your-server-ip>
Note: Replace <your-server-ip> with the actual public IP address of your Kamatera server.
When prompted with: “Are you sure you want to continue connecting (yes/no)? Type yes and press Enter.
Then, when prompted, enter the root password to complete the login.
4. Confirm your current MySQL version:
Command:
mysql –V
Note: It should show something like: mysql Ver 14.14 Distrib 5.6.51.
![]()
Check MySQL version
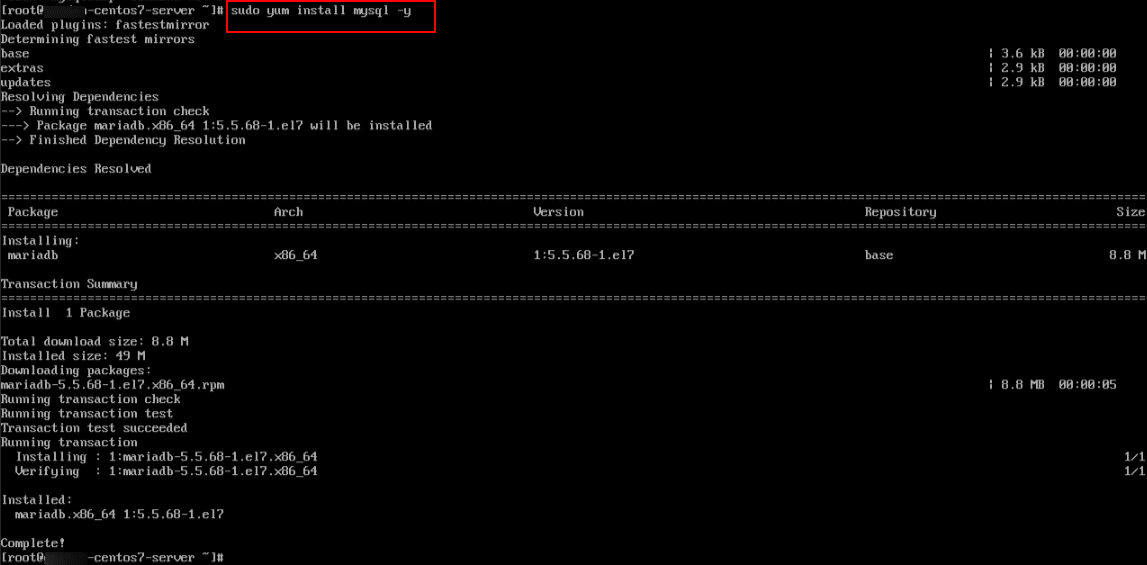
5. Now, check whether mysqldump tool (which is part of MySQL client utilities) is installed on your CentOS 7 server. If it is not installed, you can install the MySQL Client tools using the MySQL yum repository.
Command:
sudo yum install mysql -y
Note: This package includes mysql, mysqldump, and other essential client tools.
6. Before making any changes, back up your existing databases and MySQL configuration.
- Backup all databases:
To do that, use mysqldump to create a full backup of all MySQL databases
Command:
mysqldump -u root -p --all-databases > /root/all-databases-backup.sql
- This will prompt you for your MySQL root password. Enter the password.
- It creates a file /root/all-databases-backup.sql containing all your databases.
- Backup MySQL configuration file:
Run the command below to make a copy of the current MySQL configuration in case you need to restore it.
Command:
cp /etc/my.cnf /etc/my.cnf.bak
![]()
Note: You may also take a snapshot if you’re using Kamatera’s cloud server snapshot feature.
Upgrade MySQL version
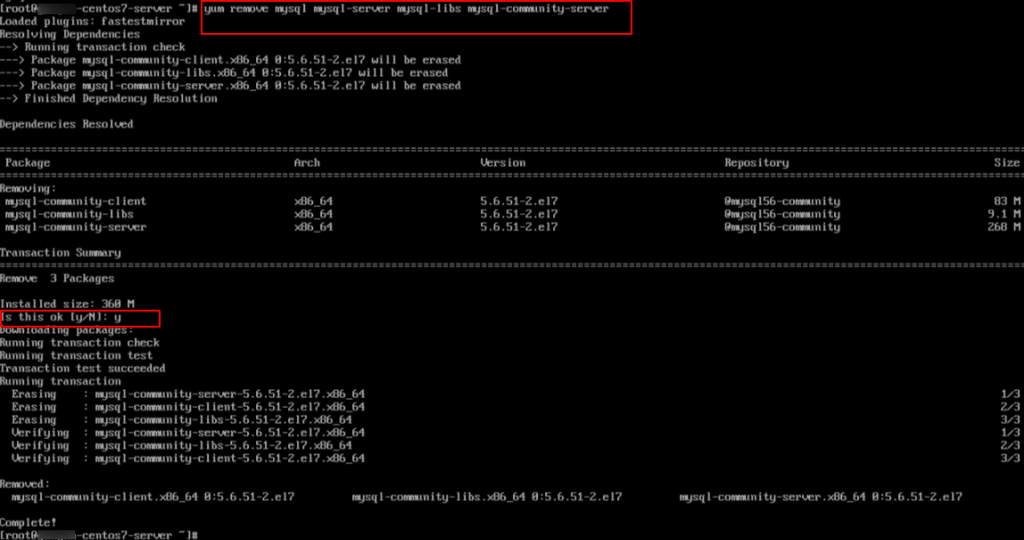
7. Remove MySQL 5.6 and related server/client packages:
Use the command below, if you already installed MySQL 5.6 and want to upgrade cleanly to 5.7.
Command:
yum remove mysql mysql-server mysql-libs mysql-community-server
Note: This removes the actual MySQL 5.6 components (binaries, libraries, and running server).
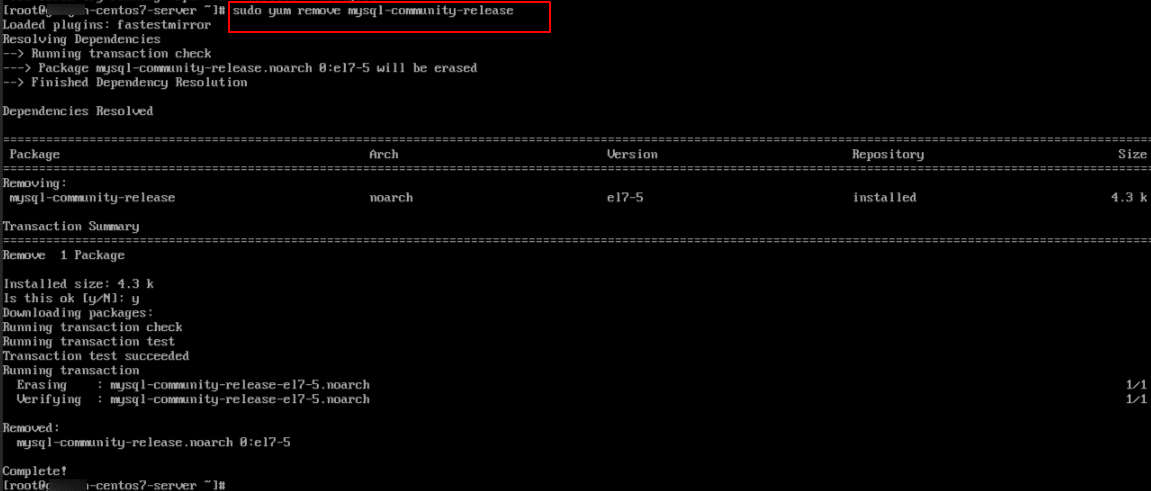
8. Remove the MySQL 5.6 YUM repository config:
Use this if you added the MySQL 5.6 YUM repo earlier, so you can replace it with the 5.7 repo.
Command:
sudo yum remove mysql-community-release
Note: This removes the repository configuration, which helps prevent conflicts when you later add the MySQL 5.7 repo.
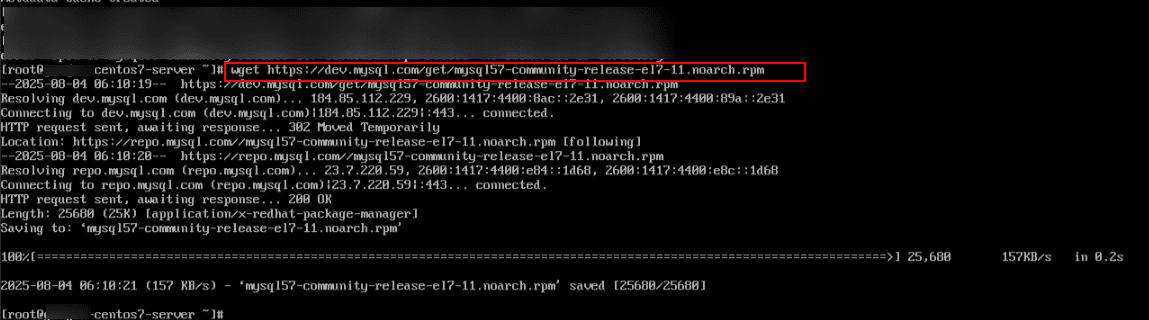
9. Now, download and add the official MySQL 5.7 repository from Oracle:
Command:
wget https://dev.mysql.com/get/mysql57-community-release-el7-11.noarch.rpm
Install RPM installer
10. Once downloaded, install the RPM.
Command:
sudo rpm -ivh mysql57-community-release-el7-11.noarch.rpm
Note: You should see messages like Preparing… and Installing… if it’s successful.
(An .rpm file is like a .exe installer on Windows or .deb on Debian-based Linux.
It contains precompiled software, configuration files, and metadata to install a program cleanly).

11. Proceed to Install MySQL 5.7
Command:
sudo yum install mysql-community-server
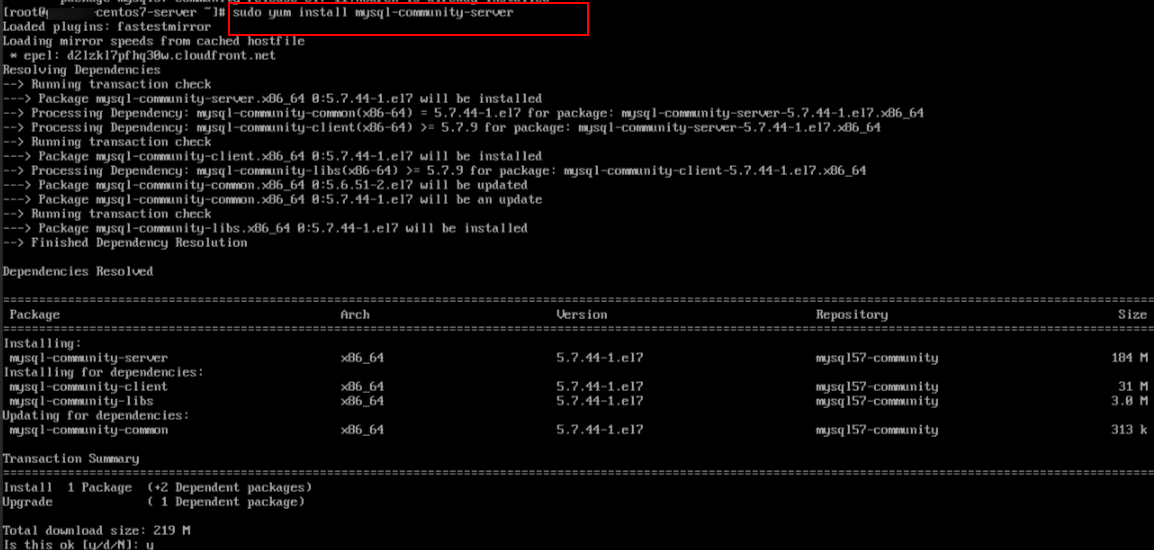
When prompted “Is this ok [y/d/N]”. Type y and press Enter.

12. Ensure that only MySQL 5.7 is enabled by running the below commands:
Command:
sudo yum-config-manager --disable mysql80-community
Command:
sudo yum-config-manager --enable mysql57-community
13. Now upgrade the MySQL server package:
Command:
sudo yum update mysql-server

Check for correct functioning
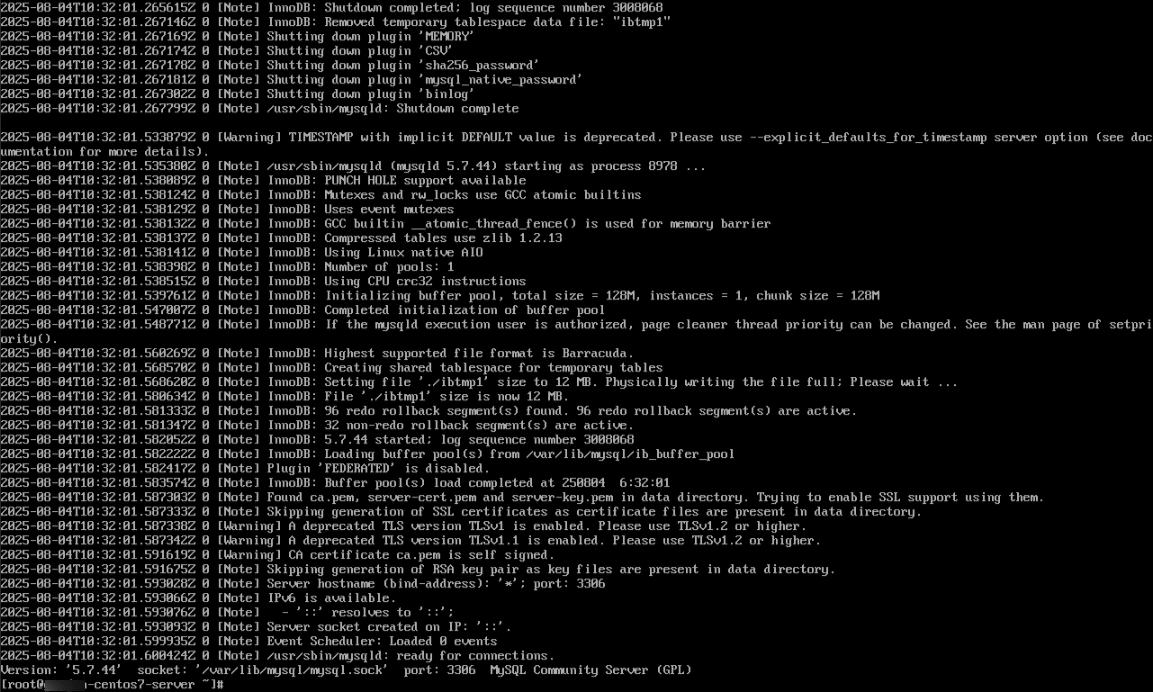
14. Ensure the MySQL service is running and enabled on boot:
Command:
sudo systemctl start mysqld
Command:
sudo systemctl enable mysqld
![]()
15. This command is used to check and upgrade the MySQL system tables after a MySQL version upgrade (for example, from 5.6 to 5.7 or 5.7 to 8.0).
Command:
mysql_upgrade -u root -p
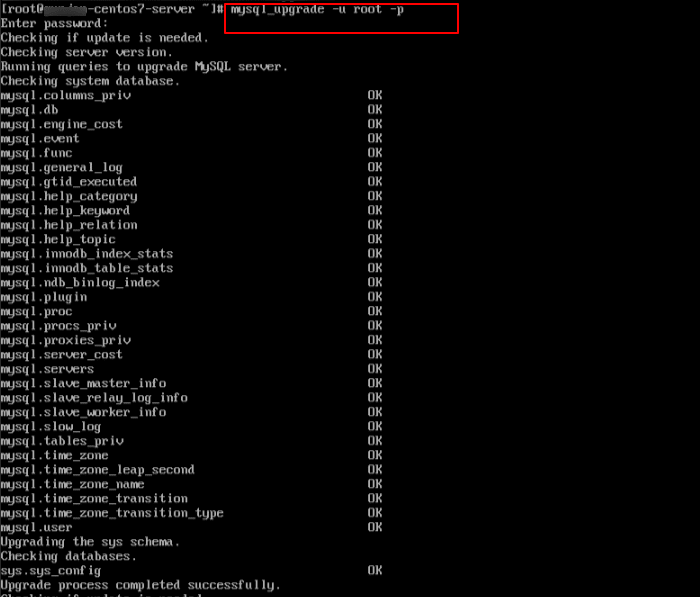
16. Once the upgrade script is complete, restart the service by running the below command.
Command:
sudo systemctl restart mysqld

17. Now, check that the new version is installed:
Command:
mysql -V
Note: It should show something like: mysql Ver 14.14 Distrib 5.7.44.

18. Check for any post-upgrade warnings or errors:
Command:
sudo tail -n 100 /var/log/mysqld.log
19. Verify that your applications and databases are functioning correctly after the upgrade.
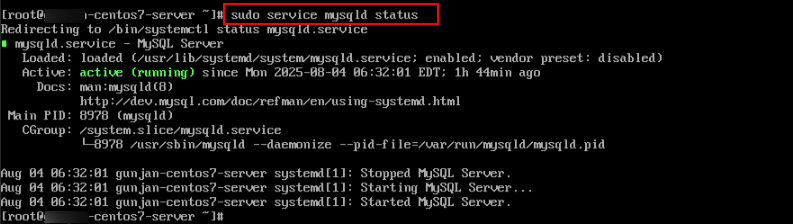
- Check MySQL Server Status:
Command:
sudo service mysqld status
Note: Should say: active (running)
- Log In to MySQL
Command:
mysql -u root –p
When prompted, enter the password.
Now, run the queries:
SHOW DATABASES;
SELECT VERSION();
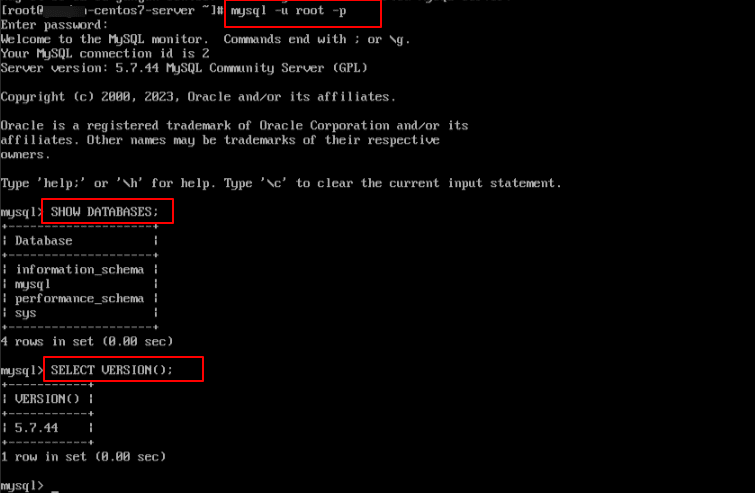
Note: This confirms access and upgraded version.
By carefully following the steps outlined in this guide, you can successfully upgrade MySQL from 5.6 to 5.7 on your CentOS 7 server while minimizing downtime and ensuring data integrity, keeping your environment secure and up to date.