


In this guide, we’ll walk through how to self-host GitLab on a Kamatera VPS. If you are a small team or an early-stage startup looking for a reliable way to keep your source code, issues, and CI pipelines under your control, self-hosting GitLab on a VPS is a practical move. Kamatera makes this especially straightforward because you can start with a right-sized cloud server in minutes, then scale CPU, RAM, and disk as your repos and build workloads grow. In this guide, you will set up GitLab using the app image, choose minimum and recommended server requirements for lean teams, implement a backup strategy that covers both GitLab data and configuration, apply simple security basics like SSL, firewall rules, and disabling root login, and finish with clear scaling considerations including storage growth, memory headroom, and offloading CI runners.
Set up your Kamatera cloud server
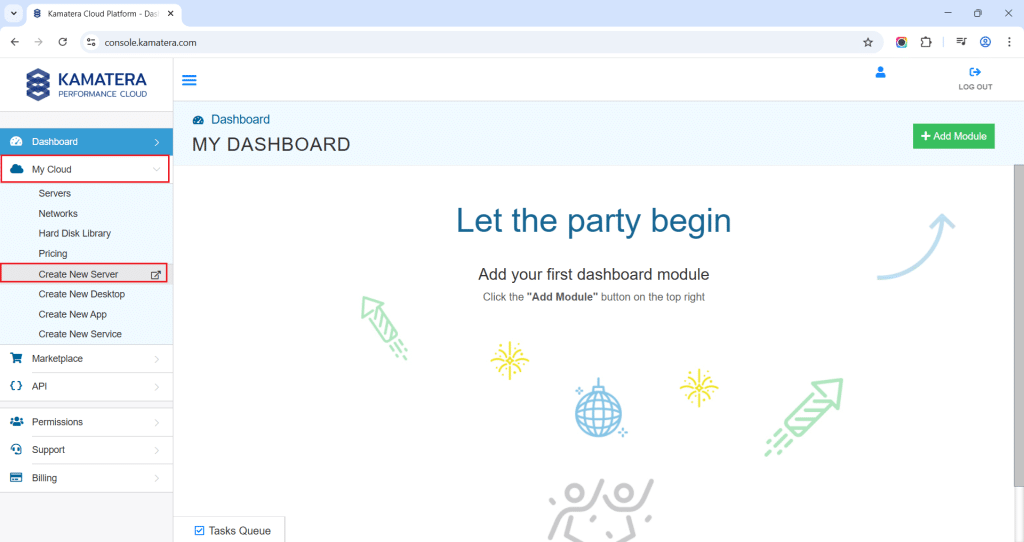
The very first step in deploying GitLab on Kamatera is to log in to your Kamatera Cloud Management Console.
Once you log in, you will see the dashboard. This is where you’ll manage servers, networking, and storage.
- Expand the My Cloud option on the right bar and choose Create New server.
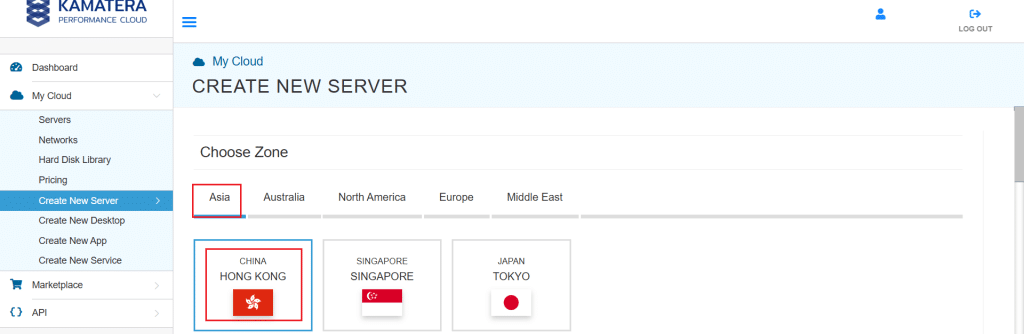
2. Under create new server option, choose Zone.
3. Scroll down and look for the GitLab option under the App Images tab. Select it and choose the version associated with the app image.

4. Once you choose the version, scroll down, and enable the Detailed View toggle and input the server Specifications.
5. Choose the Type, CPU, RAM, and disk storage that you need. Click on the help button along to know more about the settings. You can add more disk storage at any time.
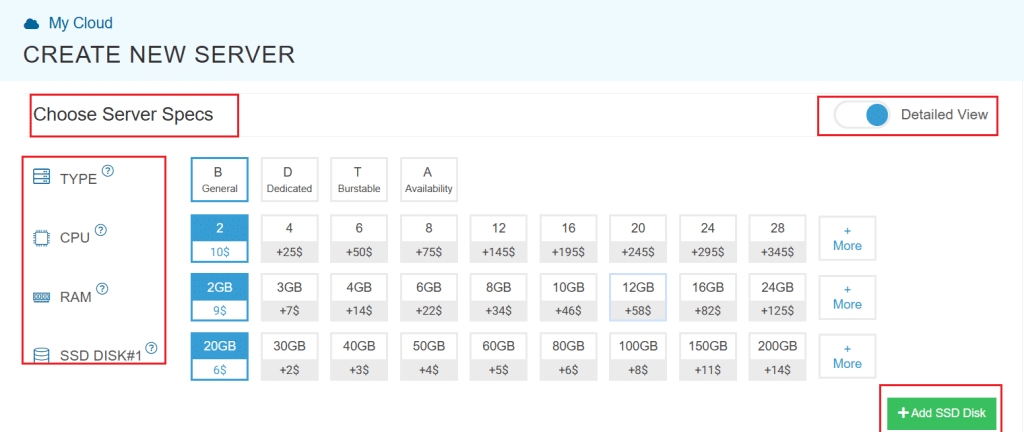
Minimum (small test use): 2 vCPU, 4 GB RAM, 40–60 GB SSD
Recommended (small teams): 4 vCPU, 8–16 GB RAM, 100 GB SSD
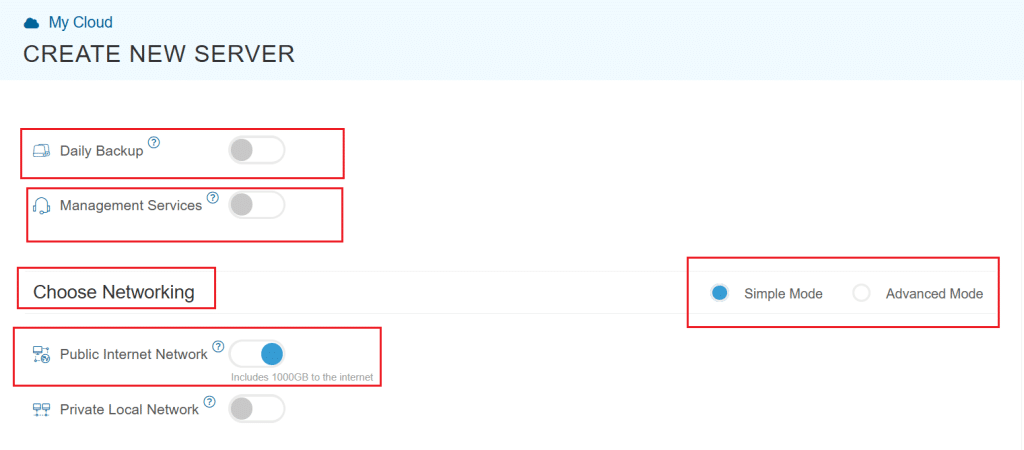
6. Enable Daily backup option if a daily backup of your server storage is needed.
7. Enable Management Services toggle to have your server managed by Kamatera’s professional services team.
8. Choose Networking option, either simple or advanced mode. This section lets you define how your server will connect to the internet and how much outbound data it can use per month.
- Simple mode: Choose between WAN or LAN.
- Advanced mode: NIC #1 (Network Interface Card)
- WAN (selected): This means your server will be accessible from the internet. It will get a public IP.
- The other options (LAN, Private, etc.) are only needed for internal or isolated setups.
Advanced configuration
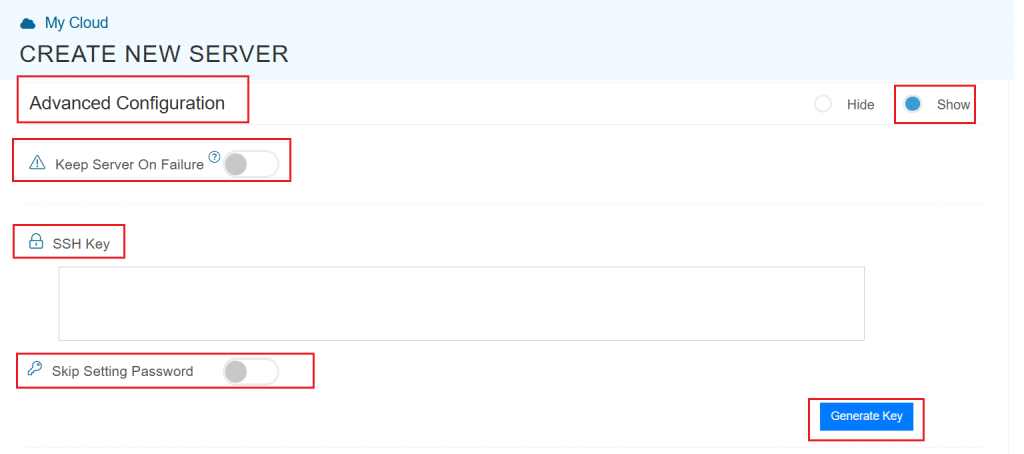
9. Proceed with Advanced Configuration if required.
- Keep Server On Failure: This option controls what happens if something goes wrong while setting up your server. For example, if a startup script fails. If this setting is OFF (default), Kamatera will automatically delete the server if the setup fails. It is useful if you want to avoid paying for a broken setup, but you won’t be able to debug what went wrong. If this setting is ON, Kamatera will keep the server running, even if something fails during the initial setup. This lets you log in, investigate the issue, fix problems manually, and retry setup if needed.
Recommended for most users:
Keep it OFF unless you’re running custom scripts or complex configurations. For basic setups like this, the default (OFF) is usually fine.
- SSH key: Allows you to securely connect to the server without a password (recommended for better security).
- Skip Setting Password: If enabled, your server will only allow SSH key login—no password access.
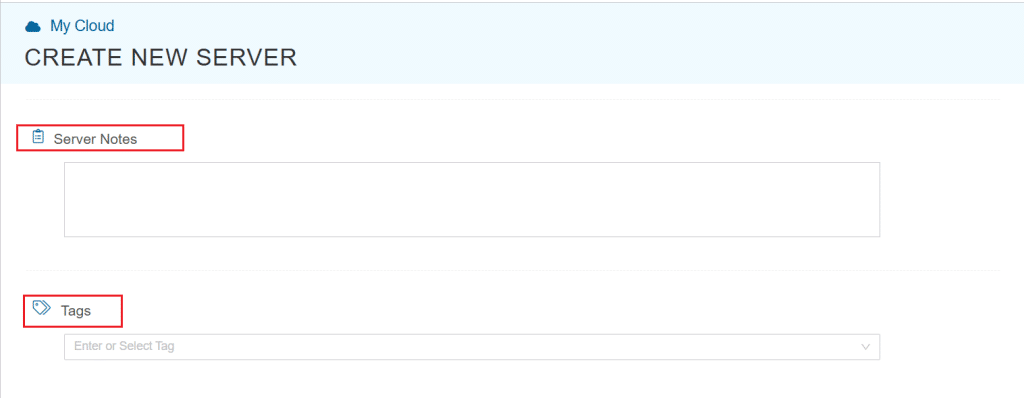
You can click “Generate Key” if you don’t already have one. Input more server notes and tags, if necessary.
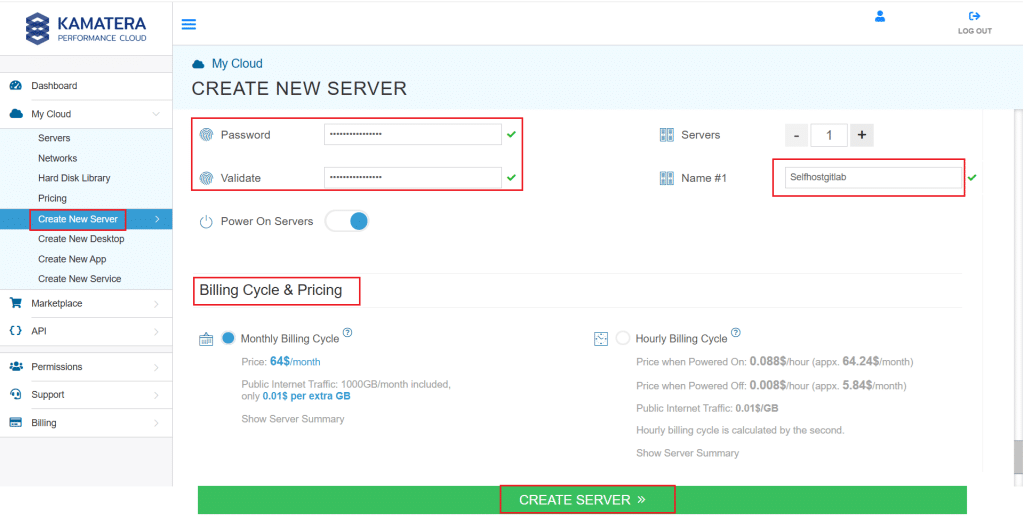
10. Finally, choose a strong password, select the number of servers, and input a server name.
11. Once all details are inputted, choose billing cycle and click on Create server button.
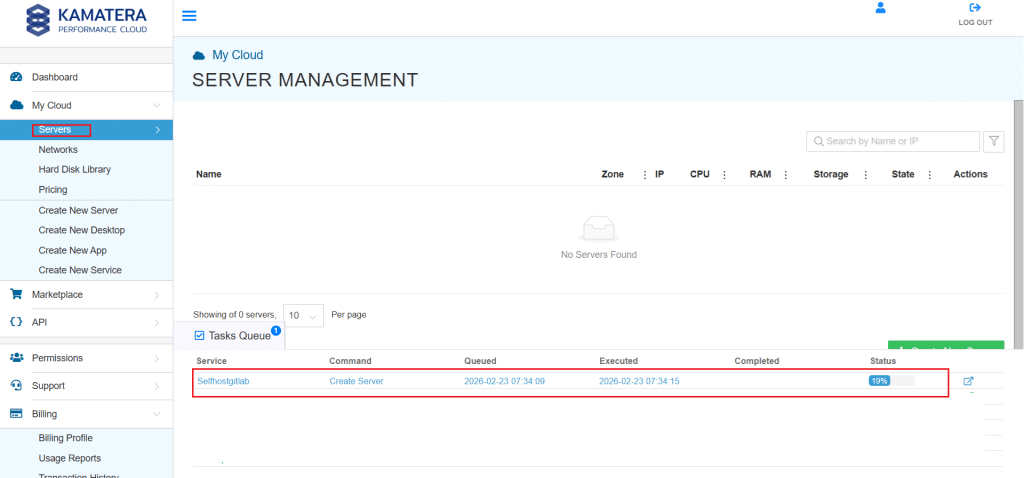
You can check the server creation progress under Server > Task Queue. Once done the server will be visible under same Servers panel.
To open the remote server further click on Connect and Open Remote Console, and it will open the remote machine in a separate window where the user can access the consol of the remote machine as well. To disconnect the remote server, click Disconnect, which will disconnect the remote session.
Verify GitLab is running and finish setup (Kamatera app image)
In this section, you will connect to your VPS, confirm GitLab services are running, set the correct external URL, and open GitLab in your browser.
- SSH into the VPS (from your computer)
On your computer, open a terminal (Windows PowerShell, macOS Terminal, or Linux shell) and connect to the VPS:
ssh root@YOUR_SERVER_PUBLIC_IP
Replace YOUR_SERVER_PUBLIC_IP with the public IP shown in your VPS provider dashboard.
2. Confirm GitLab services are running
On the VPS, run:
sudo gitlab-ctl status
Expected result:
- You should see services like Puma, Sidekiq, and NGINX listed and running.
If the services are running, continue to the next step.
3. Retrieve the initial root password
On the VPS, try:
sudo cat /etc/gitlab/initial_root_password
Notes:
- Do not share this password publicly.
- Some GitLab setups remove this file automatically after a short time. If the file is missing, you can reset the root password later.
4. Set the external URL for GitLab
GitLab uses external_url to know how users will access it (IP or domain).
Open the config file:
sudo nano /etc/gitlab/gitlab.rb
Set the external URL:
If you are using the server IP:
external_url "http://YOUR_SERVER_PUBLIC_IP"
If you have a domain:
external_url "http://gitlab.yourdomain.com"
Apply the configuration:
sudo gitlab-ctl reconfigure
5. Allow web access (HTTP/HTTPS)
If you are using UFW, allow GitLab web ports:
sudo ufw allow 80/tcp

sudo ufw allow 443/tcp

sudo ufw status
If you are not using UFW, ensure your VPS provider firewall/security group allows inbound access to ports 80 and 443.
6. Open GitLab in the browser and log in
In your browser, open:
- http://YOUR_SERVER_PUBLIC_IP
(or your domain if configured)
Login with:
- Username: root
- Password: the password retrieved earlier
Once you log in, GitLab is ready for the next step: enabling HTTPS (SSL) and applying basic security best practices.
Enable SSL (HTTPS) and quick security notes
- Point a domain to your VPS
To enable HTTPS with a free Let’s Encrypt certificate, you need a domain or subdomain (example: gitlab.yourdomain.com) pointing to your VPS public IP.
- Create an A record:
- Host: gitlab
- Value: YOUR_SERVER_PUBLIC_IP
Wait until DNS resolves (this can take some time depending on your DNS provider).
2. Update GitLab external URL to HTTPS
SSH into the VPS and edit the GitLab config:
sudo nano /etc/gitlab/gitlab.rb
Set:
external_url "https://gitlab.yourdomain.com"
3. Enable Let’s Encrypt in GitLab
In the same gitlab.rb file, add or update:
letsencrypt['enable'] = true
letsencrypt['contact_emails'] = ['admin@yourdomain.com']
Apply changes:
sudo gitlab-ctl reconfigure
GitLab will request the certificate and configure NGINX automatically.
4. Confirm firewall allows HTTPS
Ensure inbound ports are allowed:
- 22 (SSH)
- 80 (HTTP) required for Let’s Encrypt validation
- 443 (HTTPS)
If using UFW:
sudo ufw allow 80/tcp
sudo ufw allow 443/tcp
sudo ufw status
5. Brief security checklist
Keep these basic security practices in place:
- Disable root SSH login (use a sudo user instead)
- Use SSH keys if possible and disable password authentication
- Keep ports limited to 22, 80, and 443
- Keep the server updated regularly
Backup strategy (gitlab-backup + config)
This section ensures you can recover your GitLab instance if the VPS fails, the disk gets corrupted, or you make a wrong change.
- Understand what must be backed up.
A complete GitLab backup has two parts:
- GitLab data backup (repos, DB, uploads, CI artifacts if enabled)
- GitLab configuration and secrets
/etc/gitlab/gitlab.rb
/etc/gitlab/gitlab-secrets.json
Both are required for a reliable restore.
2. Create a GitLab data backup
Run on the VPS:
sudo gitlab-backup create
This creates a timestamped backup file in GitLab’s backup directory (commonly under /var/opt/gitlab/backups).
3. Back up config and secrets files
Create a folder to store config backups:
sudo mkdir -p /var/opt/gitlab/backups/config
Copy the config and secrets:
sudo cp /etc/gitlab/gitlab.rb /var/opt/gitlab/backups/config/
sudo cp /etc/gitlab/gitlab-secrets.json /var/opt/gitlab/backups/config/
4. Recommended: Move backups off the VPS
Backups stored only on the same VPS are not enough. If the VPS disk fails, you lose both GitLab and the backups.
Recommended options:
- Copy backups to an object store (example: S3 compatible storage)
- Copy backups to another server
- Download backups periodically to a secure internal storage location
Keep at least:
- Daily backups for 7 days
- Weekly backups for 4 weeks (minimum)
5. Schedule backups automatically (cron)
Create a daily backup schedule (example: 2:00 AM server time):
Open root’s crontab:
sudo crontab -e
Add:
0 2 * * * /usr/bin/gitlab-backup create CRON=1
Also add a weekly config copy (optional but useful):
0 3 * * 0 cp /etc/gitlab/gitlab.rb /var/opt/gitlab/backups/config/gitlab.rb.$(date +\%F) && cp /etc/gitlab/gitlab-secrets.json /var/opt/gitlab/backups/config/gitlab-secrets.json.$(date +\%F)
Quick restore note (high-level)
A restore typically involves:
- placing the backup file back into the backup directory
- restoring using gitlab-backup restore
- restoring gitlab.rb and gitlab-secrets.json
- running gitlab-ctl reconfigure and restarting services
Scaling considerations (disk, RAM, runners)
This guide targets small teams and startups, where a single VPS is usually enough to start. As usage grows, GitLab performance and storage needs increase quickly. Use the points below to plan upgrades without surprises.
- Disk grows first (plan for storage early)
Disk usage increases due to:
- Git repositories and LFS objects
- CI job artifacts and pipeline logs
- Container registry images (if enabled)
- Backups stored on the server
What to do:
- Start with more SSD than you think you need.
- Monitor free space regularly.
- Keep backups off the VPS so disk growth does not break GitLab.
When to upgrade:
- If disk usage consistently goes above 70%, increase volume size before it hits critical levels.
2. RAM impacts responsiveness
GitLab runs multiple services (web, background jobs, database, cache). RAM affects:
- UI speed and API responsiveness
- Background job processing (Sidekiq)
- Ability to handle multiple users and concurrent operations
What to do:
- For small teams, 8 GB RAM is a practical baseline.
- If you see slow UI, timeouts, or frequent swap usage, increase RAM.
Upgrade trigger:
- You are using swap heavily or GitLab feels slow during peak hours.
3. CPU matters for concurrency and CI workload
CPU affects:
- Number of concurrent web requests GitLab can serve
- Background processing speed
- Performance during large pushes, merges, or heavy API usage
What to do:
- 2 vCPU is acceptable for light usage.
- 4 vCPU is better for active teams and smoother performance.
Upgrade trigger:
- High CPU usage during normal operations, or slow merges and page loads.
4. Separate GitLab Runners as you grow
Runners execute CI jobs. If you run runners on the same VPS as GitLab, CI can slow down the GitLab UI and background services.
Best practice:
- Keep GitLab on one VPS.
- Run GitLab Runners on separate machines as usage increases (another VPS or dedicated server).
Upgrade trigger:
- CI jobs start impacting GitLab responsiveness or queue times increase.
5. Simple scaling path for startups
A practical scaling path looks like this:
- Increase disk first (fastest growing component)
- Increase RAM next (improves stability and UI performance)
- Add CPU if concurrency increases
- Move runners off the GitLab VPS for clean separation.
Conclusion
You now have a self-hosted GitLab instance running on a VPS, ready for a small team or startup to manage code, merge requests, and collaboration in one place. To keep it reliable, enable HTTPS, lock down basic access, and set up regular backups that are stored outside the VPS. As your usage grows, scale by adding disk and RAM first, and move CI runners to separate machines to keep GitLab responsive.
Final checklist
- GitLab services are running (gitlab-ctl status)
- External URL is set correctly in gitlab.rb
- Ports 80 and 443 are allowed (provider firewall and or UFW)
- HTTPS is enabled with a valid certificate (SSL lock in browser)
- Root password is secured and admin access is verified
- Backups run successfully (gitlab-backup create)
- gitlab.rb and gitlab-secrets.json are included in backups
- Backups are copied off the VPS
- Disk and RAM growth is monitored, and runners are separated as CI grows