


When connecting to a managed or self-hosted database, you may see the error “Invalid Parameters and Values.” This error usually means that one or more connection settings (hostname, port, username, password, SSL, or database name) are incorrect or misconfigured. Ensuring that connection parameters are accurate is critical for reliable application performance.
This guide explains the most common causes of this error and provides step-by-step troubleshooting instructions for MySQL.
Troubleshooting common causes
This section highlights the quick checks you should perform first. If one of these resolves your issue, the error should be fixed immediately. If not, proceed with the detailed step-by-step guide that follows.
- Incorrect credentials
- Verify username and password in .env or config file.
- Test directly with mysql -u myuser -p -h <server-ip> -P 3306 my_database
- If login fails, reset password.
- Database name issues
- Log in and confirm database exists:
SHOW DATABASES;
- If missing, create it:
CREATE DATABASE my_database;
- SSL/TLS misconfiguration
Some setups require SSL. Test with:
mysql –ssl-mode=REQUIRED -u myuser -p -h <server-ip> -P 3306 my_database
- Remote access permissions
If you see: “Host your_server is not allowed to connect to this MySQL server”, then reapply GRANT commands (see Step 5 below).
-
- Unsupported parameters in connection string
Remove unsupported/extra parameters. Stick to essentials: mysql -u myuser -p -h <server-ip> -P 3306 my_database
- Environment variable issues
Verify that environment variables are set correctly:
- echo $DB_USER
- echo $DB_PASSWORD
- echo $DB_HOST
- echo $DB_NAME
Verify MySQL installation
When you install MySQL server or MySQL client tools, you can verify the installation by checking its version with this command:
Command:
mysql --version
“mysql Ver 8.0.43-0ubuntu0.22.04.1 for Linux on x86_64 ((Ubuntu))” confirms MySQL client is installed correctly.

Check MySQL service status
The below command shows the current state of the MySQL service (running, stopped, or failed) along with details like process ID and uptime. It helps verify whether MySQL is active and working correctly.
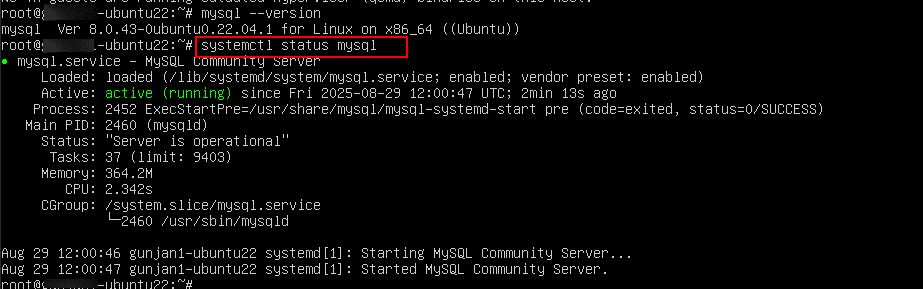
If the service is stopped or failed, restart it:
Command:
sudo systemctl restart mysql
Secure the MySQL installation
Next, run mysql_secure_installation which is an interactive hardening script shipped with MySQL. It walks you through closing common security gaps in a fresh install: setting a root password, enabling password checks, removing anonymous users, blocking remote root logins, dropping the test DB, and reloading privileges.
It has to run:
- Right after installing MySQL (recommended).
- After any reinstall/reset when defaults may be weak.
- Safe to re-run; it’ll skip/confirm steps that are already secured.
Command:
sudo mysql_server_installation
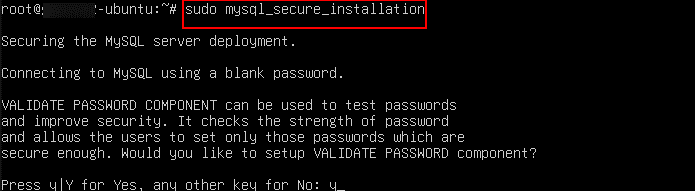 When prompted “Press y\Y for Yes, any other key for No:” press ‘y’.
There will be three levels of password validation policy, as you can see in the screenshot below.
When prompted “Please enter 0 = LOW, 1 = MEDIUM, and 2 = STRONG: 1”.
Note: Here 1 is entered. Select the level of password validation that you need.
 Follow the instructions as shown in the screenshot below:
When prompted
“Remove anonymous users? (Press y|Y for Yes, any other key for No)”: press Enter
“Disallow root login remotely? (Press y|Y for Yes, any other key for No)”: press Enter
“Remove test database and access to it? (Press y|Y for Yes, any other key for No)”: press Enter
“Reload privilege tables now? (Press y|Y for Yes, any other key for No)”: press Enter
Once all the above steps are completed, your MySQL installation should now be secure.
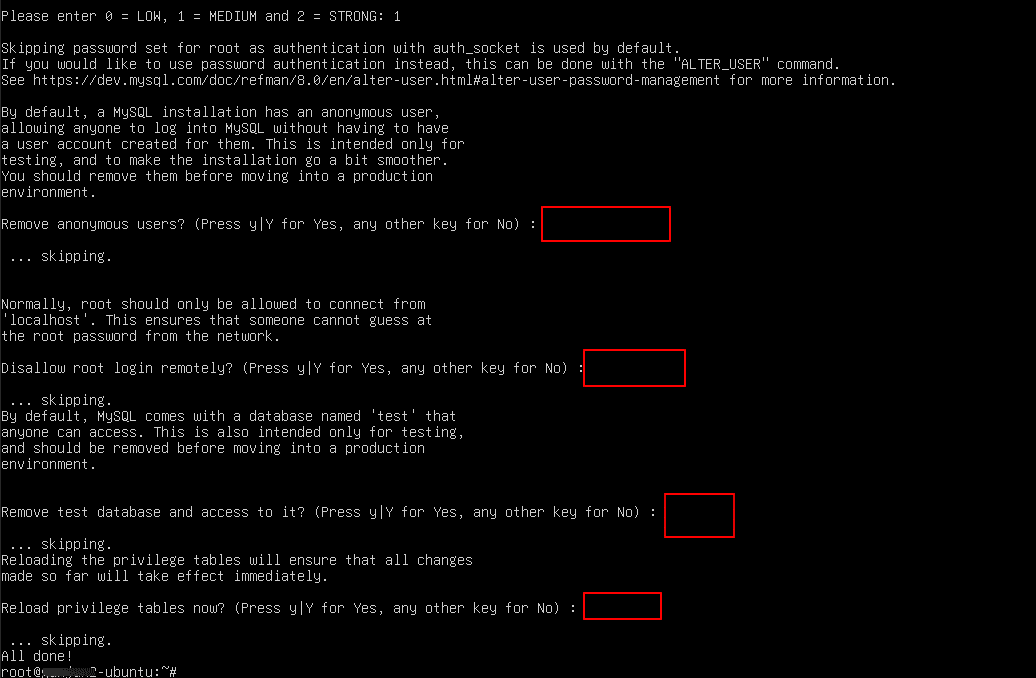 Note: You can safely rerun this script anytime.
Confirm MySQL is listening on port 3306
After securing your MySQL installation using the mysql_secure_installation script, the next step is to confirm that the MySQL service is actively running and listening for connections. By default, MySQL communicates over port 3306, so checking this ensures that the database server is ready to accept connections.
Command:
sudo ss -tulnp | grep 3306
 From the screenshot above, you can see MySQL is currently bound only to 127.0.0.1:3306 (localhost). That means MySQL only accepts local connections (from the same server) and rejects remote connections.
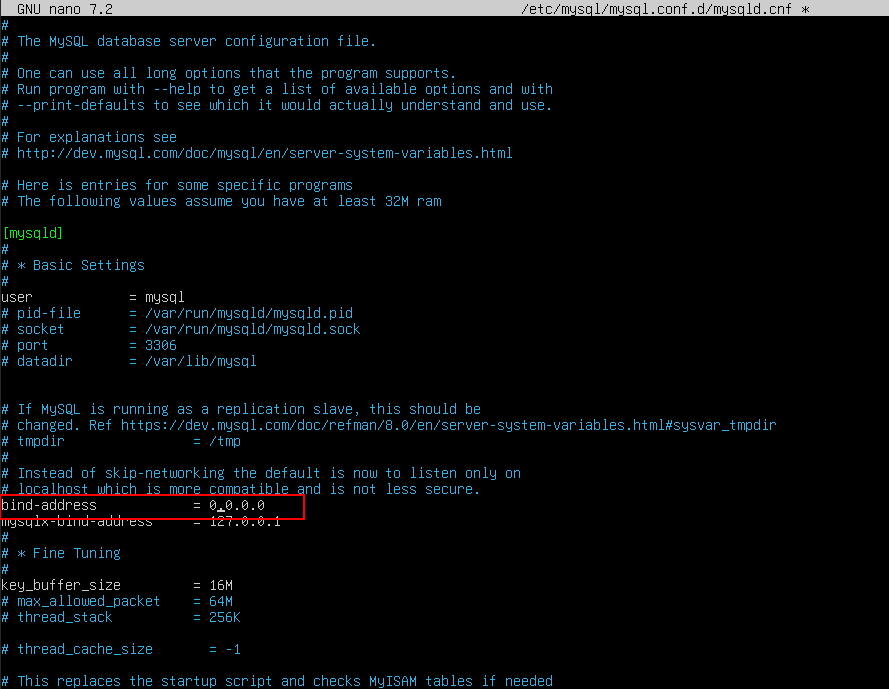
To allow MySQL to Listen on All Interfaces, open the configuration file by running
Command:
sudo nano /etc/mysql/mysql.conf.d/mysqld.cnf
When nano editor opens, find the line “bind-address = 127.0.0.1” as shown in the screenshot below.
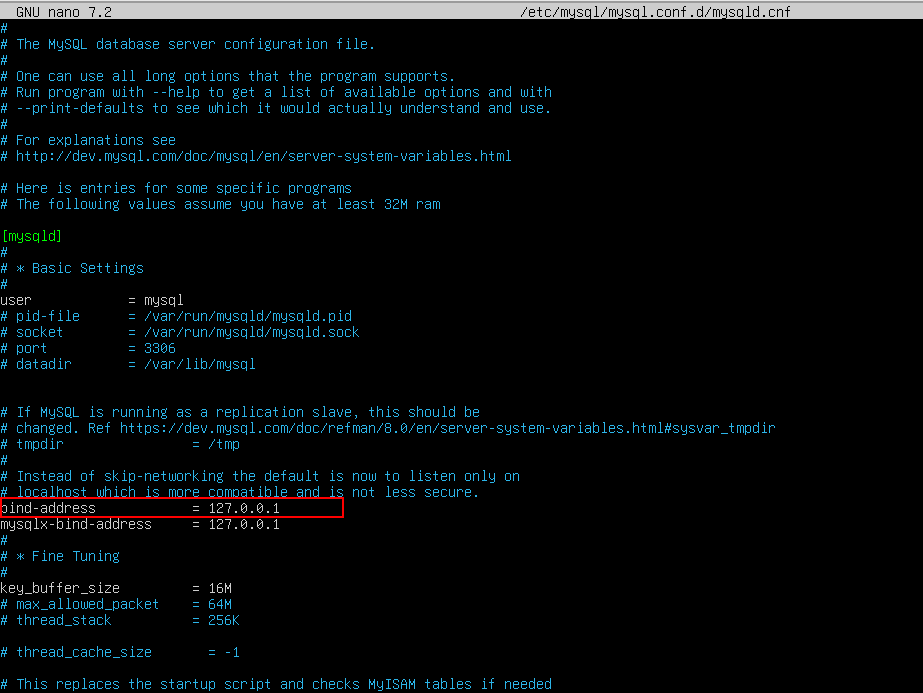 Change it to “bind-address = 0.0.0.0”.
Now, save and exit by pressing CTRL+O, then hit ENTER, and press CTRL+X.
 Now, restart Mysql and check the status by running the below commands:
Command:
sudo systemctl restart mysql
Command:
sudo systemctl status mysql
You can see the mysql.service status is active.

Check again by running sudo ss –tulnp | 3306
Now, you should see 0.0.0.0:3306

Grant remote access to MySQL users
After enabling remote listening, your MySQL user must be allowed to connect from outside:
Command:
mysql -u root –p
Enter password when prompted.
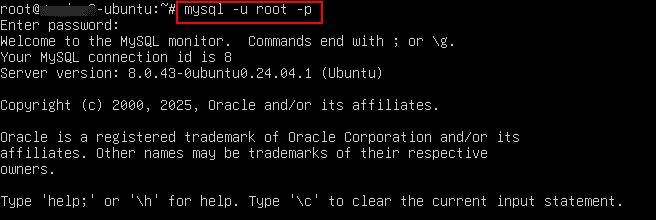
Then inside MySQL, run the commands below one by one.
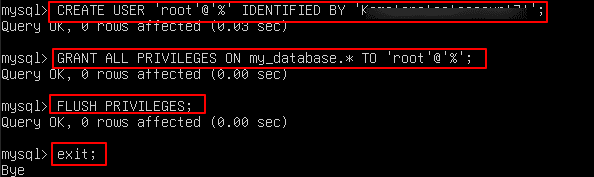
Commands:
CREATE USER 'myuser'@'<Your-IP>' IDENTIFIED BY 'mypassword';

GRANT ALL PRIVILEGES ON my_database.* TO 'myuser'@'<Your-IP>';

FLUSH PRIVILEGES;
After that, run
exit;
Note: In place of ‘myuser’, enter your username or root and in place of ‘mypassword’, enter your strong password.
Note: If you’re at the ‘> continuation prompt inside MySQL, MySQL thinks your query isn’t finished. Then just type \c and press Enter. Otherwise press ctrl+c, this cancels the current query and usually drops you back to the Linux shell.
Configure firewall for remote access
Finally, check the firewall. Open port 3306 using UFW:
Commands:
sudo ufw allow from <Your-IP> to any port 3306 proto tcp

sudo ufw reload
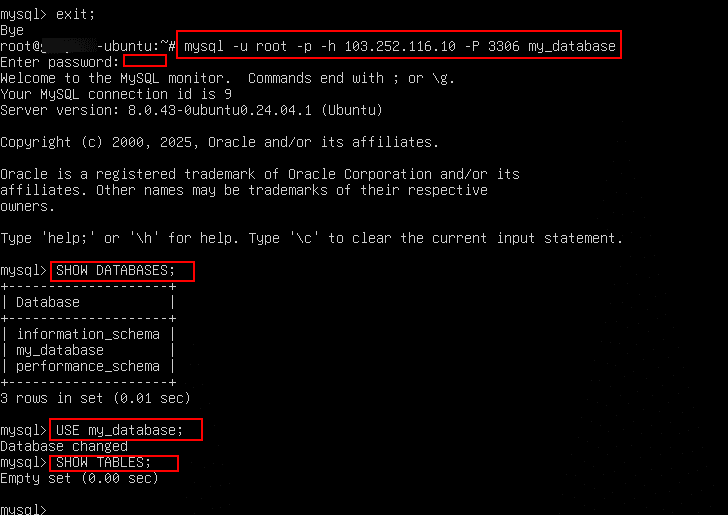
Test remote connection
After these steps, retry your connection:
Command:
mysql -u myuser -p -h <server_IP> -P 3306 my_database
Enter the password when prompted.
Now you’re inside MySQL, ready to run queries.
You should see the mysql> prompt as shown in the below screenshot.
Now, you can try:
- Create database: CREATE DATABASE my_database;
- Check what databases exist: SHOW DATABASES;
- Switch to your database: USE my_database;
- See tables inside it: SHOW TABLES;
- Run a test query (if you have a table, replace table_name): SELECT * FROM table_name LIMIT 5;
Note: here, my_database is already created.
If you want to create more databases, then type
CREATE DATABASE database_name;
(Replace database_name with your own database name required)
![]()
Verify connectivity with Telnet
This is a connectivity check to confirm whether you can reach your MySQL database server externally.
Command:
telnet <server_IP> 3306
It tries to open a Telnet connection from your machine to the server at IP address 103.252.117.99 on port 3306 (MySQL’s default port).
If you get a message like this “server_ip is not allowed to this MySQL serverConnection closed by foreign host”. Then, fix user permissions (see step-5).

If “blocked”, check firewall/network rules (see step 6).
If “connection refused”, that means service is not running. Then, restart the server by running the following commands:
sudo systemctl restart mysql

sudo ufw allow 3306/tcp

sudo ufw reload

If the connection is “successful”, it means there’s no firewall or network issue blocking the connection.

From the above screenshot, we can understand that Telnet successfully reached the server on port 3306, so the port is open and not blocked by a firewall.
But the message “The Got timeout reading communication packets” means Telnet couldn’t continue because it’s not a MySQL client and it doesn’t understand the MySQL protocol. The error is expected when using Telnet, because Telnet can’t “speak” the MySQL protocol.
Instead of Telnet, you should test with the MySQL client (see step 7):
Command:
mysql -u myuser -p -h <server_IP> -P 3306 my_database
That will give a proper connection attempt and meaningful errors (like authentication failure, wrong database, or SSL issues).
Use environment variables (Optional):
To avoid exposing credentials in commands, store them as environment variables. To use environment variables for MySQL credentials, you should set them in the Linux shell, for example:
export DB_USER=user_name

export DB_PASSWORD=password
Note: Replace user_name and password with your username or root and your password.
Then you can connect like this:
Command:
mysql -u $DB_USER -p $DB_PASSWORD -h <server_IP> -P 3306 my_database
![]()
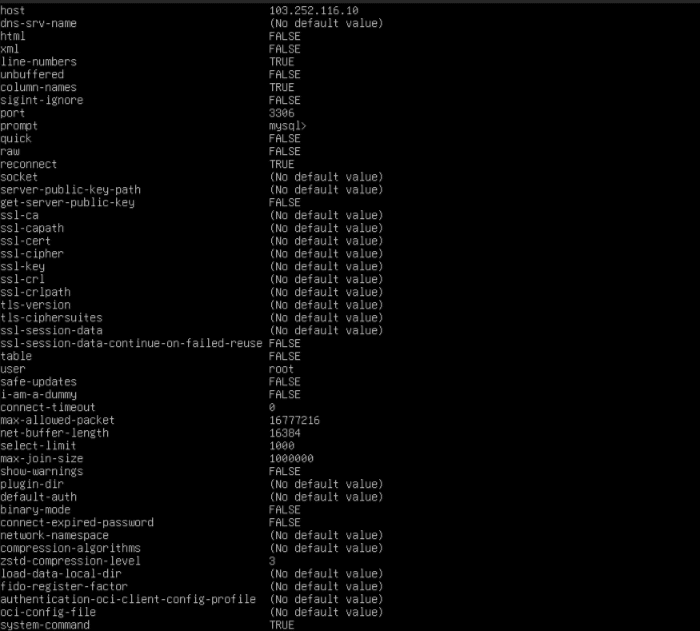
After running the above command, you will see details of host, port, user, and more.

SSL/TLS misconfiguration
Some setups require SSL. Test with:
Command:
mysql --ssl-mode=REQUIRED -u myuser -p -h <server-ip> -P 3306 my_database
![]()
After running the above command, you will see details of host, port, user, and more.
And that’s it! You have successfully learned all the ways to fix “Invalid Parameters and Values” database errors. Remember, when you encounter this error in MySQL, it usually points to configuration issues- whether it’s credentials, permissions, or network settings. By starting with the quick troubleshooting checks and then following the detailed step-by-step fixes, you can systematically resolve the problem. To keep your database stable and secure, make it a habit to test connections regularly, review user access, and monitor the MySQL service.