


Working with files is one of the most common tasks in Linux, whether you are checking system configurations, reviewing logs, editing scripts, or analyzing data. Linux offers a variety of command-line tools to view file contents efficiently, making it easy to inspect files without opening a full-fledged text editor. These commands are useful across all Linux distributions and server environments.
In this guide, we demonstrate how to use these tools on an Ubuntu server deployed using a Kamatera cloud server image. Using this environment as an example, you can easily follow the steps for creating, navigating, and viewing files in Ubuntu.
Commands to manage files
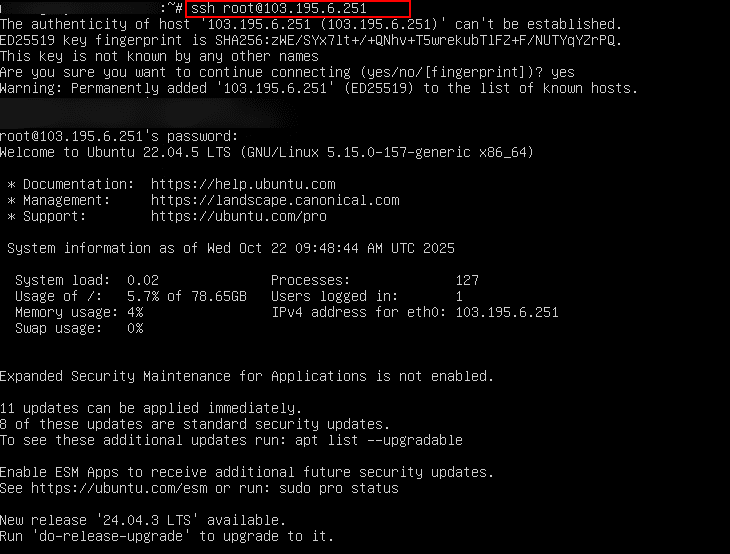
To manage files on your Kamatera Linux server, you first need to establish a secure connection using SSH (Secure Shell). The command below connects you to your remote server from your local terminal.
Command:
ssh username@your_server_ip
Note: Replace username with your server user (often root) and your_server_ip with the server’s IP address.
You will then authenticate either with your account password or an SSH key, ensuring a secure session to perform all server operations.
Once connected, you need to move to the directory where your file is stored. The below command changes your current working directory to the specified location. This allows you to run file commands without specifying the full path each time, making file management easier and more efficient.
Command:
cd /path/to/directory
Note: Here, the directory is changed to myfiles as shown in the screenshot below.
![]()
The cat command displays the entire contents of a file directly in the terminal. It is simple and effective for viewing small files or quickly checking configurations. This command outputs the full text without pauses, so it works best when the file is not too long.
Command:
cat filename.txt

The cat -n command shows the file’s content along with line numbers. Line numbering is particularly useful when referencing or troubleshooting code, configuration files, or logs. It makes it easier to locate specific lines or track changes over time.
Command:
cat -n filename.txt

The tac command is essentially the reverse of cat command and displays file content starting from the last line. This is useful for log files or recent entries, where the newest information is typically at the bottom. It allows you to quickly access recent updates without scrolling through the entire file.
Command:
tac filename.txt

The head command shows the first 10 lines of a file, while the tail command displays the last 10 lines. These commands are handy when you only need to check the beginning or end of a file, such as configuration headers or recent log entries. They provide a quick overview without overwhelming you with the full content.
Command:
head filename.txt

Command:
tail filename.txt

Both head and tail can be customized to display a specific number of lines using the -n option. This feature helps you focus on only the portion of the file that matters for your task.
Command:
head -n 5 filename.txt
This command shows the first 5 lines.

Command:
tail -n 15 filename.txt
This command shows the last 15 lines

The below command allows you to monitor files in real time as they are updated. This is particularly useful for log files or live data, where new entries appear continuously. The -f option keeps the terminal open and automatically displays new lines as they are added.
Command:
tail -f /var/log/syslog

The more command allows you to view large files one screen at a time.
Note: Use the Space key to scroll down or q to quit. This command prevents the terminal from being flooded with too much text, making it easier to navigate through lengthy files.
Command:
more filename.txt
![]()
The less command is more powerful than more and allows both forward and backward navigation through a file.
Note: You can scroll using arrow keys, Page Up/Page Down, or search using /pattern. Press q to exit. This command is ideal for reviewing long configuration files or logs efficiently.
Command:
less filename.txt
![]()
The grep command searches for a specific keyword or pattern within a file. It is useful when looking for errors, configuration settings, or particular data points. It displays only the matching lines, helping you quickly locate the information you need.
Command:
grep "keyword" filename.txt
![]()
In the screenshot below, you can see all the files containing the keyword “ubuntu” is displayed.
Using grep -in enables a case-insensitive search (-i) while also showing line numbers (-n). This is helpful when you need to find all instances of a word regardless of capitalization and know their exact location in the file. It streamlines troubleshooting and configuration reviews.
Command:
grep -in "keyword" filename.txt
![]()
Even though the keyword “UBUNTU” is written in capital letters, the command displays all the files containing the keyword, along with their corresponding line numbers.
Other useful commands
- The nl command displays the file content with numbered lines, like cat -n. It is especially useful when referencing or documenting specific lines during collaboration or debugging.
Command:
nl filename.txt
![]() The screenshot below shows the result.
The screenshot below shows the result.
- The sed command prints only the specified range of lines (lines 2 to 4 in this example). This allows you to focus on specific sections without scrolling through the entire file.
Command:
sed -n '2,4p' filename.txt

- Using awk command prints all lines of a file, often used in scripts to process or filter file content. It is helpful for automation, batch processing, or extracting structured data from text files.
Command:
awk '{print $0}' filename.txt
![]()
You have reached the end of our list. By mastering these Linux commands, you can efficiently create, view, and navigate files on your server. Whether you are inspecting configuration files, monitoring logs, or searching for specific content, these tools provide a flexible and powerful way to manage your server’s data directly from the command line.