


You can upload and use your own custom disk images to customize your Kamatera cloud servers. This is particularly useful if you have a pre-configured OS environment, a backup of an existing server, or a custom server image that you want to use across multiple deployments. By uploading your own image, you gain full control over the configuration, installed software, and system settings, saving time on repetitive setups.
Custom images can be uploaded through the Kamatera cloud management console using a direct HTTP/HTTPS/FTP link or by uploading a server image. Once the image is uploaded and the server configurations and resource allocations have been defined, it can be used just like any standard template for new server deployments.
You must have at least one server deployed. Learn more about how to deploy a Kamatera server.
Log in to your account
- Go to https://console.kamatera.com and log in using your Kamatera account credentials. This will take you to the main dashboard, where you can manage servers, storage, images, and more.
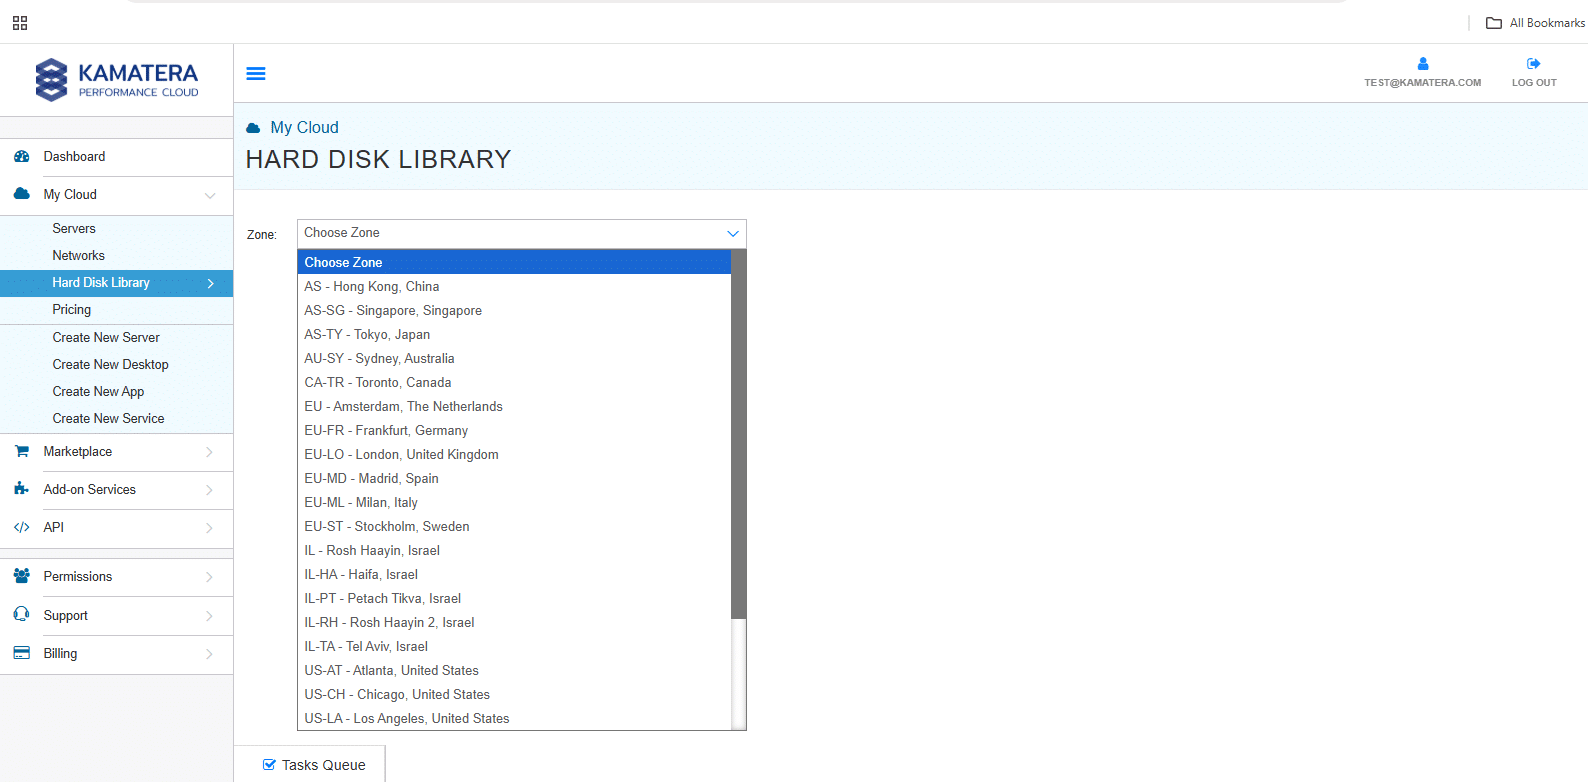
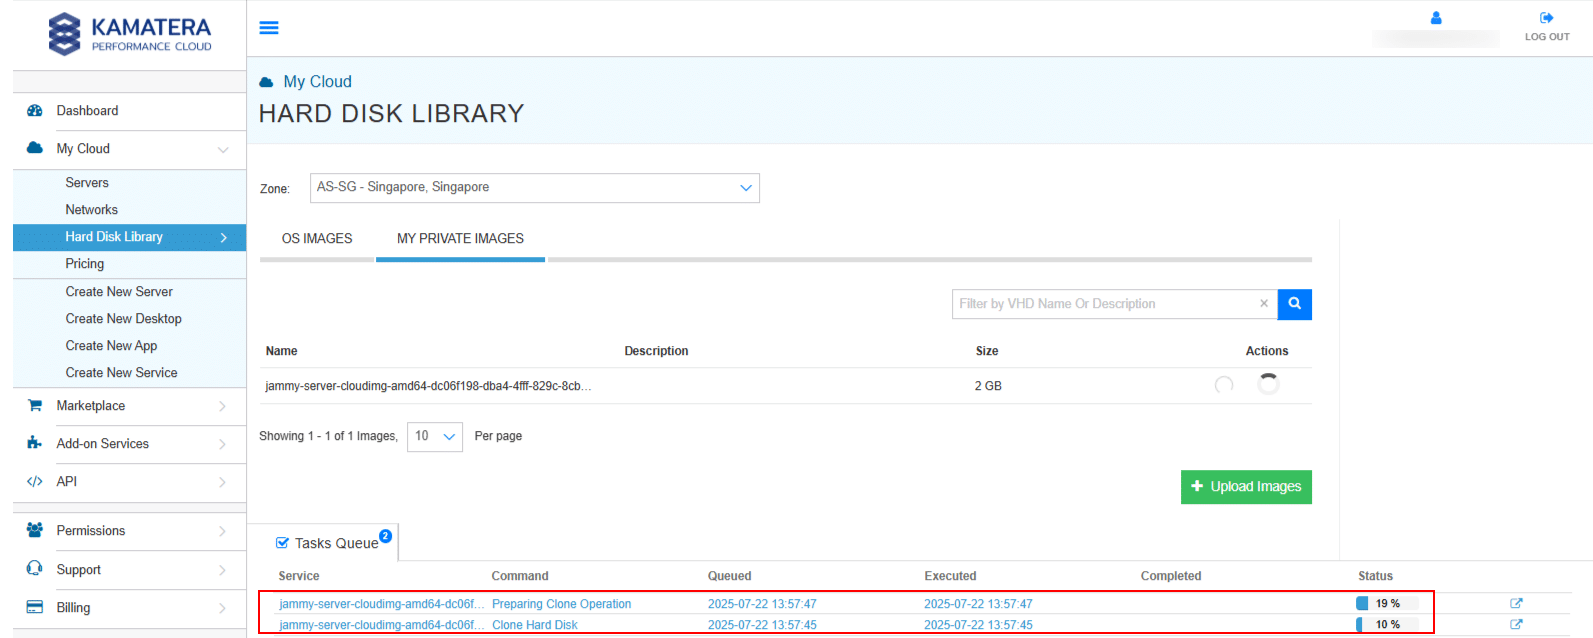
2. From the left-hand navigation menu, go to the Hard Disk Library. Then, select the appropriate Zone (data center location) where you want to manage or store your disk images.
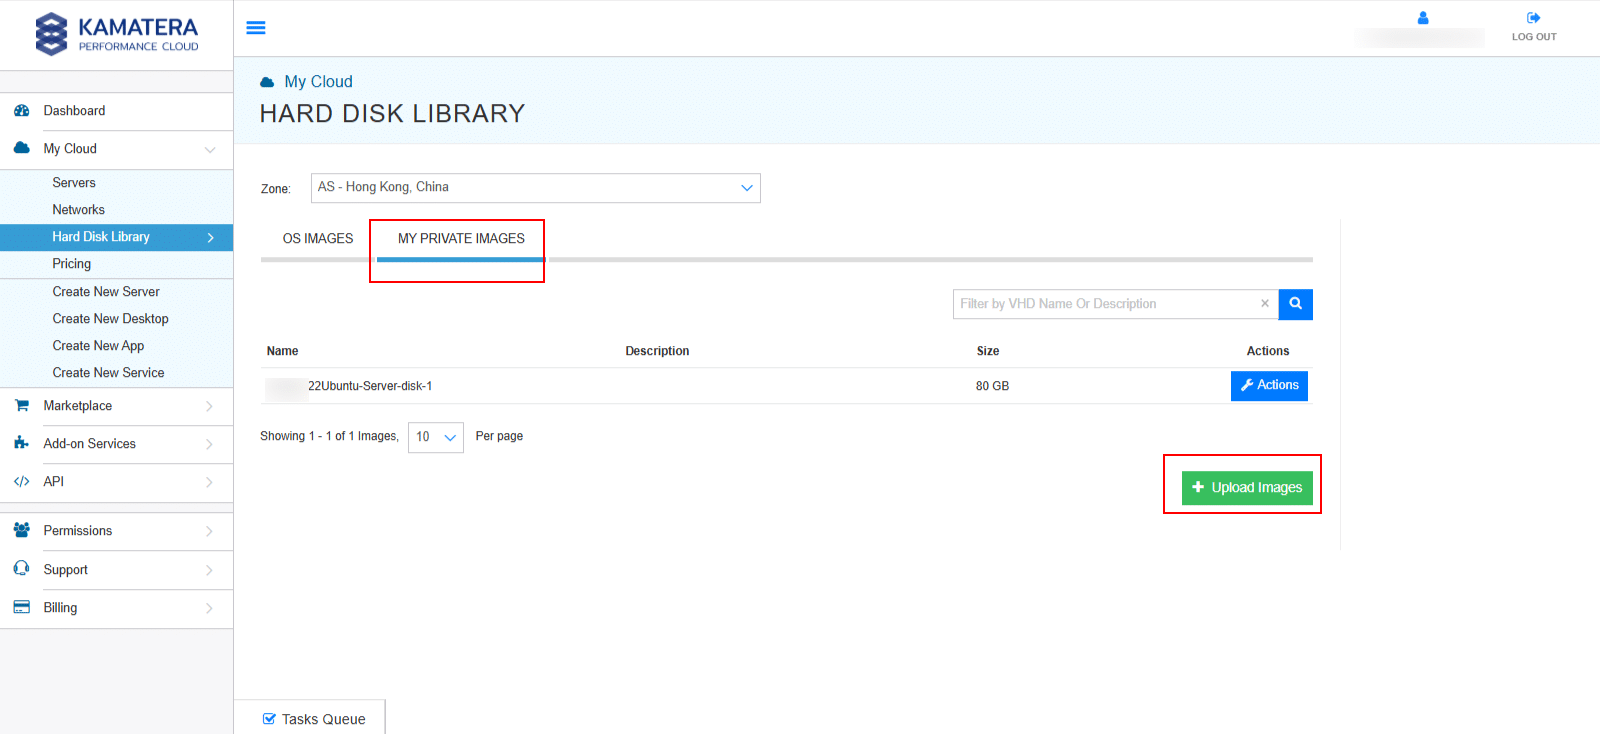
3. Click on MY PRIVATE IMAGES to view any previously uploaded custom images or to upload a new image. This section allows you to manage your own private disk images that can be used to create new virtual servers.
Click on Upload Images to upload a new disk image.
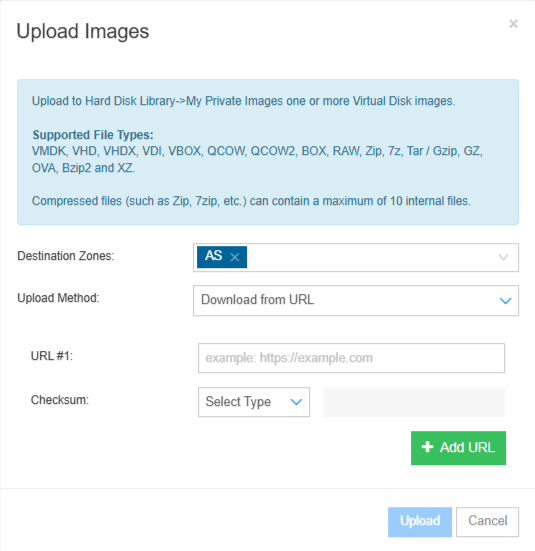
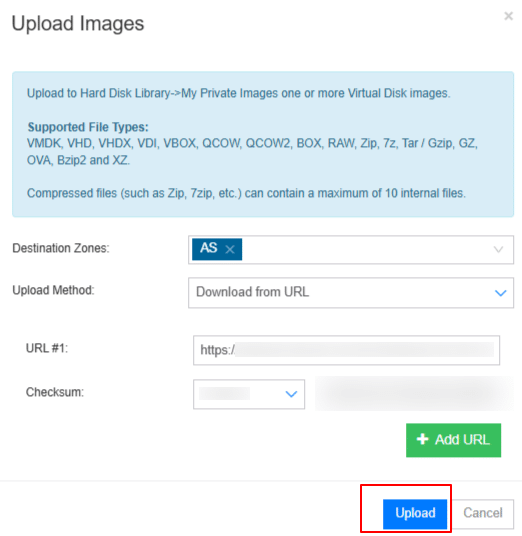
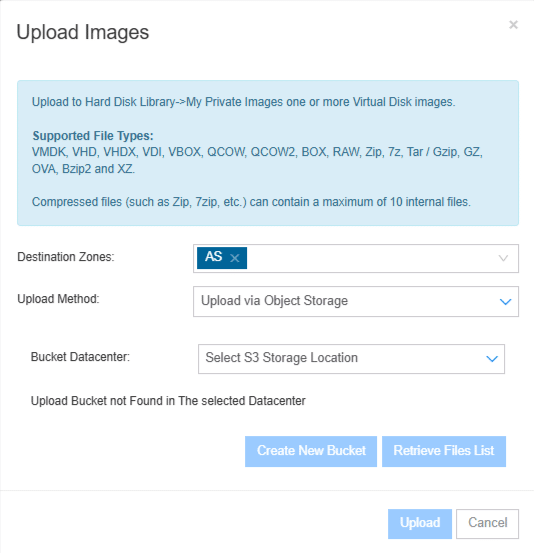
4. A pop-up window will appear. This form includes fields specifying the destination zones and selecting an upload method. It also lists supported file formats and important limitations related to compressed files.

The table gives the description of each field:
| Fields | Description |
| Upload target | Hard Disk Library-> My Private Images |
| Purpose | Upload one or more virtual disk images to be used in creating new virtual servers. |
| Supported file types | VMDK, VHD, VHDX, VDI, VBOX, QCOW, QCOW2, BOX, RAW, ZIP, 7z, TAR/GZIP, GZ, OVA, BZIP2, and XZ |
| Compressed files | Compressed formats like .zip or .7z are supported. They can contain a maximum of 10 internal files |
| Destination zones | Choose the data center zones where you want your image stored |
| Upload method options |
|
Download from URL
- From the Upload Method drop-down menu, select Download from URL option. This will display two fields that need to be filled in to proceed with the image upload.
- URL: Provide a direct, publicly accessible link to your image file.
- Example: https://cloud-images.ubuntu.com/jammy/current/jammy-server-cloudimg-amd64.img
- Ensure that the URL points directly to the file and does not require authentication or redirection.
- Checksum: Used to verify the integrity of the file after it is downloaded by Kamatera.
- Supported types: MD5, SHA256, SHA512, or None
- Choose the same type as the checksum you generate locally and paste the corresponding hash value.
2. In this guide, None is selected as the Checksum option, meaning the system will proceed without verifying the file’s integrity after download.
After entering URL and Checksum as None, click Upload.
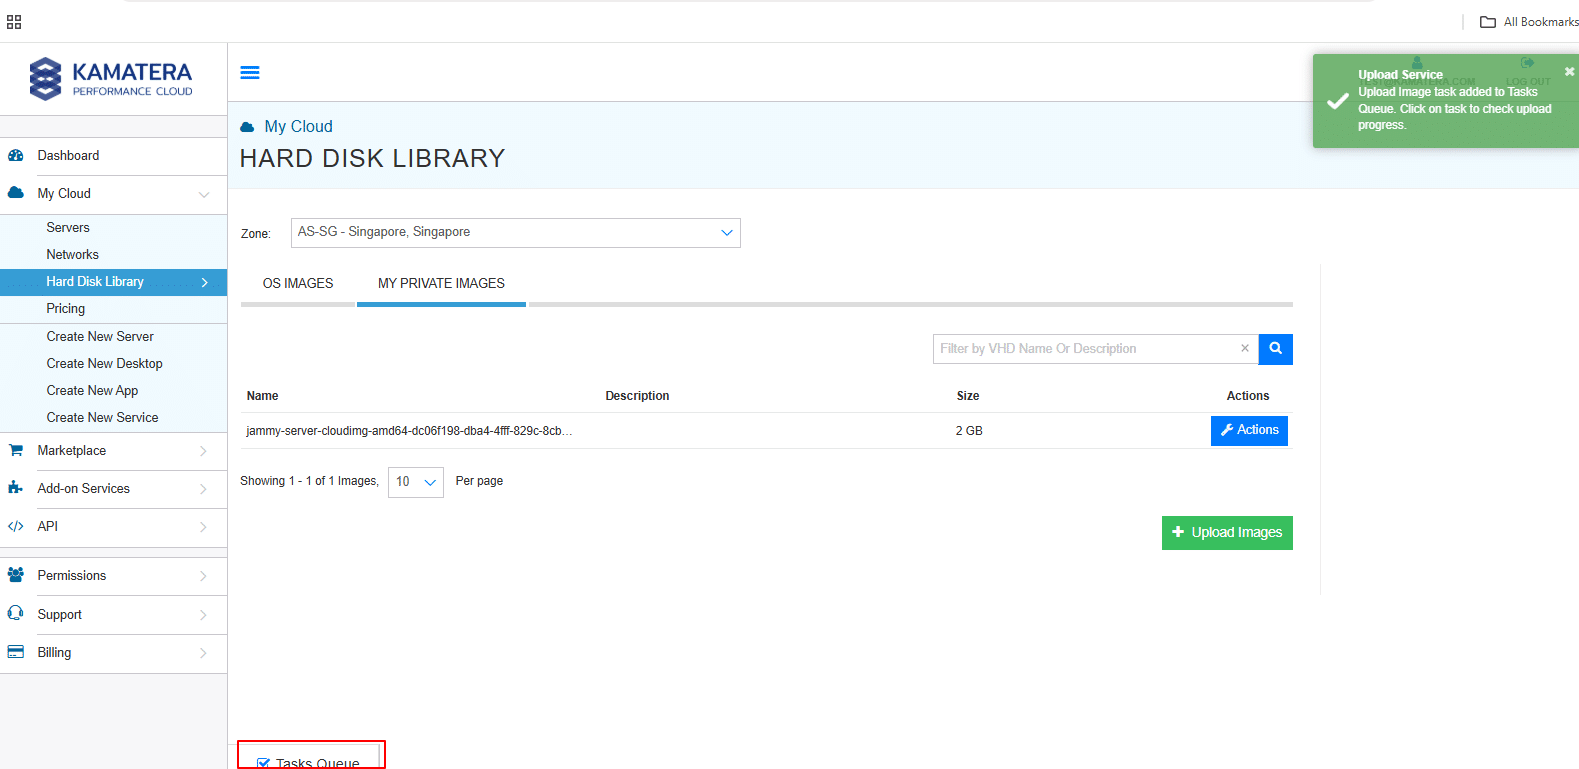
3. On the right-hand side of the screen, you will see the message:
“Upload Service: Upload Image task added to the Tasks Queue. Click on the task to check the upload progress”.
Click on Tasks Queue.
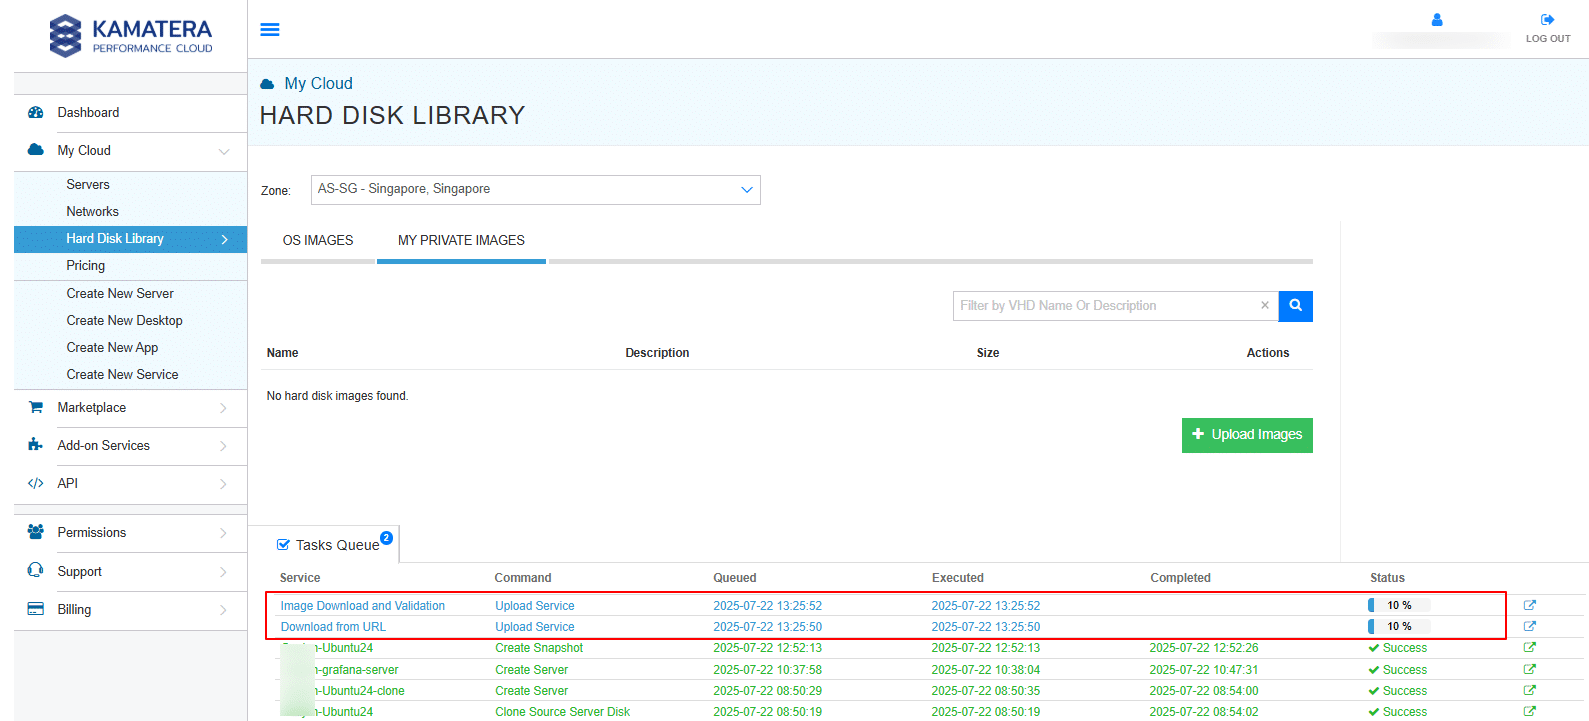
4. Then, you will see two tasks listed under the Service column, both showing as In Progress under the Status column:
- Download from URL and
- Image Download and Validation
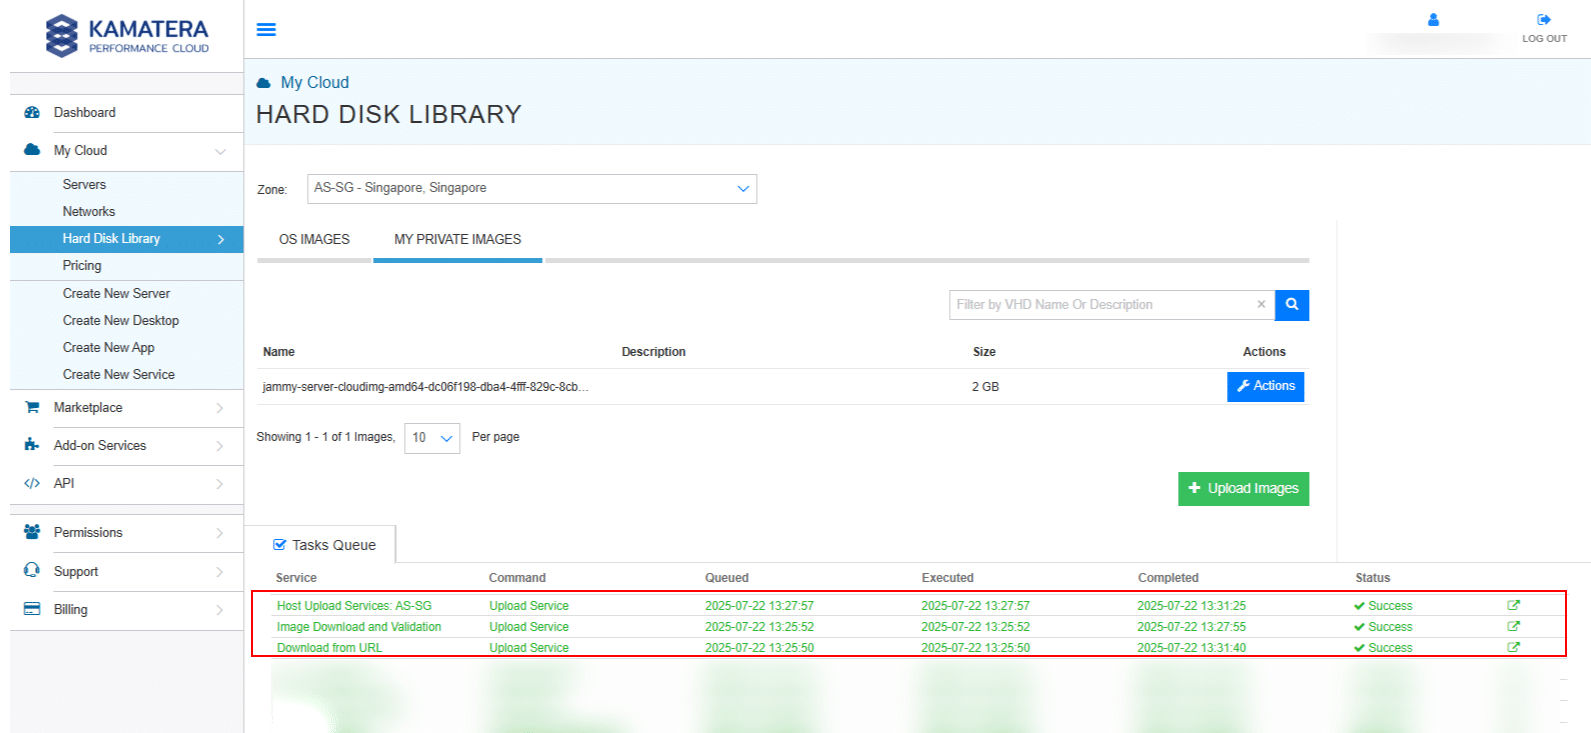
5. Once both tasks are completed, the status will update to Success under the Status column. This indicates that the image was successfully downloaded, validated, and added to your MY PRIVATE IMAGES library. You can now use this custom image to create new virtual servers within the selected zone.
Create a new server
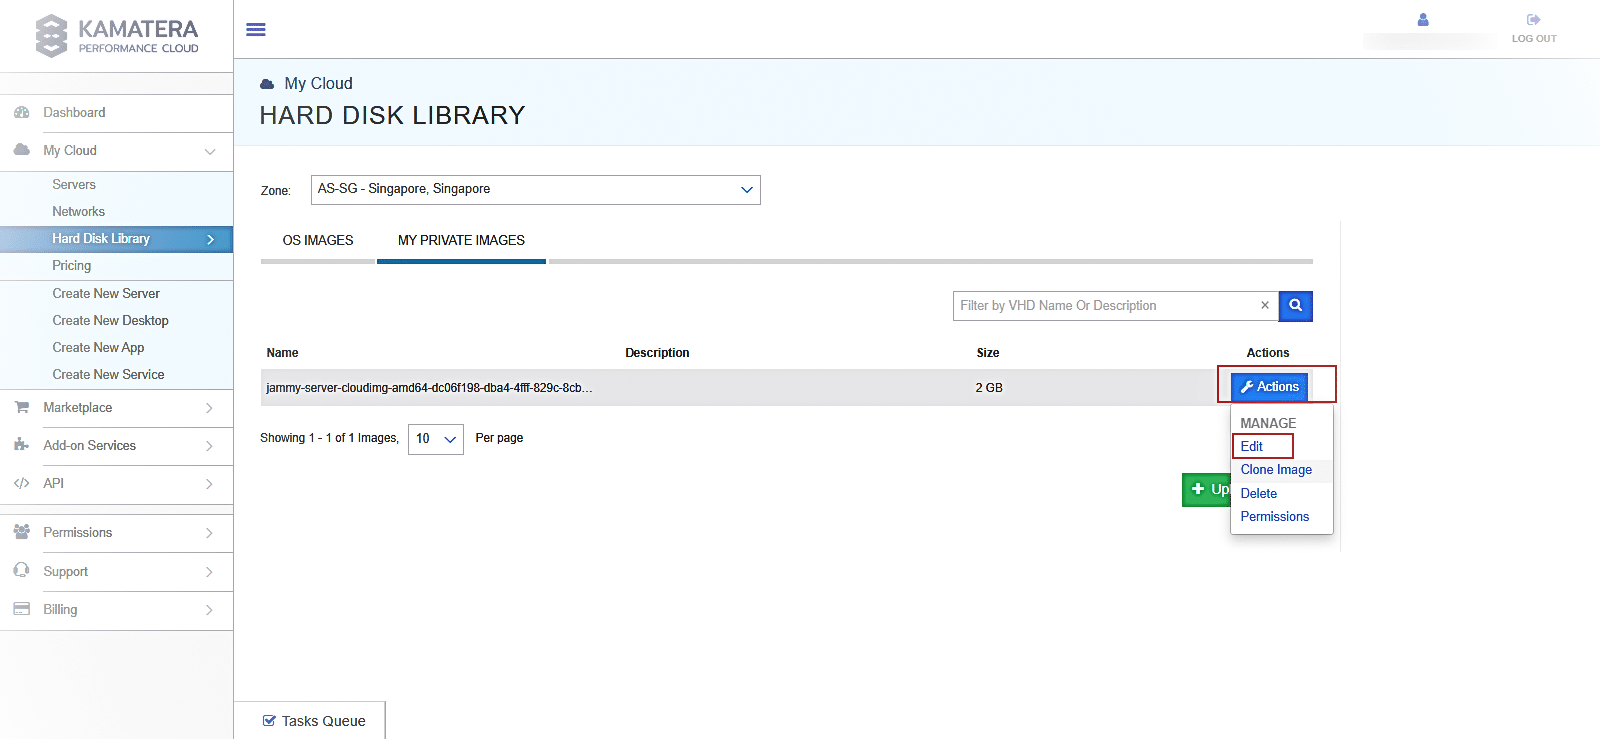
6. To create a new server using the uploaded image, you must first configure the image by editing its settings.
To do this, locate the image in the MY PRIVATE IMAGES tab, click the Actions button next to the image, and select the Edit option from the dropdown menu.
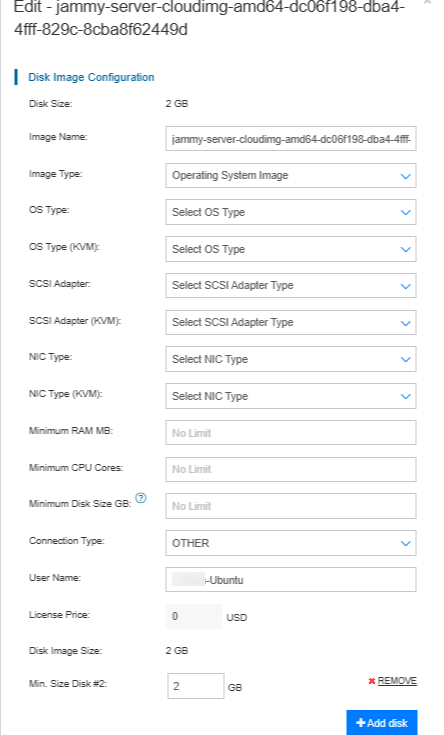
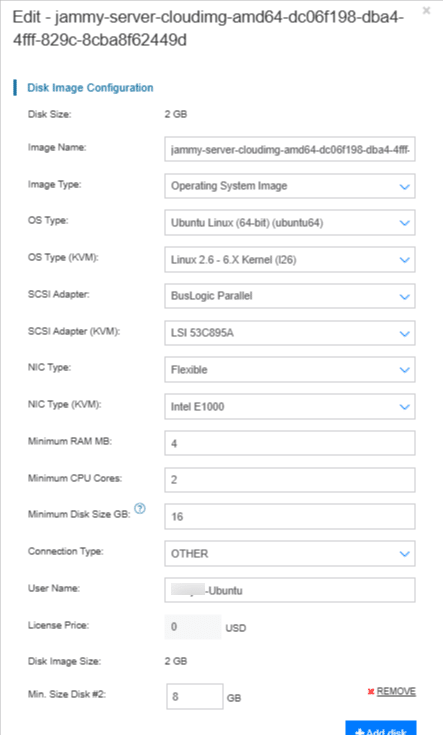
7. A pop-up window will appear with several configuration fields that need to be completed.
These fields allow you to define important properties for the image, such as the Image name, Image Type, OS Type, OS Type (KVM), SCSI Adapter, SCSI Adapter (KVM), NIC Type, NIC Type (KVM), Minimum RAM MB, Minimum CPU Cores, Minimum Disk Size GB, Connection Type, User Name, License Price, Disk Image Size, Min. Size Disk#2.
Properly configuring these settings ensures that the image is correctly categorized and can be used seamlessly when creating new virtual servers.
Description of each field is given in the table below:
| Field | Description |
| Disk Size | Displays the total size of the disk image (e.g., 2 GB). This is auto detected and not editable. |
| Image Name | A unique identifier for the image. You can rename it for easier recognition (e.g., Ubuntu-test). |
| Image Type | Select the type of image: typically, “Operating System Image” for bootable OS templates or “Hard Disk Image”. |
| OS Type | Choose the operating system family (e.g., Linux, Windows, FreeBSD). This helps to categorize the image for deployment. |
| OS type (KVM) | If you are using KVM virtualization, specify the corresponding OS type again for compatibility. |
| SCSI adapter | Select the SCSI (Small Computer System Interface) adapter type (e.g., BusLogic Parallel, LSI Logi Parallel, LSI Logic SAS, VMware Paravirtual). |
| SCSI adapter (KVM) | Choose the SCSI adapter specifically for KVM-based instances (e.g., LSI 53C895A, LSI 53C810, VirtIO SCSI, etc.,). |
| NIC Type | Choose the virtual network adapter type (e.g., E1000, E1000 Enhanced, VMXNET2, VMXNET3, Flexible). This determines how the network behaves on the instance. |
| NIC type (KVM) | Same as above, but specific to KVM environments (e.g., VirtIO (paravirtualized), Realtek RTL 8139, VMWare vmxnet3, Intel E1000). |
| Minimum RAM (MB) | Specify the minimum RAM required for this image to run properly. The “No Limit” allows flexibility. |
| Minimum CPU cores | Define the minimum number of CPU cores needed to deploy the image. Useful for ensuring performance. |
| Minimum disk size (GB) | Set a minimum disk size requirement when launching a new server from this image. |
| Connection type | Indicates the method of image access or provisioning. Use OTHER unless instructed otherwise. |
| User name | Specify the default username for accessing the server created from this image. This is often used for cloud-init or post-deployment scripts. |
| License price | Set a license fee (in USD) if you intend to offer the image as a paid template (optional, often left at 0). |
| Disk image size | Shows the base size of the disk image file. Usually matches the Disk Size at the top. |
| Min. size disk #2 | If this image supports or requires a secondary disk, specify the minimum size here. Use + Add disk to attach additional disk entries (e.g., 8). |
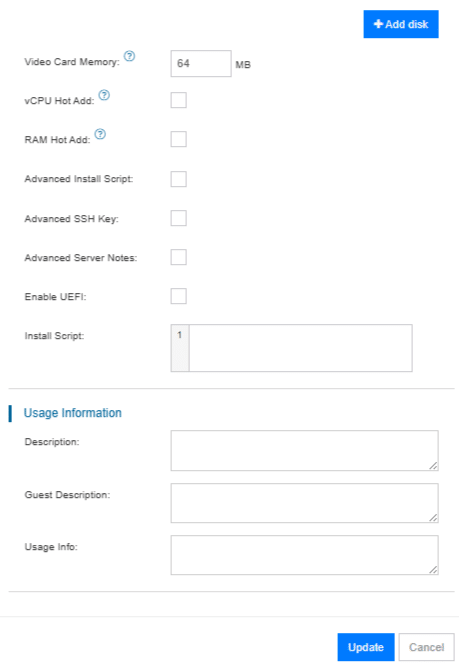
8. Once all the required fields are filled in, scroll down to view additional configuration options.
9. You can continue customizing the image by specifying advanced settings such as Video Card memory, vCPU Hot Add, RAM Hot Add, Advanced Install Script, Advanced SSH Key, Advanced Server Notes, Enable UEFI, Install Script. Under Usage Information, you will see Description, Guest Description, and Usage Info.
Description of each field is given in the table below.
| Fields | Description |
| + Add disk | Adds another virtual disk to the image. Useful for partitioning or storage flexibility. |
| Video card memory | Allocates video memory (in MB) to the server. Relevant for graphical user interfaces or GPU tasks. |
| vCPU hot add | Allows virtual CPUs to be added while the server is running, without needing a reboot. |
| RAM hot add | Enables dynamic memory scaling by allowing RAM to be added while the server is active. |
| Advanced install script | Enables the execution of a custom installation script during the provisioning process. |
| Advanced SSH key | Allows injection of a secure SSH key during setup for remote access without using a password. |
| Advanced server notes | Internal notes or metadata about the server, used for administrative reference. |
| Enable UEFI | Activates UEFI boot mode instead of legacy BIOS. Recommended for modern OS support and secure boot. |
| Install script | A custom script that runs during installation. Ideal for automated setup tasks such as software installation or system configuration. |
| Description | A general overview of the image’s purpose or setup, intended for administrators. |
| Guest description | A simplified or branded description visible to guest users or clients. |
| Usage info | Additional instructions or notes for using the image, such as login credentials, configurations, or dependencies. |
After entering all the required information in the respective fields, scroll down and click the Update button to save your changes. This action will apply the specified configurations to the image and finalize the setup. If you wish to discard the changes, you can click Cancel instead.
Provision your new server
10. Now, click on the Actions button located next to the image you just configured. From the dropdown menu, select the Create New Server option. This allows you to initiate the process of provisioning a new virtual server using the customized image configuration you have just completed.
Note:
- After clicking Create New Server, you’ll see the Origin Server Information section, which displays the selected Operating System and Zone. Toggle the Detailed button ON to access full configuration options. Under Choose Server specs, you can choose the server type, number of CPUs, amount of RAM, NVMe SSD storage capacity, and decide whether to enable daily backups or opt for managed services. Next, configure the networking settings by choosing between a public or private network, or both, depending on your requirements. You will then need to create a password, specify the number of servers you want to deploy, and assign a name to your server. Before finalizing the setup, you have the option to install scripts and create an SSH key, though these steps are optional. Finally, choose your preferred billing cycle– either monthly or hourly, based on your usage needs.
- For more details on server configuration, refer to “How to Configure and Manage Windows Server on Kamatera”.
After completing the configuration, click Create Server. Kamatera will deploy your server in less than a minute, and it will be ready to use. Click on Servers under My Cloud from the left-hand menu. Your new server will be reflected under the SERVER MANAGEMENT dashboard.
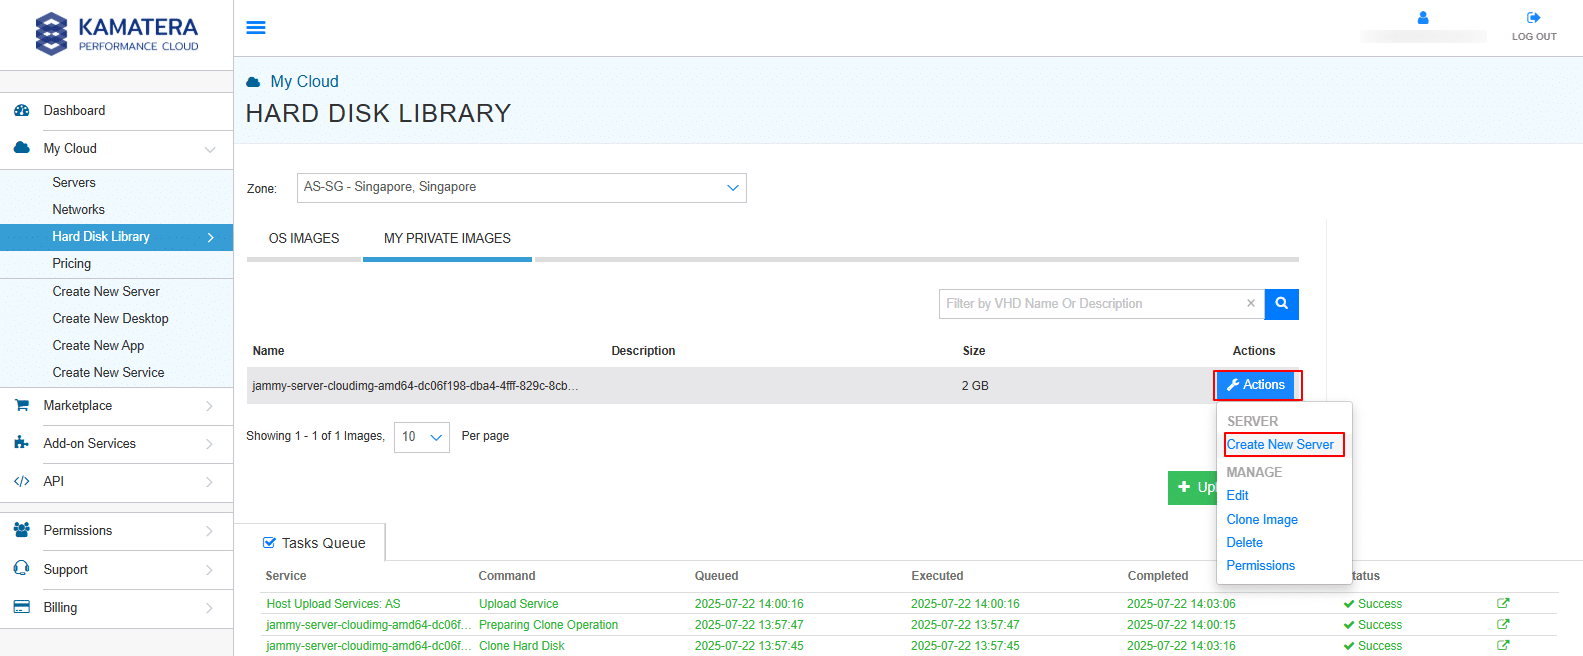
- In addition to Create New Server, the Actions button also provides the following options:
- Clone image: Create an exact copy of the selected image configuration for reuse or backup.
- Delete: Permanently remove the selected image from your library.
- Permissions: Manage access rights by defining which users or groups can view or modify the image.
Click on the Clone Image.
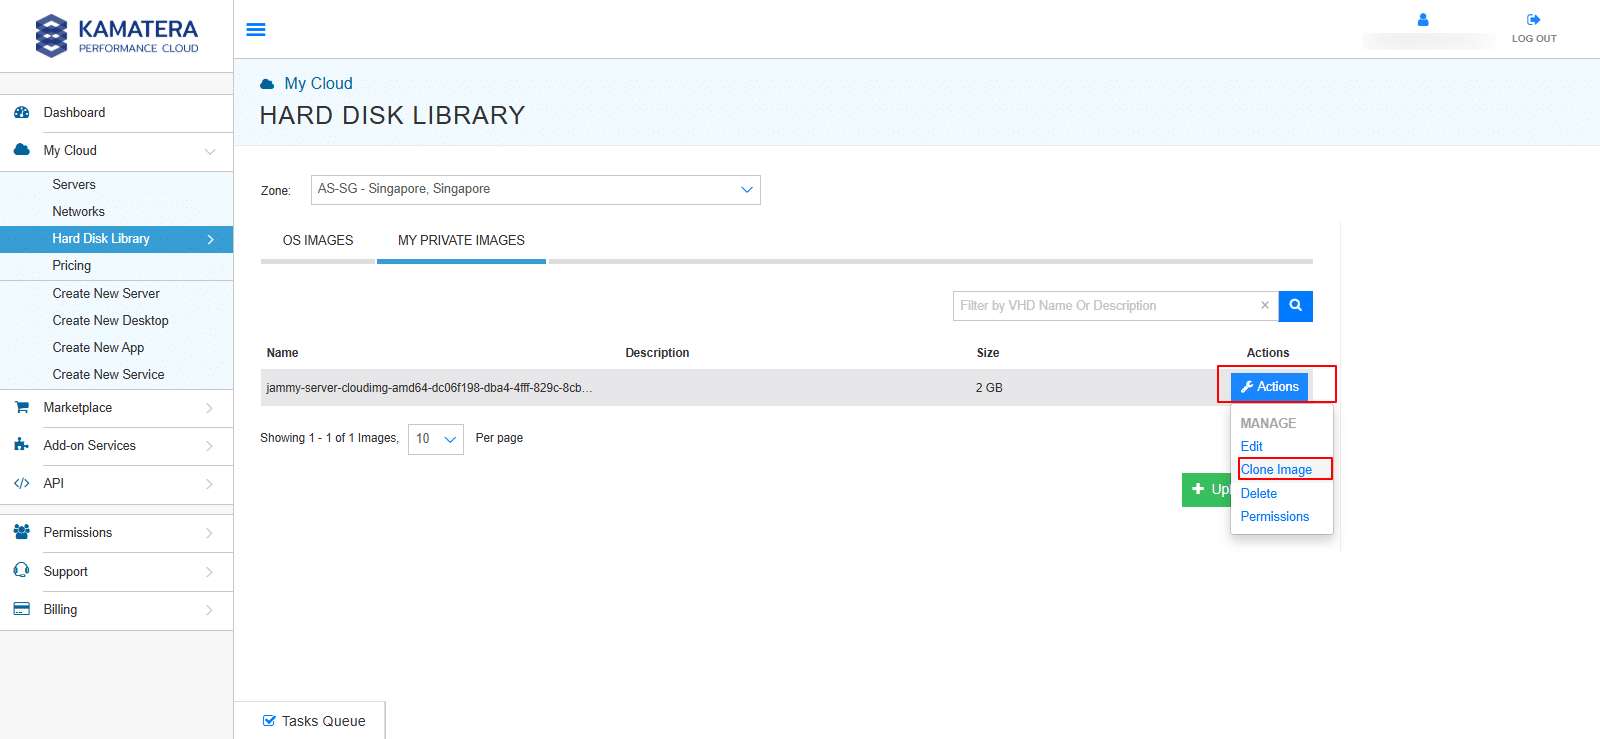
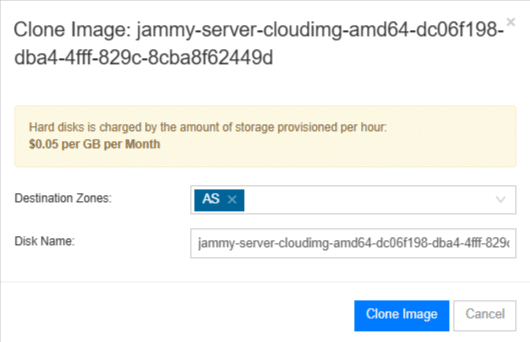
12. When you select the Clone Image option, a pop-up window appears prompting you to provide the following details:
- Destination Zones: Choose the data center location(s) where the cloned image should be stored. You can select one or multiple zones depending on your deployment needs.
- Disk Name: Enter a unique and descriptive name for the cloned image to help you identify it later.
Once the required information is filled in, click Clone Image to begin the duplication process. The new image will appear under MY PRIVATE IMAGES tab, once the cloning task is complete.
13. On the right-hand side of the screen, you will see the message: “Hard Disk Image task updated successfully.”
Click on Tasks Queue.
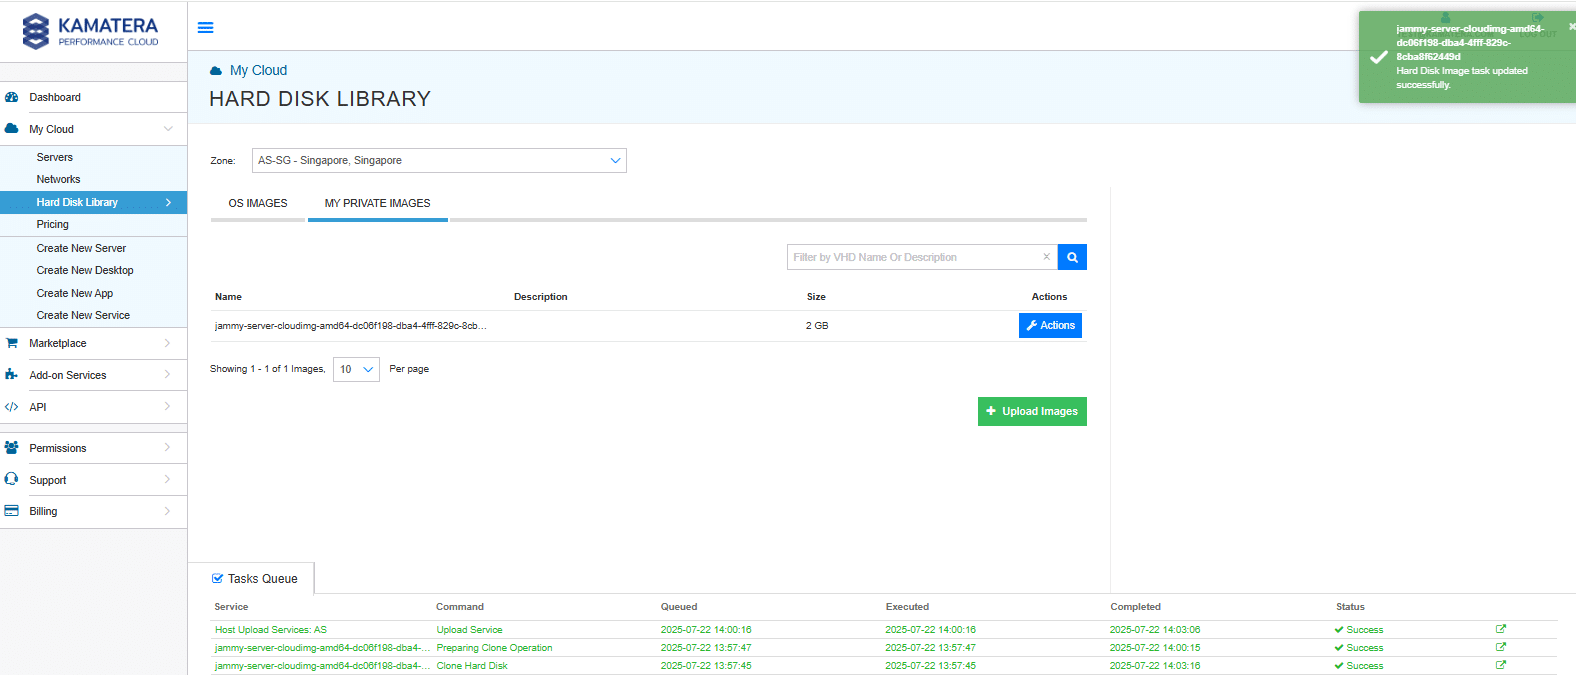
14. When you click on the Tasks Queue, all tasks that have been added are displayed, along with their current progress and status.
15. Once the task status changes to Success in the Tasks Queue, the cloned image will become visible under the MY PRIVATE IMAGES tab within the Hard Disk Library. This confirms that the cloning process has been completed successfully and that the new image is now ready for use. You can now perform additional actions on the cloned image such as editing its configuration, creating a new server from it, or managing its permissions just as you would with the original image.
Download from S3 compatible storage
From the Upload Method drop-down menu, if you select Download from s3 compatible storage, a form will appear prompting you to enter specific details required to fetch the image from your S3 bucket. This method is used to directly import virtual disk images stored in an S3-compatible cloud storage system, such as AWS S3, etc. The form includes fields for storage access credentials and file location and lists the supported file formats and limitations for compressed archives.
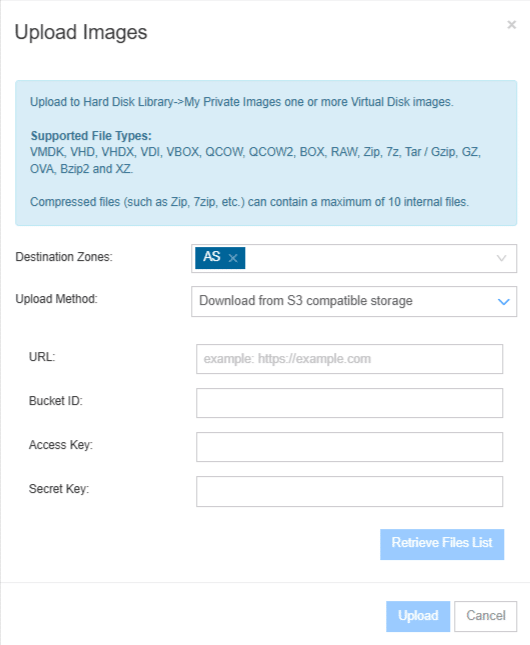
The table below gives the description of each field
| Field | Description |
| URL | Direct path to the image object in your S3 bucket (e.g., https://bucket-name.s3.amazonaws.com/image.qcow2) |
| Bucket ID | The name or ID of the bucket where your image is stored |
| Access Key | Your S3 access key for authentication |
| Secret Key | Your S3 secret key for secure access |
Upload via Object Storage
From the Upload Method drop-down menu, if you select “Upload via Object Storage,” a form will appear prompting you to enter the Destination Zones, select the appropriate S3 storage location from the Bucket Datacenter drop-down, and either create a new bucket or retrieve an existing files list.
This process enables you to upload supported virtual disk images (e.g., VMDK, VHD, QCOW, etc.) into your MY PRIVATE IMAGES section in the Hard Disk Library. If no upload bucket is found in the selected datacenter, you will need to create a new one by clicking Create New Bucket before proceeding with the upload.
Uploading custom virtual disk images to Kamatera’s hard disk library using methods like S3-compatible storage, direct URL, or object storage offers flexibility and control over your server deployments. By following the steps outlined above, you can easily manage, edit, and clone images within your chosen data center zone ensuring fast, reliable access when creating new servers. Whether you’re migrating existing systems or setting up pre-configured environments, this streamlined upload process helps you get up and running quickly.