


PostgreSQL is an open source, object-relational database which extends the SQL language and runs on Linux/Unix platforms. Having the ability to run on all operating systems, it supports image, video, and audio storage and supports graphical data as well. It does share core features with SQL, but it’s an open-source platform and offers advanced SQL functions, including foreign keys, subqueries, and triggers.
By default, PostgreSQL comes with a user called doadmin that has full access to all databases you create. However, it’s better not to use doadmin for everyday tasks. Instead, create other users with only the permissions they actually need. This keeps your database more secure.
If you’re deploying PostgreSQL on Kamatera, you can simplify setup by using Kamatera’s ready-to-use PostgreSQL app image. This pre-configured image allows you to get started quickly and focus on configuring access and security from the start. This guide covers how to manage user privileges in PostgreSQL effectively. It is intended for database administrators and developers who want to enforce proper access controls and maintain data security and integrity.
Before you make changes to your configuration, it’s a good idea to back up all critical databases and configuration files. We recommend doing this by taking a server snapshot. Here are the step-by-step instructions to create the snapshot.
Understanding PostgreSQL roles and privileges
- Roles
Imagine roles as the gatekeepers of your database, deciding who gets in and what they can do. It can either be a single user or a group of users. You must have CREATEROLE privilege or be a database superuser to use this command.
- Privileges
Privileges are actions a role can perform to do data manipulation. These include commands like SELECT, INSERT, UPDATE, CREATE, and DELETE. With privileges users can read the data using the Select command. Insert, Update, and Delete allow users to make any modifications to the data. Create command allows you to create tables or databases.
How to create roles
The following syntax is used to create the roles, to which further privileges can be assigned using the grant command as shown below.
Step 1. Create a role and assign user role privileges.
Step 2. Grant privileges to the user role on objects or tables or schemas for further actions.

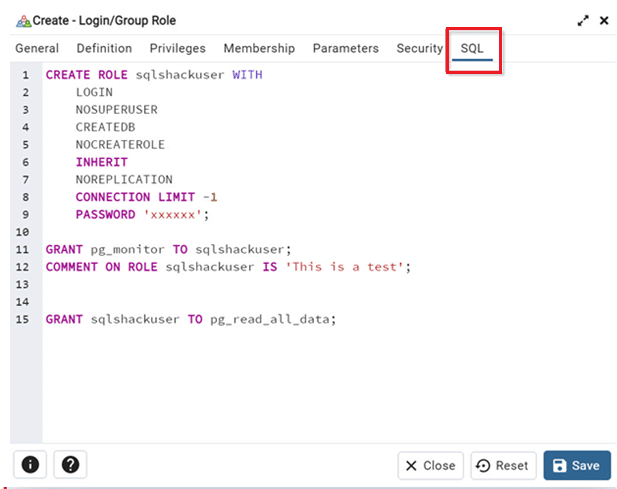
The privileges used after the syntax ‘WITH’ are further used to define what rights are to be provided to the user role being created. Further each parameter has its own description. In the attached image shown, the privileges/parameters used are as described below.
Note: Each privileges/parameter comes with its denial role, restricting it from performing any actions as such and not providing any privileges.
- ROLE NAME: The name of the new role that the user wants to create. Like in the above image, the role name is ‘sqlshackuser’.
- LOGIN: This parameter defines whether a role is allowed to log in to the database. If a role has the LOGIN attribute set, it means it can be used as a user account to start a session because roles with LOGIN are considered users. However, if LOGIN attribute is not defined then by default this attribute NOLOGIN is considered under which a user cannot log in—they’re mainly used to group and manage permissions, not to access the database directly.
- NONSUPERUSER: This attribute is by default setting in case no SUPERUSER attribute is defined. SUPERUSER, on the other hand, can override all access restrictions within the database.
- CREATEDB: This clause defines a role’s ability to create databases. If not specified, NOCREATEDB is the default. Only superuser roles with CREATEDB can specify CREATEDB.
- NONCREATEROLE: It is a by default denial parameter in case its opposite attribute CREATEROLE is not defined. CREATEROLE permits to create, alter, drop, comment on, and change the security label for other roles
- INHERIT: This attribute allows users to derive data from one table to another. The new table here will be considered as a child table while the data being derived from will be the parent table. To understand better the SQL command will be as follows:
CREATE TABLE books (author text, publisher text, isbn text) INHERITS (products);
Here the books table inherits all the columns of the table products, including three additional columns that are specific to books.
- NONREPLICATION: In PostgreSQL, NONREPLICATION is used to clearly say that the user should not have replication rights which let a user copy data from the database, for example, for setting up a standby server.
- CONNECTION LIMIT ConnLimit: Once logged in, it specifies how many concurrent connections the role can make. By default, the range is set to -1, meaning no limit.
- PASSWORD: It is used to set the password for a role. This can only work if the LOGIN attribute is defined for the role. If no password is specified, be default, the password authentication will be treated as null which can be written also as PASSWORD NULL, and authentication will fail every time user tries to login.
Understanding the difference: User role privileges vs GRANT and REVOKE
Before we GRANT and REVOKE (MODIFY) the privileges, it is important to understand its difference with user role privileges provided above.
When we create a user role and assign privileges to it means creating a user role with specific capabilities in PostgreSQL (as shown in Step 1 above). Whereas GRANT and REVOKE are used to define what the user can do with specific database objects (tables, schemas, etc.) as shown in step 2 above.
| TYPE | Purpose | Applies To | Example |
| CREATE ROLE … WITH | Role-level capabilities | The role itself (what it can do in general) | CREATE ROLE Admin WITH CREATEDB; |
| GRANT / REVOKE | Object-level privileges | Tables, views, schemas, sequences, functions, etc. | GRANT SELECT ON books TO Admin; |
We will learn more about step 2, where we have different examples to learn about that.
Modifying user privileges
To modify user privileges in PostgreSQL, you use the GRANT and REVOKE commands. GRANT Statement.
Granting privileges to roles
The ‘GRANT’ statement is used to assign a single or multiple privileges to a specific role per the need. It works on database objects including tables, views, and functions as highlighted.
- Single privilege
Syntax:
‘GRANT privilege ON object TO role;’.
Example: ‘GRANT SELECT ON my_table TO my_user;’
Note: Here ‘SELECT’ is the only privilege being provided.
- Multiple privileges
If multiple privileges are to be provided to a single role, that can be done at once. Use a comma-separated list as shown in the syntax below.
Syntax:
Example: ‘GRANT SELECT, INSERT ON my_table TO my_user;’
Note: Here ‘SELECT’ and ‘INSERT’ are 2 different privileges.
Revoke privileges
The ‘REVOKE’ statement is used to remove it take back the permissions or privileges from a user or a role on an object. But you can only revoke the privilege you granted, you cannot revoke the privilege you didn’t grant unless you are a superuser or the owner. The steps are explained below using an image for reference.
- Revoke single privilege
Syntax:
REVOKE privilege_list ON object FROM role_name;
For example: REVOKE SELECT ON employees FROM john;
Note: Here ‘SELECT’ is the only privilege being removed from the employees table from the role john.
- Revoke multiple privileges
If multiple privileges are to be removed to a single role that can be done at once. Use a comma-separated list as shown below.
Syntax:
REVOKE privilege1, privilege2, … ON object FROM role_name;
For example: REVOKE SELECT, INSERT, UPDATE ON customers FROM analyst;
Note: This command removes SELECT, INSERT, and UPDATE privileges on the customers table from the role analyst in a single attempt.
- Revoke all Privileges
If all the privileges are to be revoked and assigned to one role on a table, then that can be done following the below syntax for the command.
Syntax:
REVOKE ALL PRIVILEGES ON object FROM role_name;
For example: REVOKE ALL PRIVILEGES ON salary FROM accounts_team;
Note: The role accounts_team loses all access to the salary table.
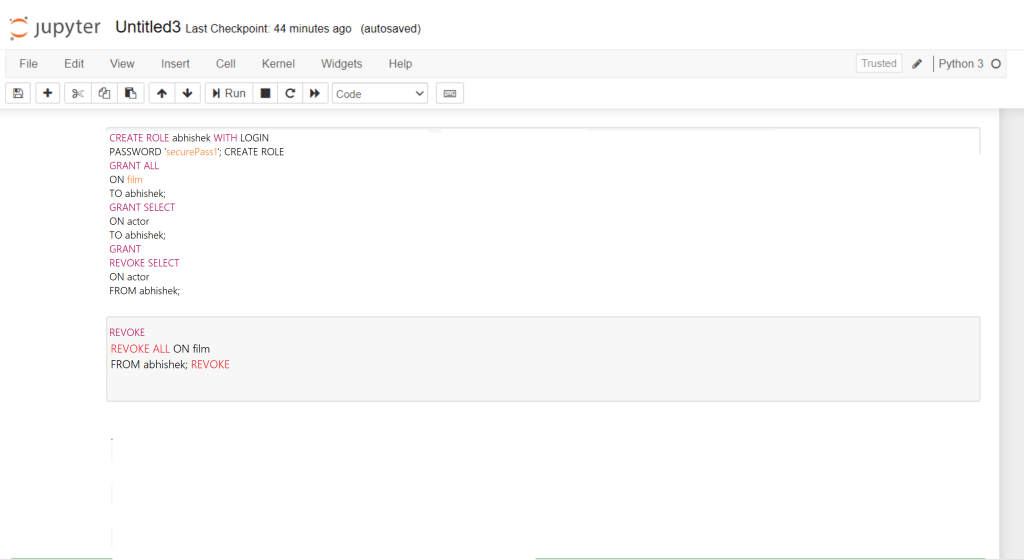
Step 1: To CREATE user role and assign user privileges.
Step 2: To GRANT role and assign privileges.
Step 3 To REVOKE/ MODIFY user privileges.
Note: The role accounts_team loses all access to the salary table.
And that’s it! Those are all the steps you need to understand PostgreSQL roles and privileges.