


Kubernetes is a powerful platform for managing containerized applications. In Kubernetes, the smallest deployable units are called pods. Pods contain one or more containers that can share storage and network namespaces. Kubernetes optimizes resource usage by distributing workloads, allows applications to run across different environments, and automatically scales applications, based on availability. Its rich features and extensive ecosystem make popular choices for organizations interested in improving their deployment and its efficiency.
With Kamatera’s flexible and high-performance cloud infrastructure, users can easily deploy and manage Kubernetes clusters tailored to their needs. This allows organizations to support scalable, cost-effective, and resilient application deployments. There a couple of prerequisites to have before you can follow these steps to deploy Kubernetes on your Kamatera cloud server.
Prerequisites:
- Enable Hyper V and WSL
- Install Docker Desktop
First, let’s create an account on Kamatera.
Go to console.kamatera.com and sign up for an account by providing the following information:
- Verify Your Email: Click the verification link sent to your email by Kamatera.
- Password: Enter your password.
- Repeat Password: Re-enter your password and click Create Account.

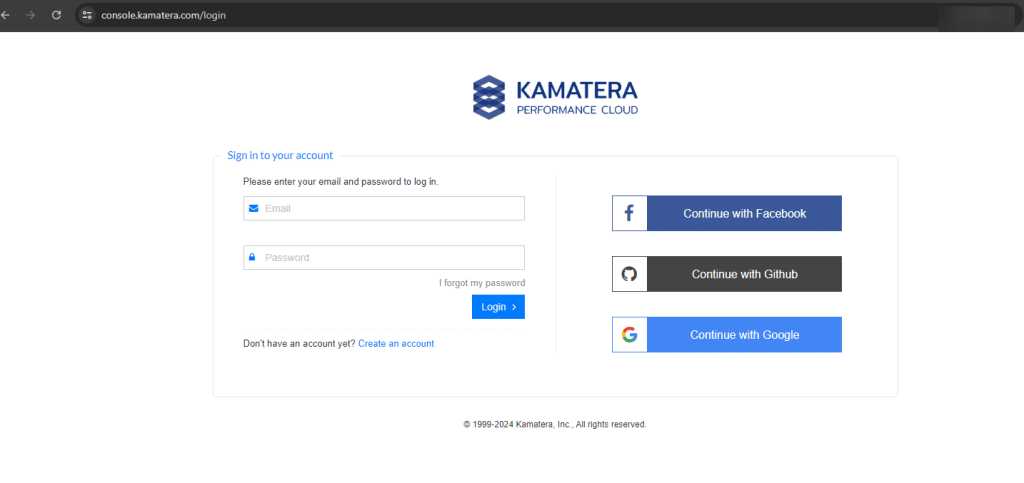
Access the Kamatera Management Console
Enter your credentials to access the Kamatera management console and Click Login.
2. Navigate to My Cloud on the left pane, select Servers and click on Create New Server or click on Create New Server on the right pane.

Choose the zone that works best for you:
- Asia
- North America
- Europe
- Middle East
Note: For this setup, we used the Asia server domain to set up a Windows server.

Now, choose an image.
Kamatera offers a variety of app and server images to help users set up preconfigured resources. Users can explore options such as:
- Server OS images
- Desktop OS images
- App images
- Service images
- My private images
Choose Server OS Images and select Windows Server.
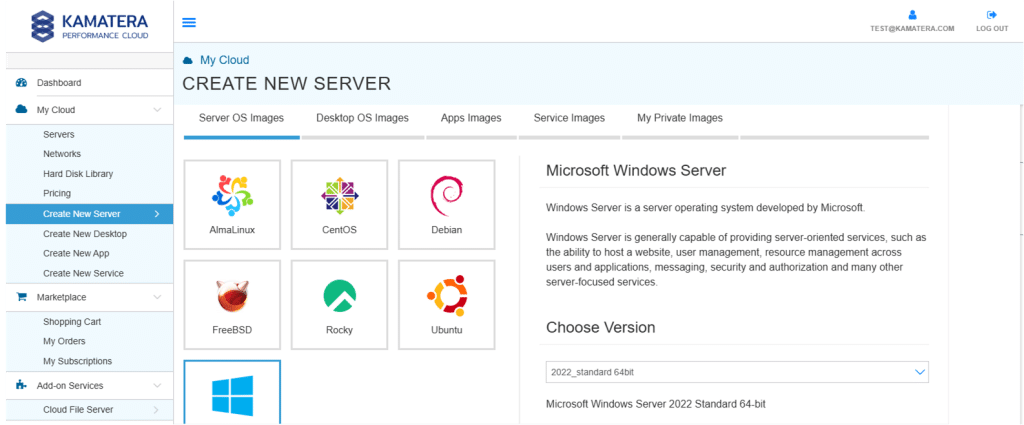
In Choose Version, select the latest version of Microsoft Windows Server (2022_standard 64-bit).

Upon selecting the version, the license prices are displayed.
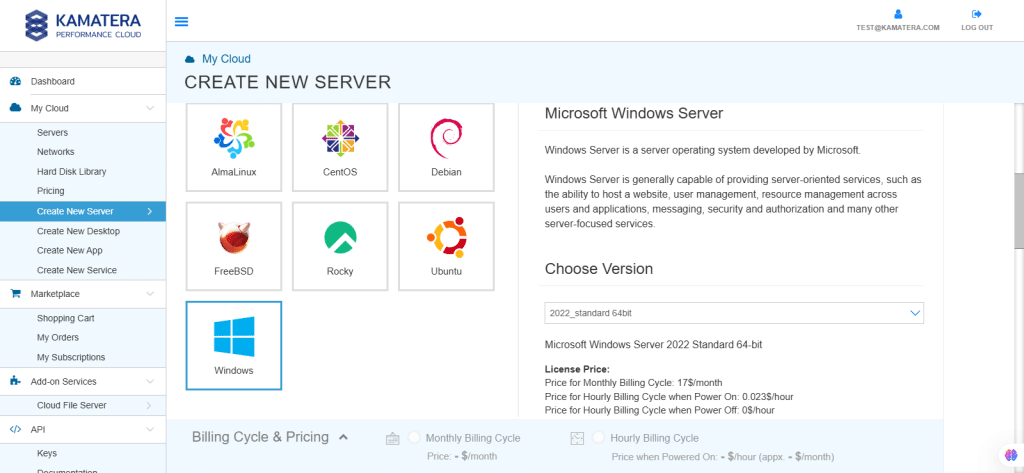
Toggle the Detailed view button enable to view the detailed description, including the price.
For this use case, below server specifications are selected. You can configure it as you wish.
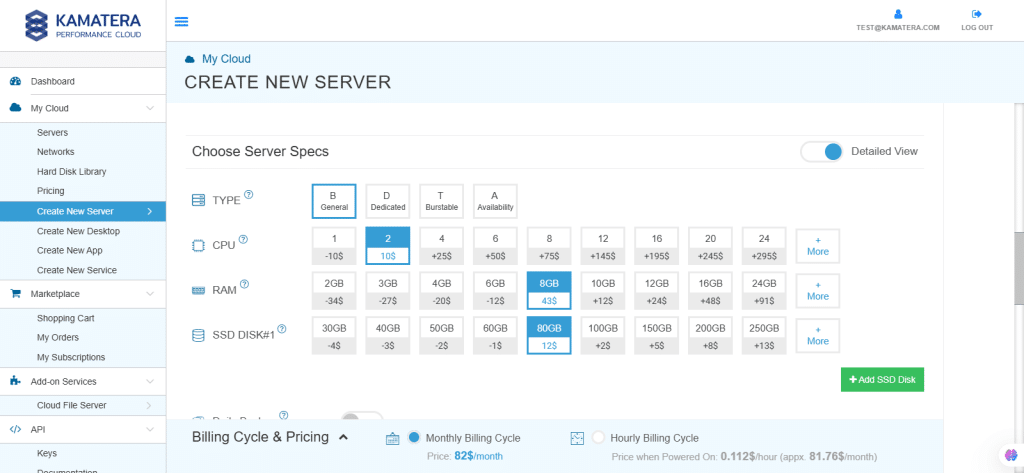
Choose server specs
| Field | Description |
| Type | Type B-General Purpose: Server CPU are assigned to a dedicated physical CPU thread with reserved resources guaranteed.
Type D–Dedicated: Server CPU are assigned to a dedicated physical CPU Core (2 threads) with reserved resources guaranteed. Type T-Burst: Server CPU are assigned to a dedicated physical CPU thread with reserved resources guaranteed. Exceeding an average usage of 10% will be extra charged for CPUs usage consumption. Type A-Availability: Server CPUs are assigned to a non-dedicated physical CPU thread with no resources guaranteed. Note: More information on CPU types is available on the My Cloud-Pricing page. |
| CPU | Choose the number of vCPUs that will be installed on the server. Type B/T can be configured with up to 104 vCPUs per server. Based on Intel’s latest Xeon Processors, 2.7 GHz+. |
| RAM | Choose the amount of RAM that will be installed on the server. Type B/T/D can be configured with up to 512GB RAM per server. |
| NVMe SSD DISK | Choose NVMe SSD Storage Size. You can add up to 15 NVMe SSD Disk. NVMe SSD Storage includes unlimited IOPS and unlimited storage bandwidth, free of charge. |
| Daily Backup | Toggle the switch to enable extended daily backups of your server’s storage to external backup storage. |
| Management Services | Toggle the switch to enable Management Services to the server’s operating system by Kamatera Technical Support Team. |
Choose networking
Users can select the network they wish to use, whether it is a public Internet network or a private local network.

Simple mode
| Field | Description |
| Public Internet Network | Check to connect the server to a network interface connected to Public Internet Network. |
| Private Local Network | Check to connect the server to a network interface connected to Private Local Network. |

Advanced mode
| Field | Description |
| NIC #1 | Select WAN from the options available in the drop-down menu.
Select auto from the options available in the drop-down menu.
Select auto from the options available in the drop-down menu.
|
| WAN Traffic | Select 5000 GB per month/ on 10 Gbit per second port. |
Advanced Configuration
Hide: To hide the advanced configuration.
Show: To see the advanced configuration.
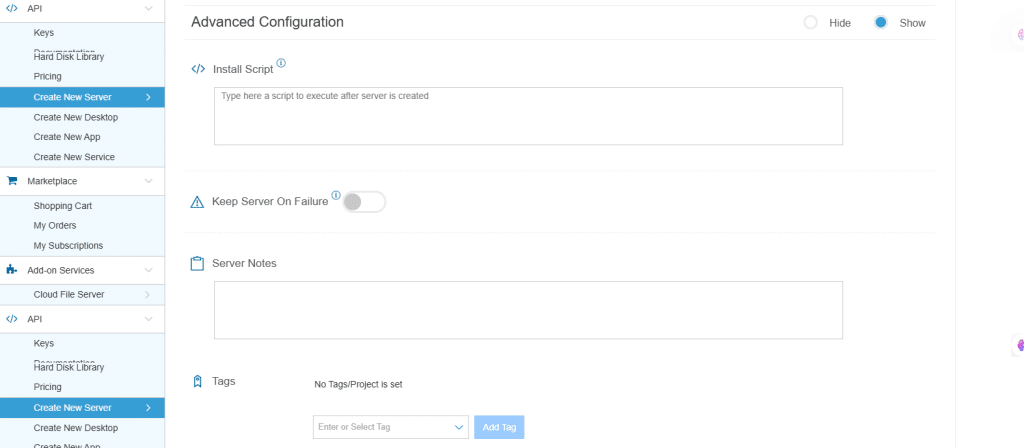
| Field | Description |
| Install script | Enter the script here to execute once the server is created.
Note: For Windows system use Power Shell. |
| Keep server on failure | Do not terminate server if start up acript or provisioning fails |
| Server notes | Enter any server notes to be noted. |
| Tags | Select the Tags from the drop-down menu and click Add Tag. |
Finalize Settings
Finalize settings by setting the password, re-validating it, selecting the number of servers, specifying the server name, and enabling the Power On Servers option.
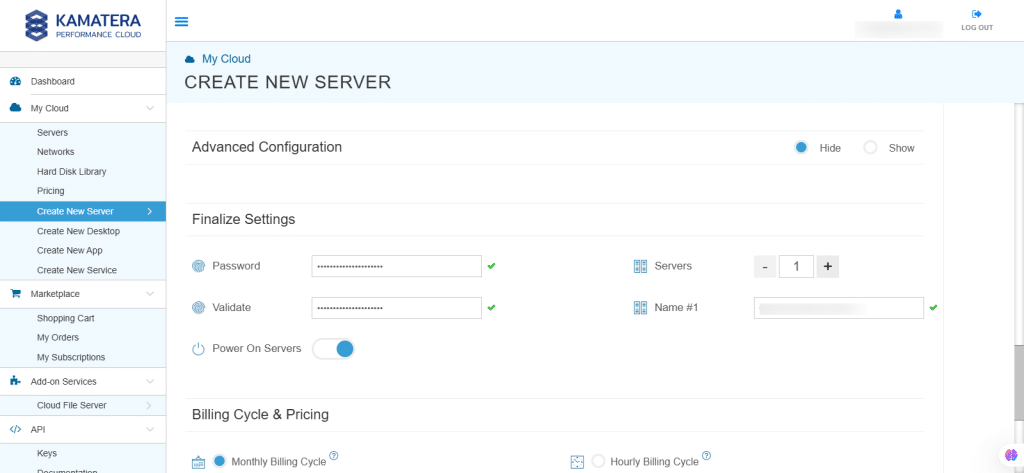
| Field | Description |
| Password | Select password
Password allowed characters: a-z, A-Z,0-9 !@#$^&*()~ and must need the following requirements:
|
| Validate | Re-enter the password to validate. |
| Servers | Select the number of servers the user wants. |
| Name # 1 | Enter the name of the server. |
| Power On Servers | Switch on the toggle button to see the details |
Note: Once the user enters the details in Finalize Settings, they can select either monthly or hourly billing.
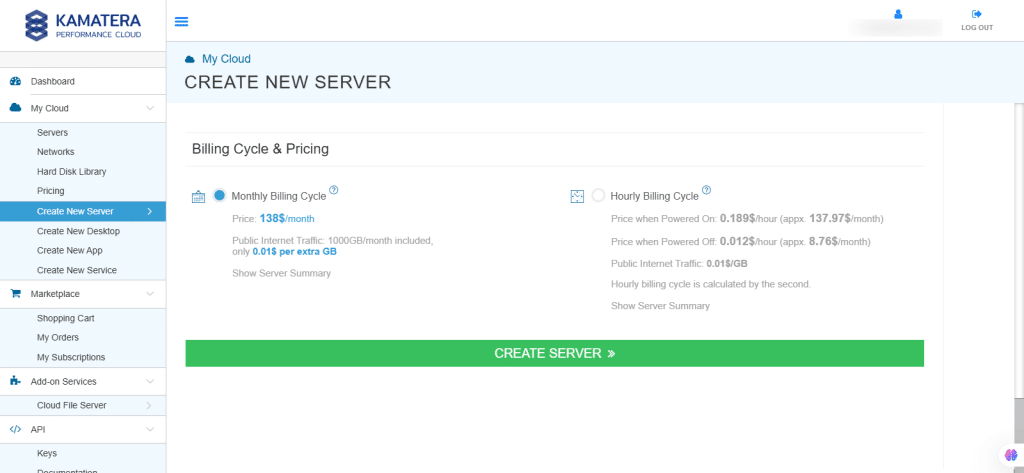
Billing cycle and pricing
Note: The Server Summary displays the location, operating system (including server specifications), add-on services, servers, and pricing.
Click Create Server.
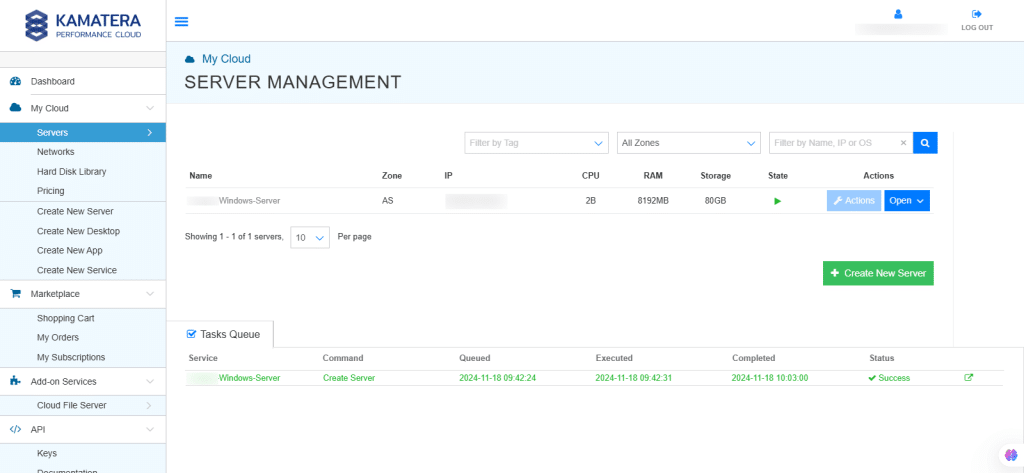
Click on Tasks Queue to see the progress of installation of Windows Server.

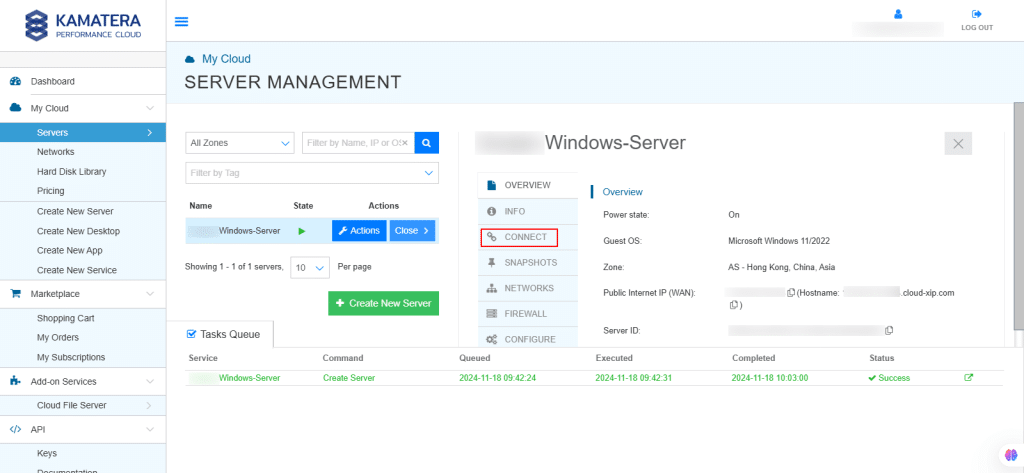
The server will be created and will appear on the Server Management screen. Once the server is created, click Open.
A new screen shows up. Overview tab in the center is selected by default. It displays information like Power state, Guest OS, Zone, Public Internet (WAN), Server ID of the server and Configuration-Number of CPU. Memory Size, Disk 1.
Click on Connect to connect to Windows Server.
Connection credentials like Connection Type, Username, and Password are shown. Now, click on Open Remote Console.
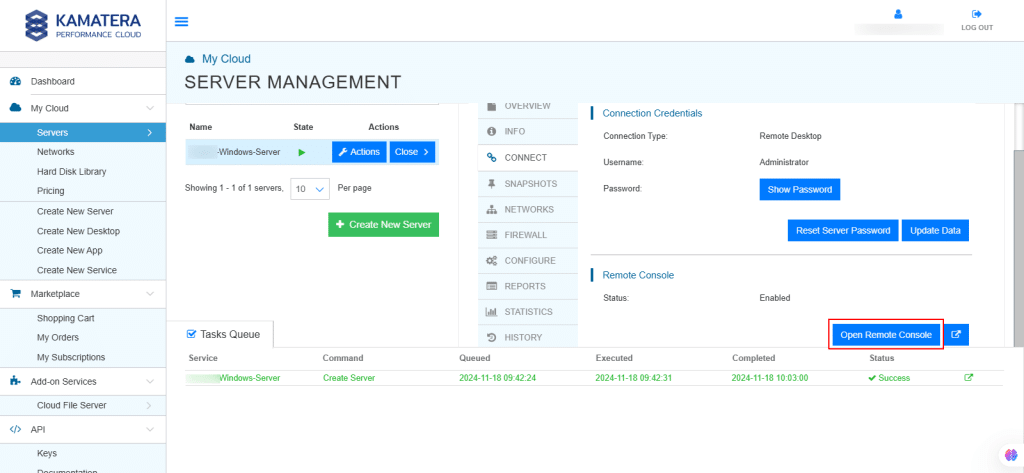
A new tab opens, connecting to the new server and displaying the Server Manager Dashboard.
Install Docker on Windows
Docker is a platform for developing, shipping and running applications using containerization. Docker provides a unit of software called a container, where it packages the codes and its dependencies so that applications can be run on different environments.
Step 1: Installing Docker Desktop on Windows. Docker Desktop is an all-in-one package to run containers, build images and much more. Go to www.docker.com or directly to the link below and install Docker for Windows.
https://docs.docker.com/desktop/install/windows-install
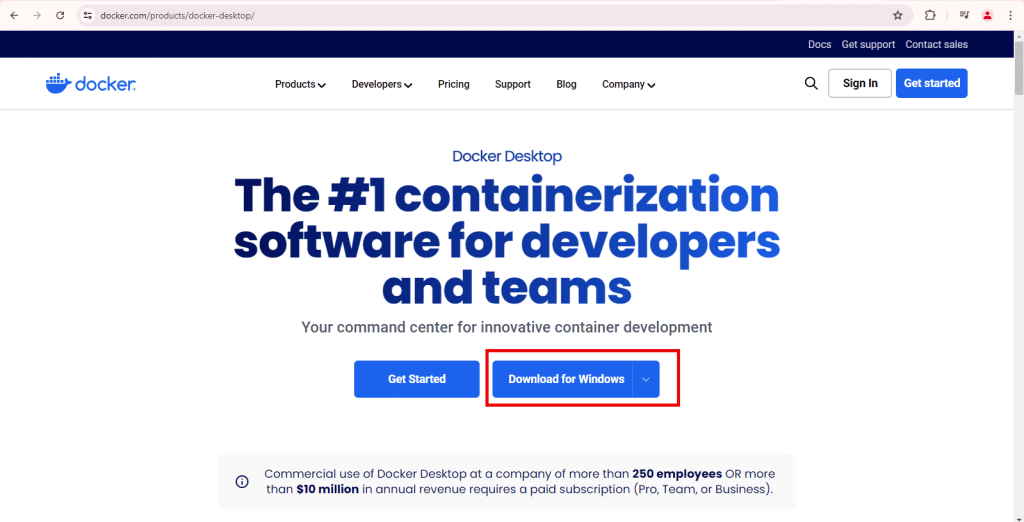
This page contains the download URL, information about system requirements, and instructions on how to install Docker Desktop for Windows.
Docker Desktop for Windows – x86_64
Docker Desktop for Windows – Arm (Beta)
Step 2: The following hardware prerequisites are required to successfully run WSL 2 on Windows 10 or Windows 11.
- 64-bit processor with Second Level Address Translation (SLAT)
- 4GB system RAM
- Enable hardware virtualization in BIOS.
Your machine must have the following features for Docker Desktop to function correctly:
- Virtual Machine Platform.
- Windows Subsystem for Linux (WSL).
- Hyper-V (Docker Desktop requires Hyper-V and the Hyper-V Module for Windows PowerShell to be installed and enabled). The Docker Desktop installer enables it for you.)
- To install Kubernetes, install Windows Hypervisor platform.
If you manually uninstall Hyper-V, WSL 2 or turn off virtualization, Docker Desktop cannot start.
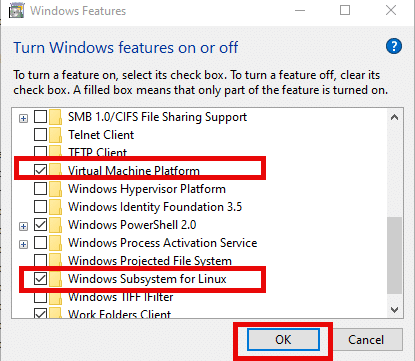
Step 3: Go to Control Panel, select Programs and Features.

Step 4: Select Turn on Windows Feature on/off.
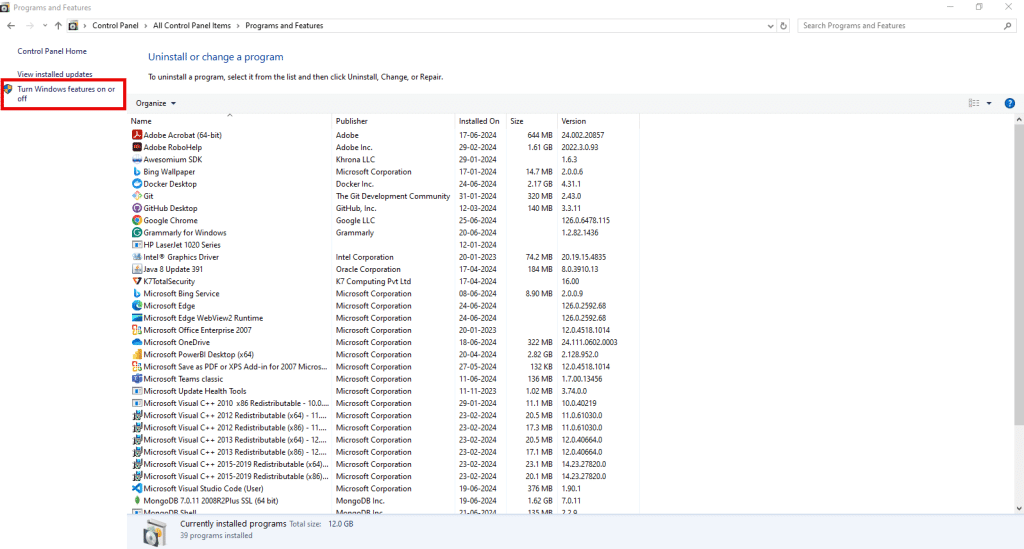
Step 5: Select Virtual Machine Platform and Windows Subsystem for Linux (WSL) and Windows Hypervisor Platform and click Ok.
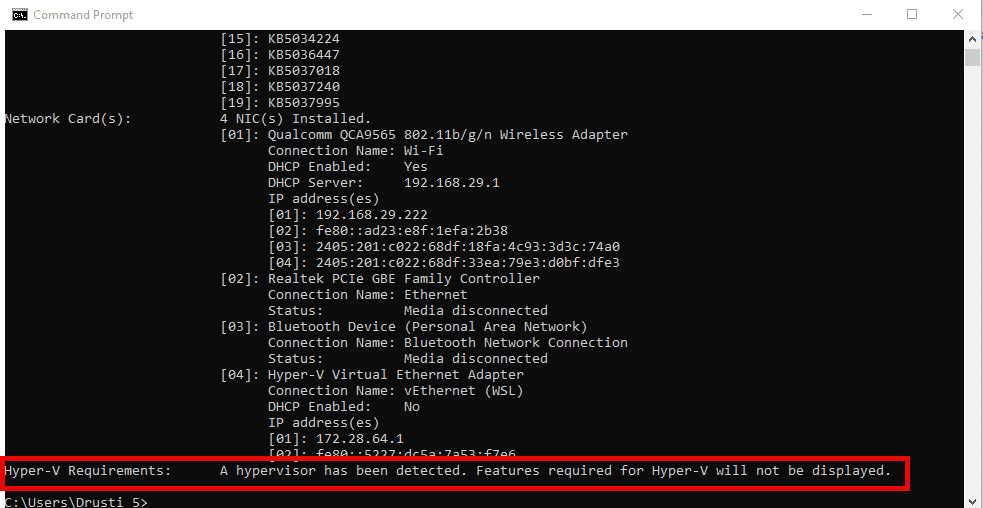
Step 6: Go to command prompt to check whether Windows Subsystem for Linux (WSL) and Hyper V (hardware virtualization) are enabled or not.
If you see the message “Hyper-V requirements: A hypervisor has been detected. Features for Hyper-V will not be displayed”. Then virtualization is enabled.
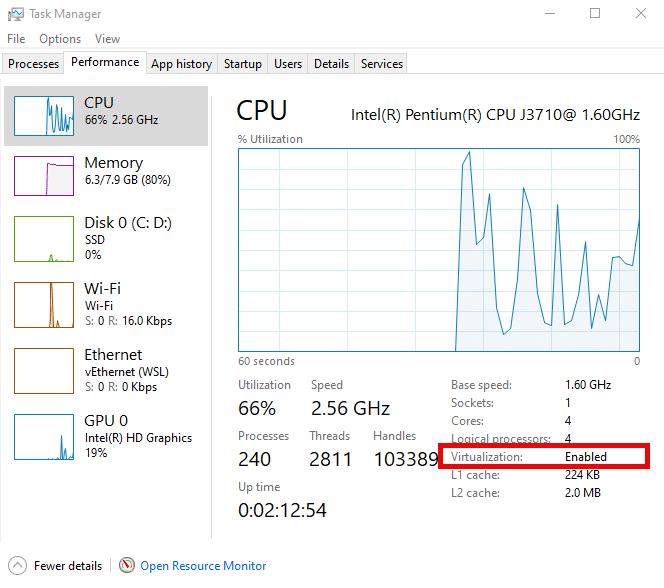
If you want to check whether Virtualization is enabled or not go to the search bar, type Task Manager and click on Open. Click on details, select Performances.
Step 7: Once they are enabled, reboot your PC.
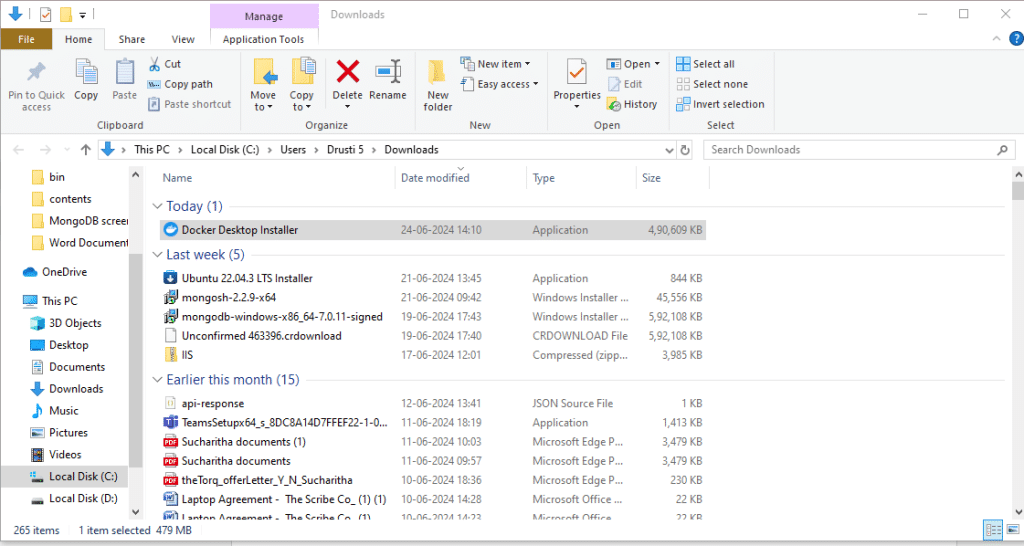
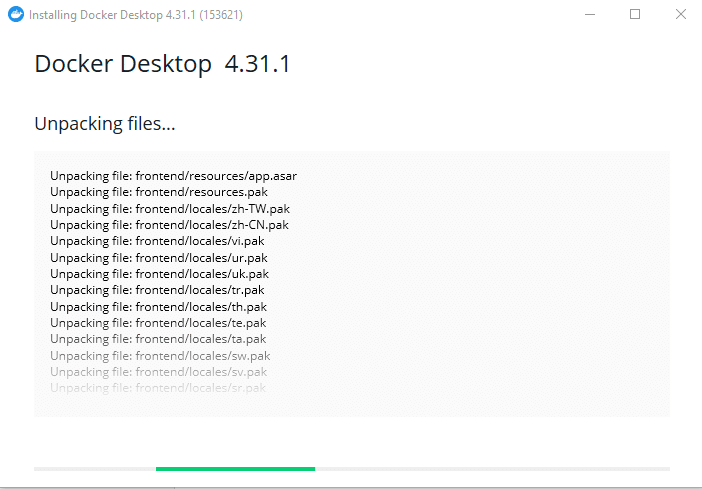
Step 8: Now, go to Downloads and select Docker executable file to run it.
Step 9: When the files are downloading, the screen below will show up.
Step 10: After it is installed, you can use recommended settings or use advanced settings and click on Finish.
Step 11: View full terms and click Accept.

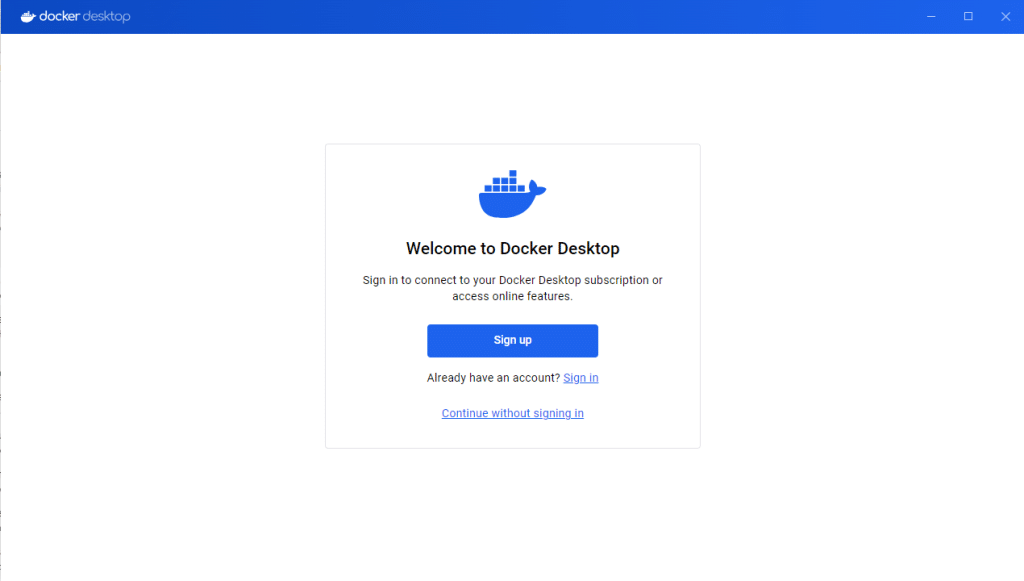
Step 12: Once the docker desktop is installed, you will see the welcome page. If you already have an account, click on Sign in, other you can create a new account by Sign up. If you don’t want to sign in, then click on Continue without signing in.
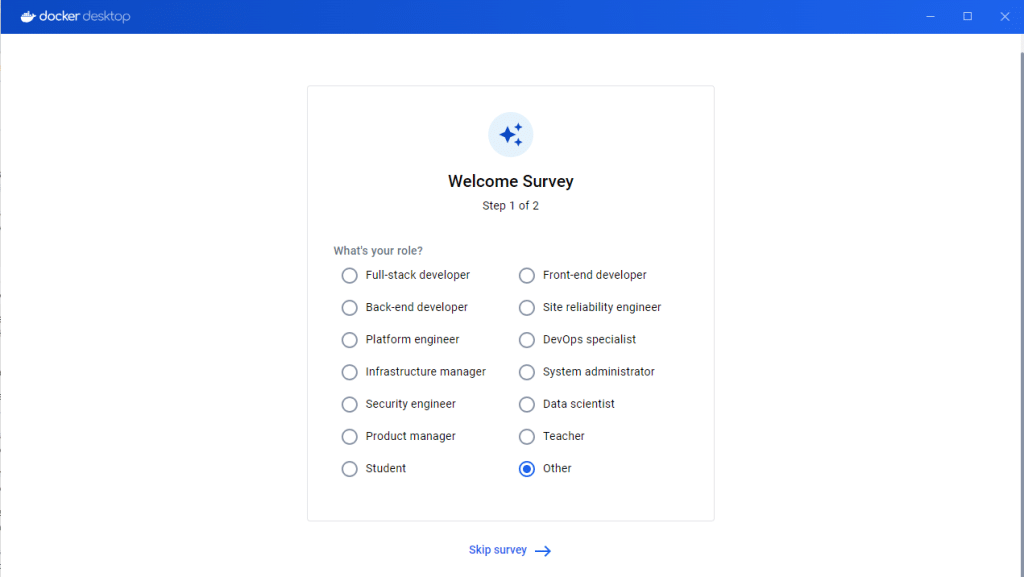
Step 13: You can skip the survey page by clicking on Skip survey.
Step 14: Now, you can see the docker desktop page, where you can see Containers, Images, Volumes, Builds, Docker Scout, and Extensions on the left navigation menu. You can create your own containers.

Install Kubernetes on Windows 10
Docker Desktop includes a graphical user interface (GUI) tool that allows you to change some settings or install and enable Kubernetes.
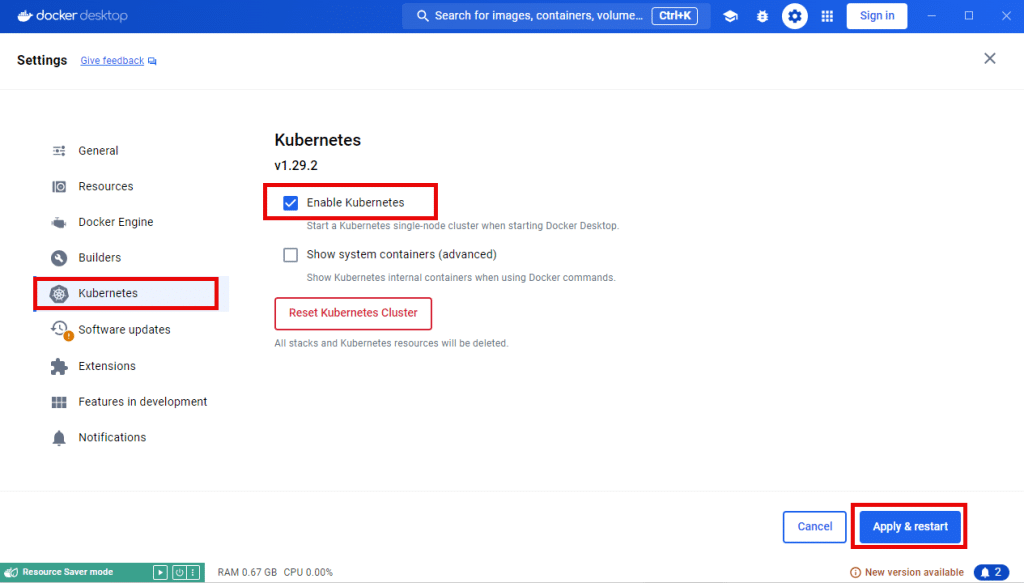
Step 1: To install kubernetes, select Settings in Docker Desktop and click on Kubernetes on the left panel.
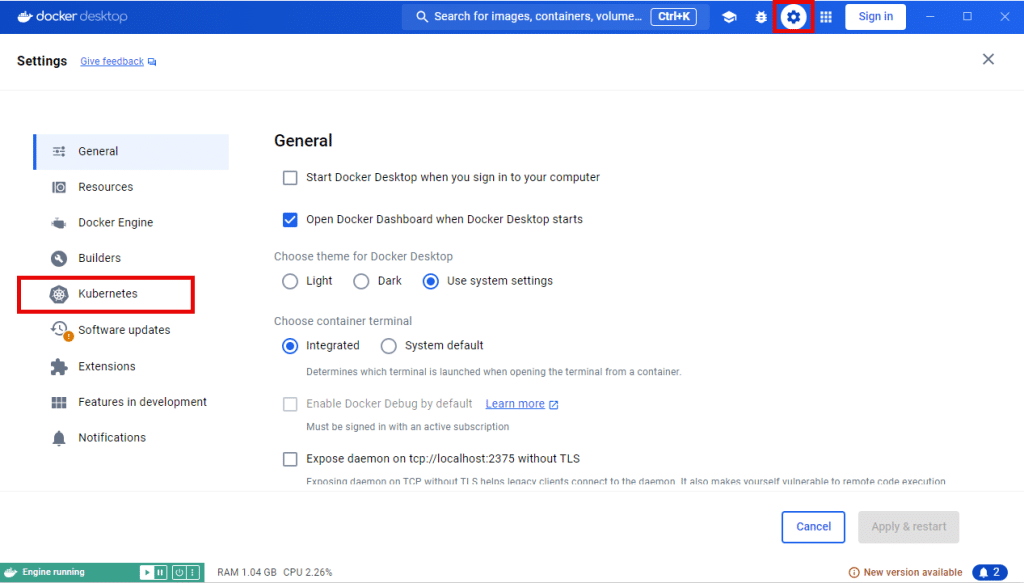
Step 2: Check Enable Kubernetes and click “Apply & restart“.
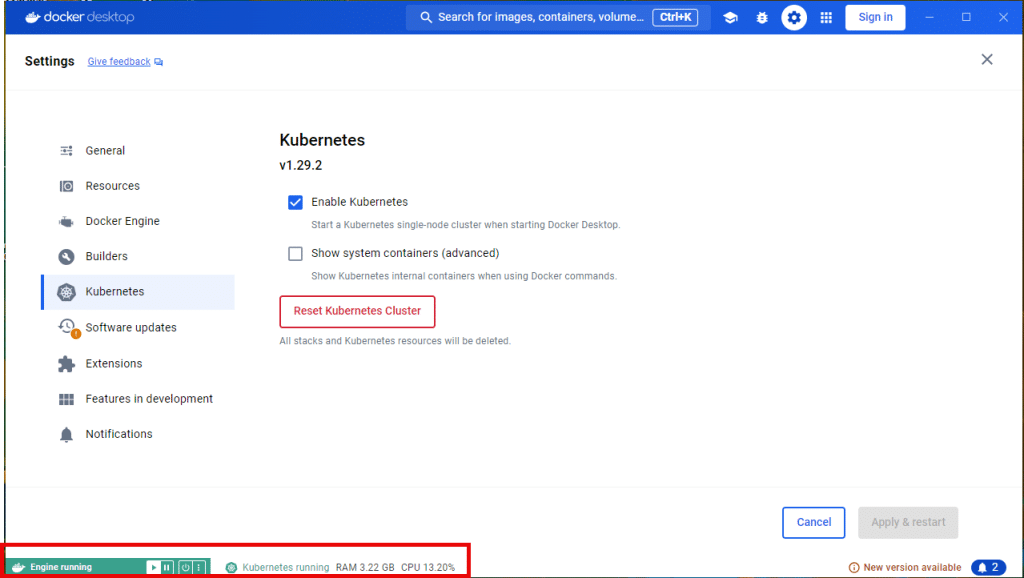
Step 3: Docker will install additional packages and dependencies during the installation process. Wait until the message ‘Installation complete!’ appears on the screen. The Docker app can be used after Kubernetes has been installed to ensure that everything is working properly.

You can see both icons at the bottom left will turn green if both services (Docker and Kubernetes) are running successfully and without errors.
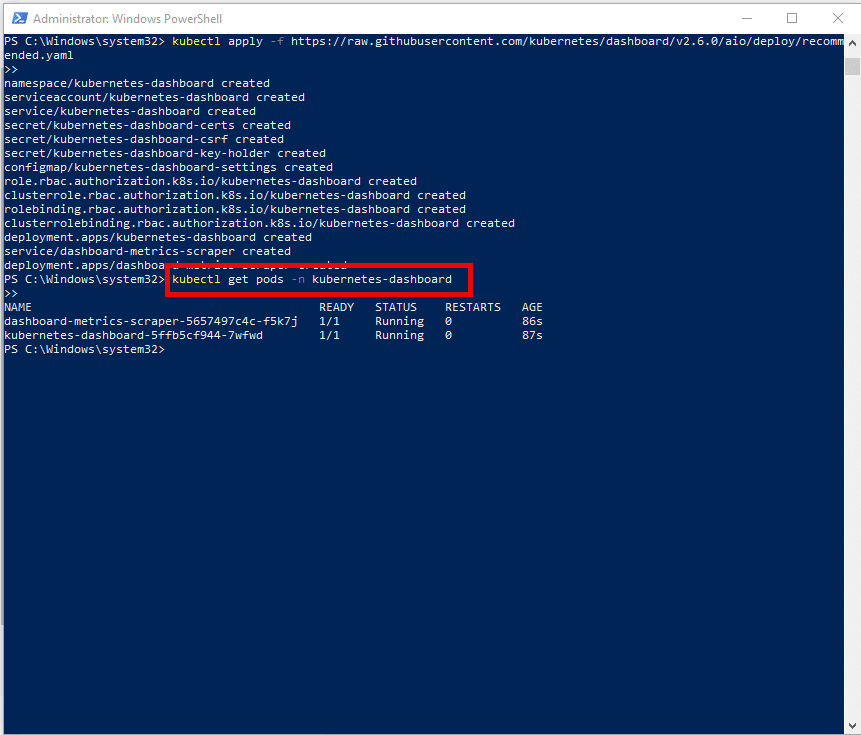
Step 4: Now, we have to install the Kubernetes dashboard, as it is not set up by default. Kubernetes applications can be easily deployed using the cli tool kubectl, which allows you to interact with your cloud and manage your Pods, Nodes, and Clusters.
You can get the yaml configuration file from here:
https://raw.githubusercontent.com/kubernetes/dashboard/v2.6.0/aio/deploy/recommended.yamlGo to Windows PowerShell and Run as Administrator and run the below command:
Command:
kubectl apply -f https://raw.githubusercontent.com/kubernetes/dashboard/v2.6.0/aio/deploy/recommended.yaml

Step 5: Check Kubernetes dashboard is deployed and running by running the below command:
Command:
kubectl get pods -n kubernetes-dashboard
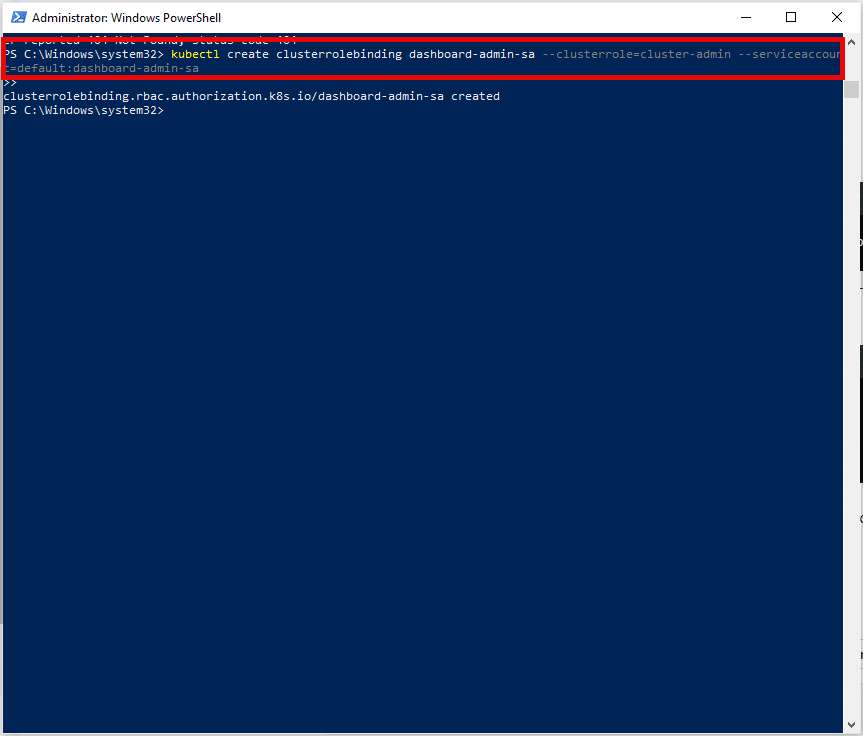
Step 6: Create a service account and cluster role binding:
Command:
kubectl create serviceaccount dashboard-admin-sa

Step 7: Bind the service account to ‘cluster admin’ role:
Command:
kubectl create clusterrolebinding dashboard-admin-sa --clusterrole=cluster-admin --serviceaccount=default:dashboard-admin-sa
Step 8: Obtain the bearer token
Command:
 # Get the secret name associated with the service account

$secretName = kubectl get serviceaccount dashboard-admin-sa -o jsonpath="{.secrets[0].name}"

Write-Output "Secret Name: $secretName"

# Get the encoded token from the secret

$encodedToken = kubectl get secret $secretName -o jsonpath="{.data.token}"

Write-Output "Encoded Token: $encodedToken"

# Decode the token if it is not null or empty

if ($encodedToken) {

    $decodedToken = [System.Text.Encoding]::UTF8.GetString([System.Convert]::FromBase64String($encodedToken))

    Write-Output "Decoded Token: $decodedToken"

} else {

    Write-Output "Encoded token is null or empty"

}

If the Secret Name and Encoded Token are not displayed,
Command:
kubectl get secrets
If you are still not able to get the secret name and token, then generate the token manually by running the below command:
Command:
kubectl create secret generic dashboard-admin-sa-token --from-literal=token=$(kubectl create token dashboard-admin-sa)

Step 9: Check the details of the newly created secret to ensure it contains the token.
Command:
kubectl get secret dashboard-admin-sa-token -o yaml
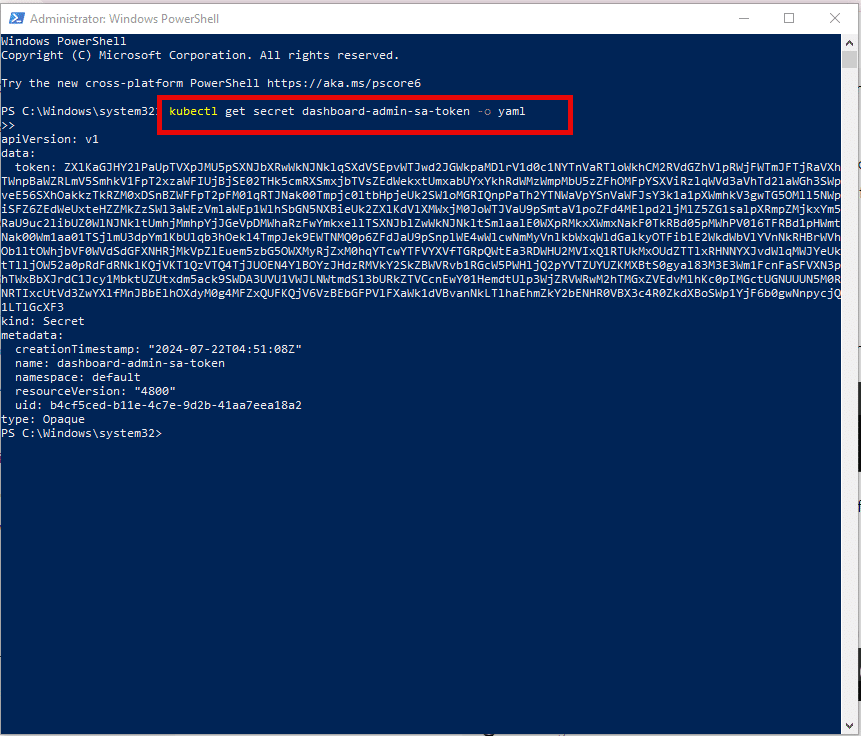
Now, you can see the token is generated.
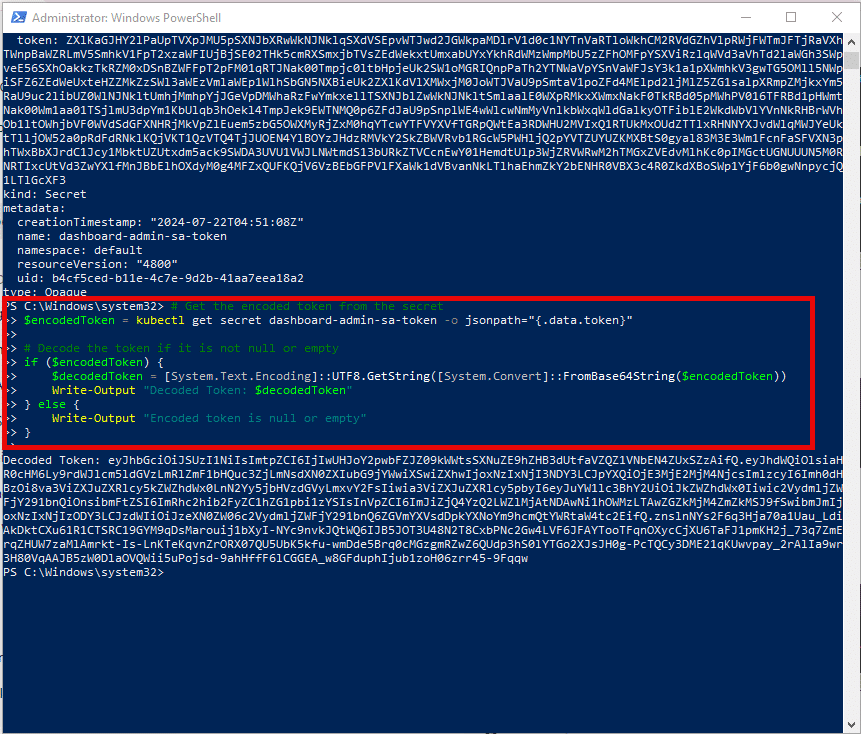
Step 10: This token must be decoded by running the below command.
Command:
# Get the encoded token from the secret

$encodedToken = kubectl get secret dashboard-admin-sa-token -o jsonpath="{.data.token}"

# Decode the token if it is not null or empty

if ($encodedToken) {

    $decodedToken = [System.Text.Encoding]::UTF8.GetString([System.Convert]::FromBase64String($encodedToken))

    Write-Output "Decoded Token: $decodedToken"

} else {

    Write-Output "Encoded token is null or empty"

}
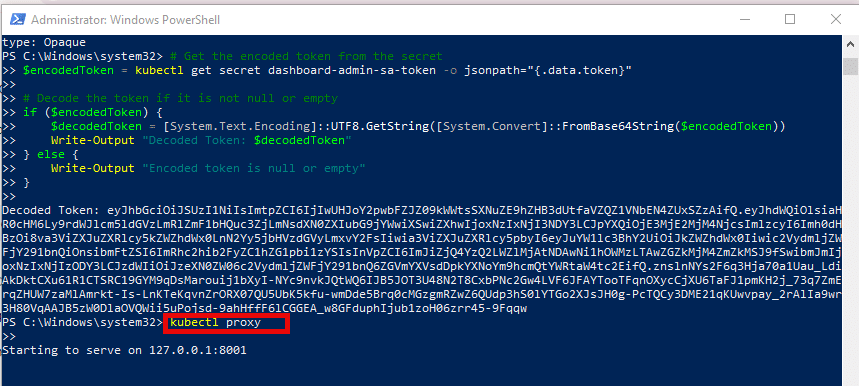
Step 11: Access the kubernetes dashboard by starting proxy.
Command:
kubectl proxy
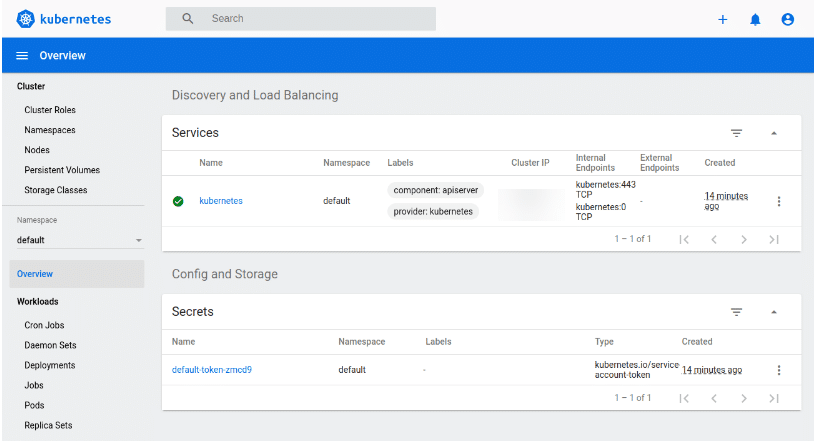
Step 12: You can see the dashboard login window, by entering the URL below. Navigate to
http://localhost:8001/api/v1/namespaces/kubernetes-dashboard/services/https:kubernetes-dashboard:/proxy/
Enter the token in Enter token generated by running the command in Step 10 and Sign in.
If there is an issue with the proxy server, check the proxy server settings on your local machine and make the changes accordingly.

Step 13: Now, you can explore the features of the Kubernetes dashboard.
Step 14: When you sign in as an admin, you can deploy new pods and services quickly and easily by clicking the plus icon at the top right corner of the dashboard.
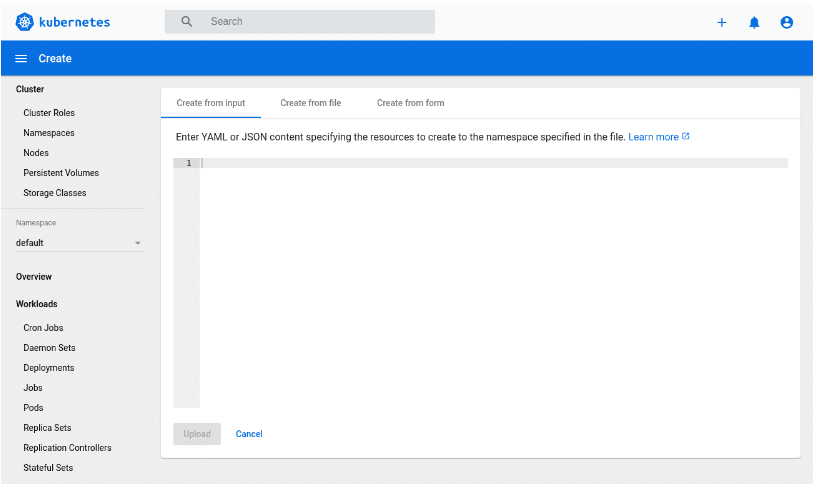
And we are done! You can now copy any configuration file you wish or select a file directly from the machine.