


This guide covers the foundational concepts you need to work effectively with Sophos XG, a next-generation firewall. You’ll learn about the XG interface, zones, firewall policies, basic NAT concepts, and VPN through step-by-step instruction.
1. Introduction and interface
Sophos XG provides advanced threat protection, application control, and secure network management for businesses of all sizes. Unlike traditional firewalls that simply block or allow traffic, Sophos XG analyzes potential threats and offers real-time visibility through a unified web interface. Its customizable policies and user-friendly dashboard simplify security operations.
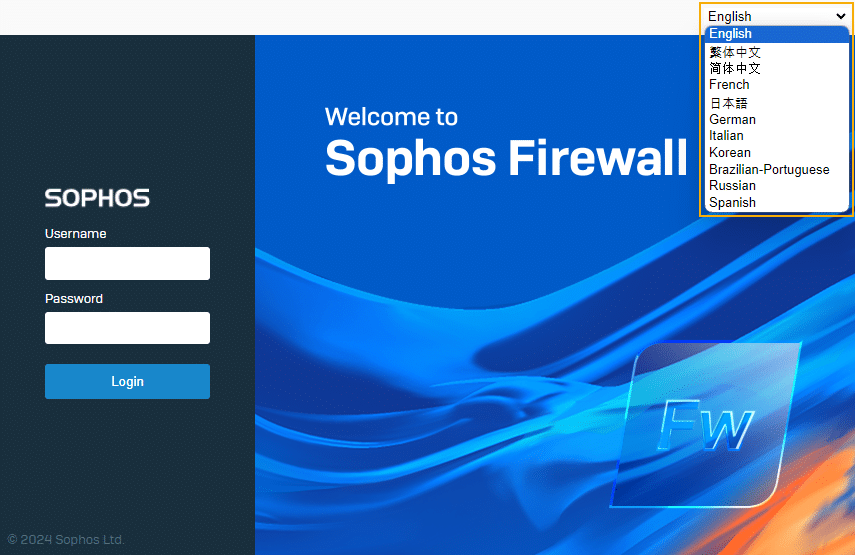
The centralized dashboard gives you access to all key functions: monitoring network configurations, setting up VPNs, managing firewall rules, configuring interfaces and zones, and viewing system reports. The first image below shows the Sophos XG login screen, and the second shows the main dashboard.

Note: The visuals of the Sophos login page may vary with latest version.
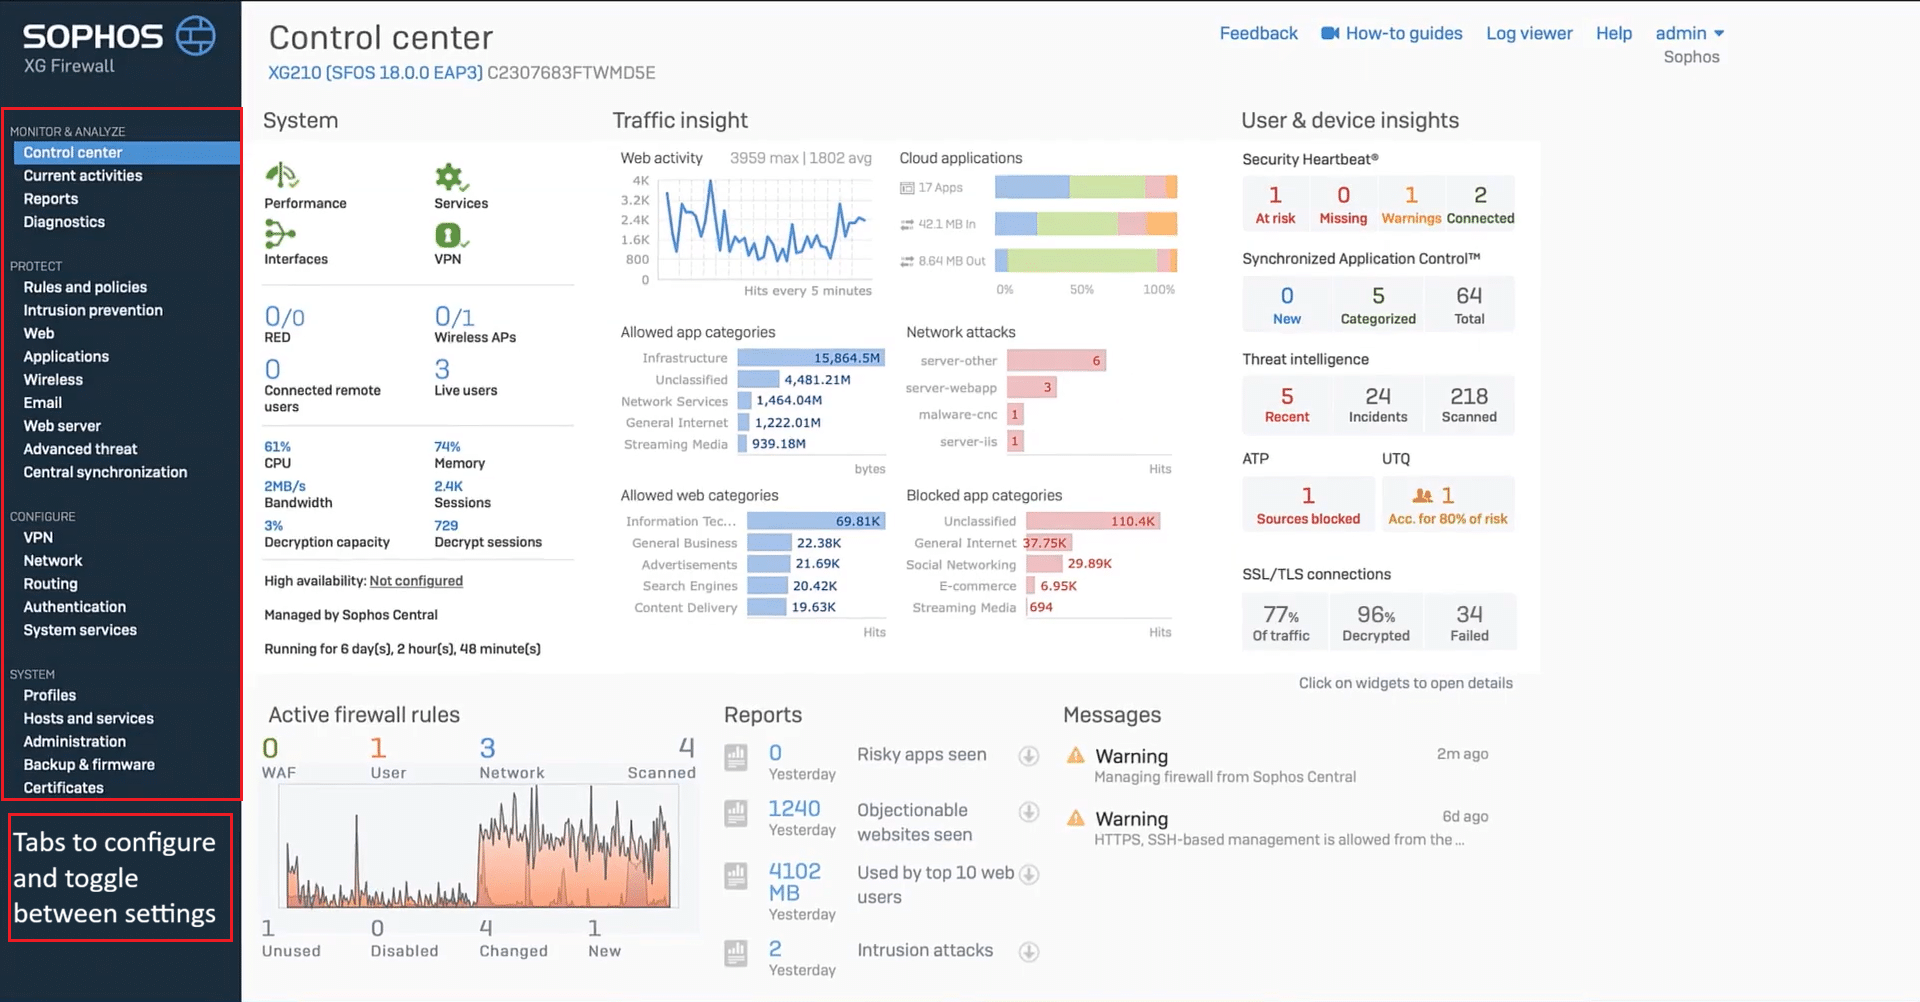
Note: Screenshot taken from Sophos Firewall OS v18.0.0 EAP3. Interface may vary slightly in later versions.
2. Understanding zones
In Sophos XG, a zone is a logical way to categorize different networks or IP ranges based on their function and trust level. Instead of creating complex, individual rules for every device, you can apply high-level security policies to an entire zone.
Sophos provides several default zones—such as LAN, WAN, VPN, and DMZ—which cover most standard use cases. However, administrators can also create custom zones tailored to specific network structures. These zones are essential for telling the firewall how to handle traffic moving between different parts of your network.
Once a zone is defined, it must be mapped to an interface. An interface is the physical or virtual connection point on the firewall. Assigning an interface to a zone determines the trust level of all incoming traffic and dictates which services, such as WebAdmin or SSH, are accessible through that port.
How to create a zone and configure an interface
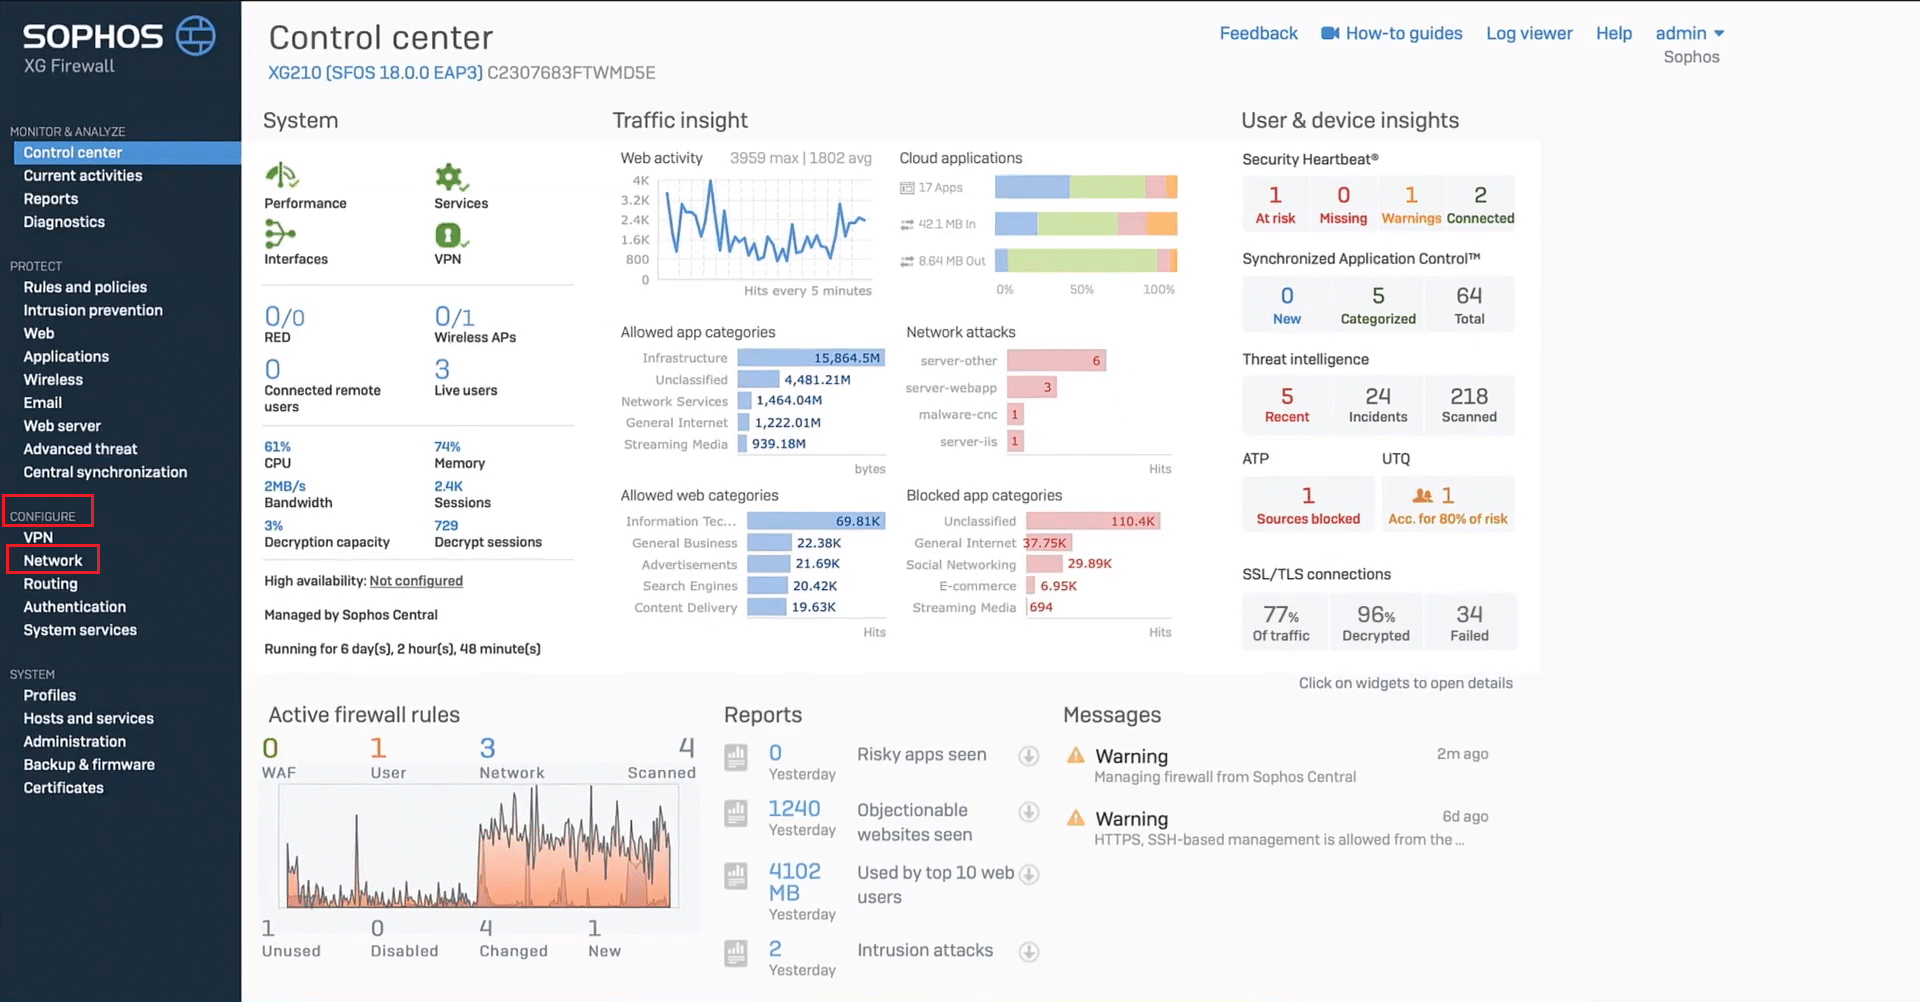
- Access the Portal: Open your web browser and navigate to the firewall’s IP address. Log in to the Sophos XG Web Admin Portal using your administrator credentials.
2. From the left-side menu, click on “Network.”
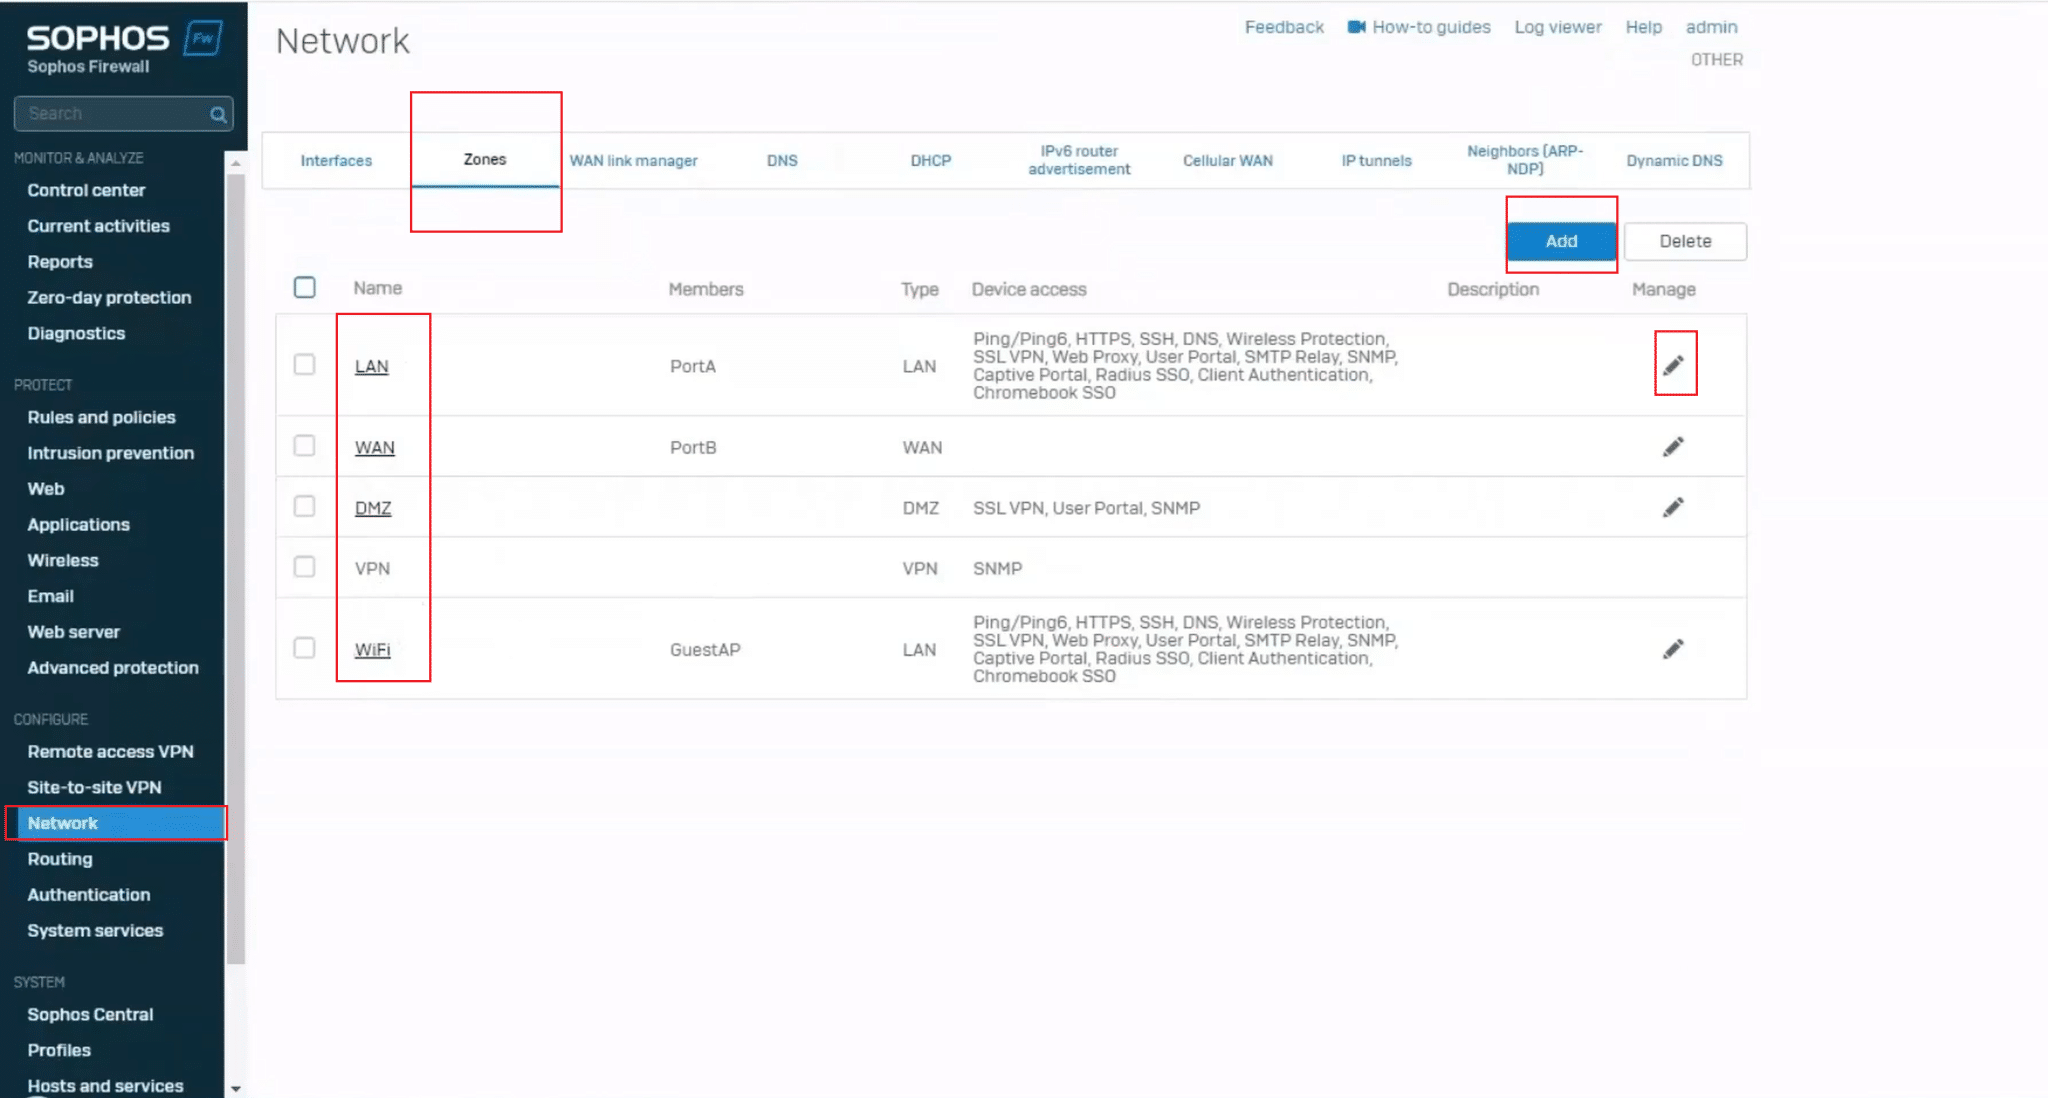
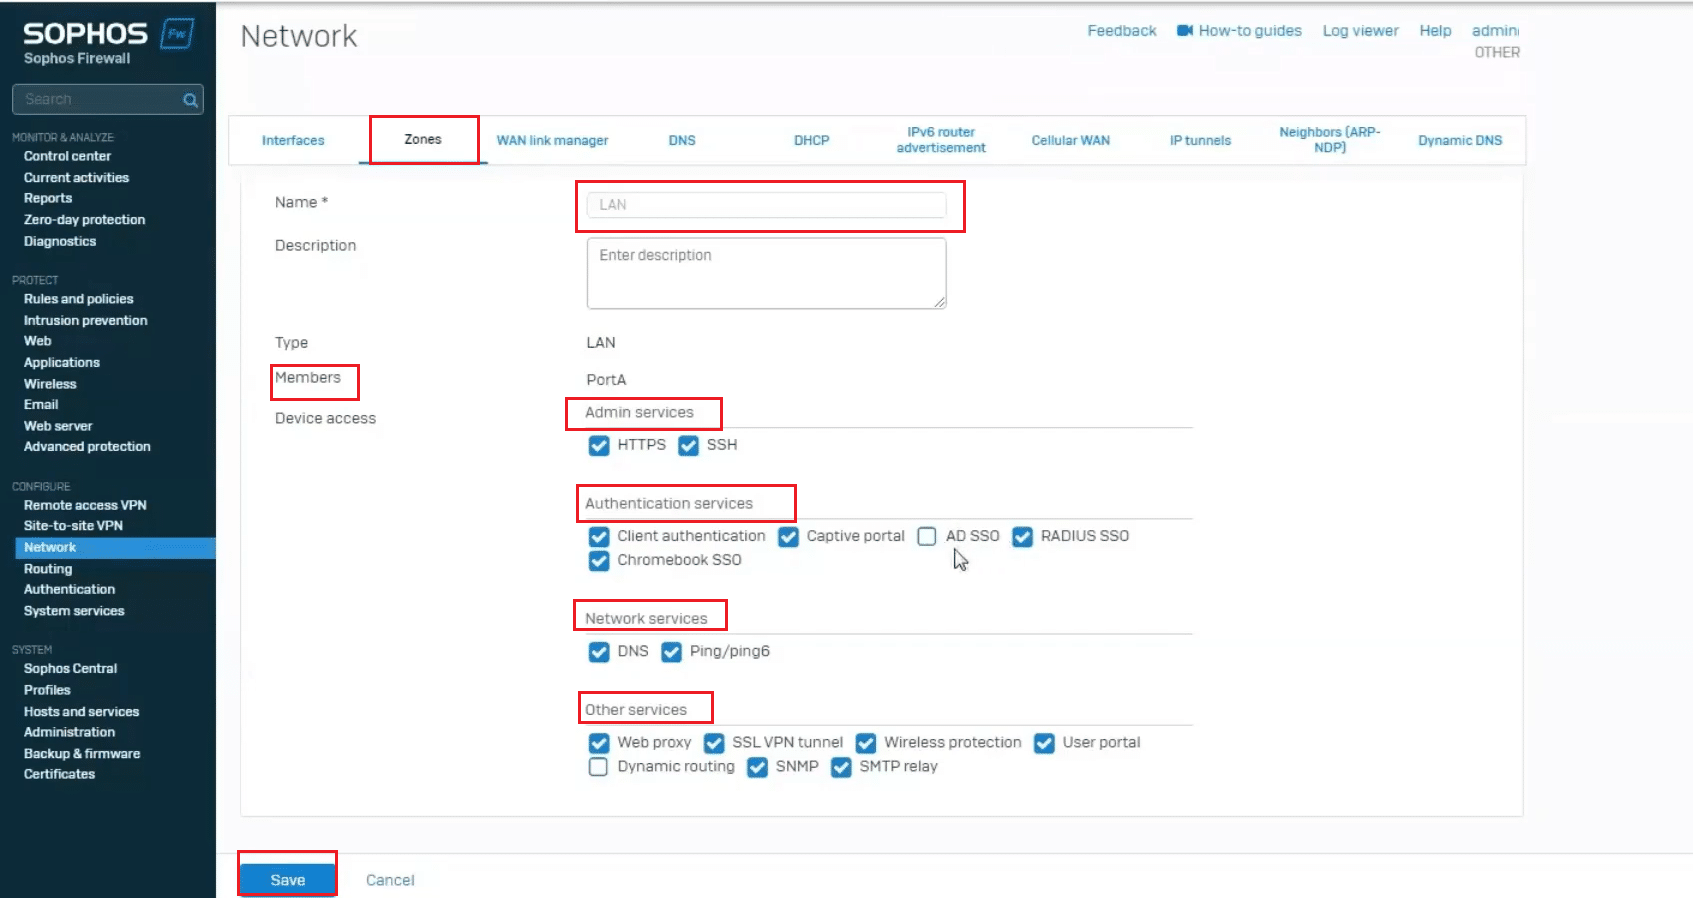
3. Under the “Network” settings, select “Zones” from the available tabs. Here you’ll see a list of existing or previously created and default zones. You can use the Edit button (pencil icon) to modify or click “Add” button to create a new custom zone.
4. Enter zone details:
- Name: Choose a name for the zone (e.g., “Test”, “IoT”, “DevOps”, “Staging”).
- Type: Select the zone type (LAN, WAN, DMZ, VPN, etc.).
- Description (optional): Add a short description for clarity.
Select zone characteristics. You can enable or disable access to the firewall for Ping/ICMP, Web Admin, SSH, SNMP, DNS, Captive Portal, etc. Tick the options depending on how secure or isolated this zone should be. Finally, click “Save” to add the zone.
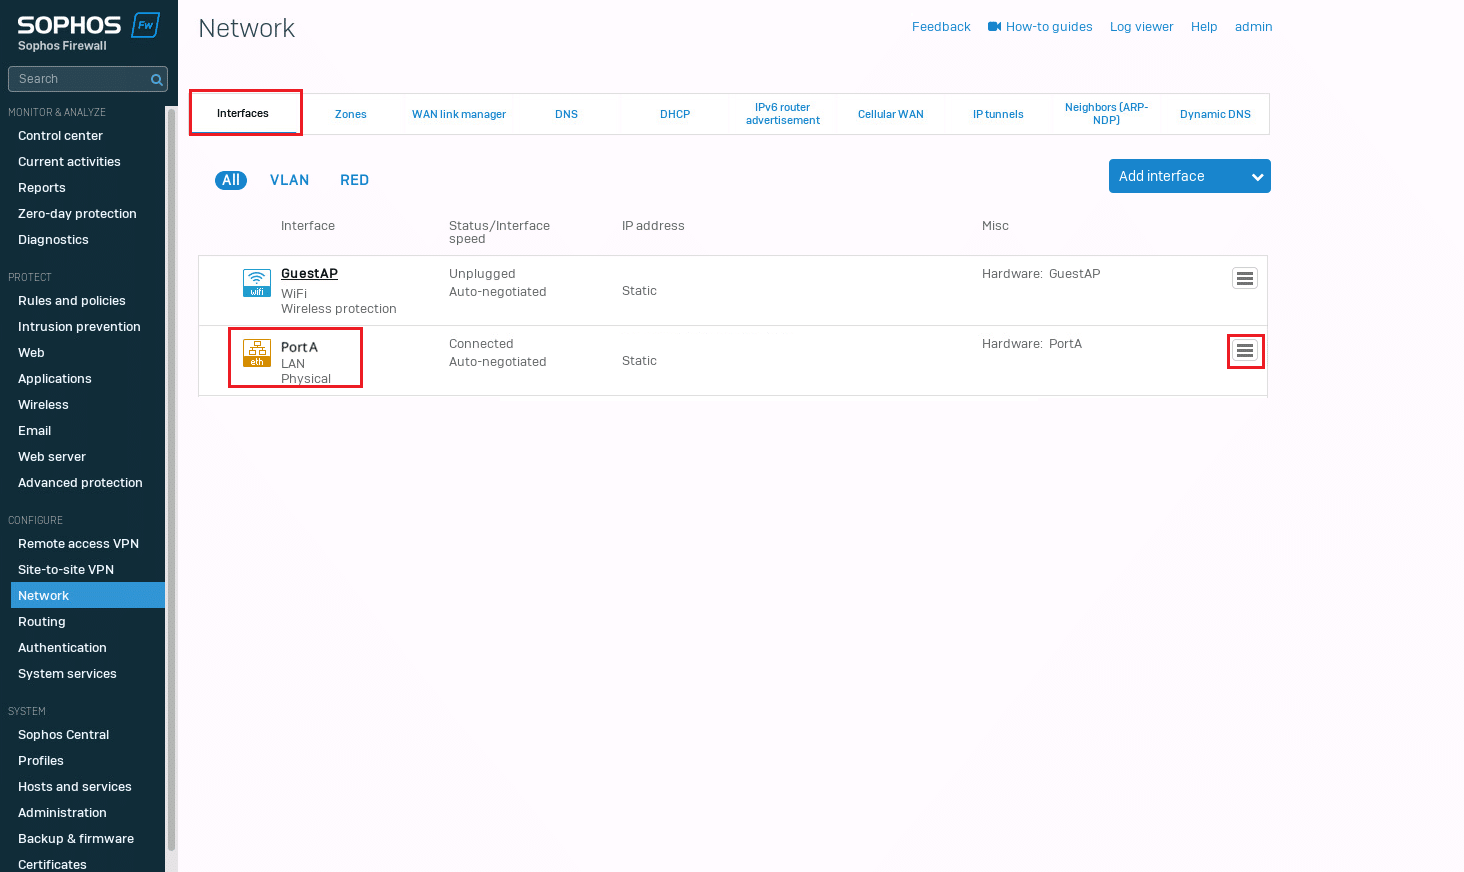
5. Now go to Interfaces, and for any port (e.g., PortA), assign it to the newly created zone by editing the interface and selecting the new zone from the dropdown.

3. Understanding firewalls
In Sophos XG, firewall policies (also called firewall rules) define how traffic is allowed or denied between from one zone to another for example, from LAN to WAN, or from VPN to LAN. Each policy lets you control:
- Source and destination zones/IPs
- Allowed services (e.g., HTTP, HTTPS, SSH)
- Application control, web filtering, malware scanning, etc.
- User-based access (if applicable)
- Logging and traffic shaping
Here are the steps to add the firewall rules:
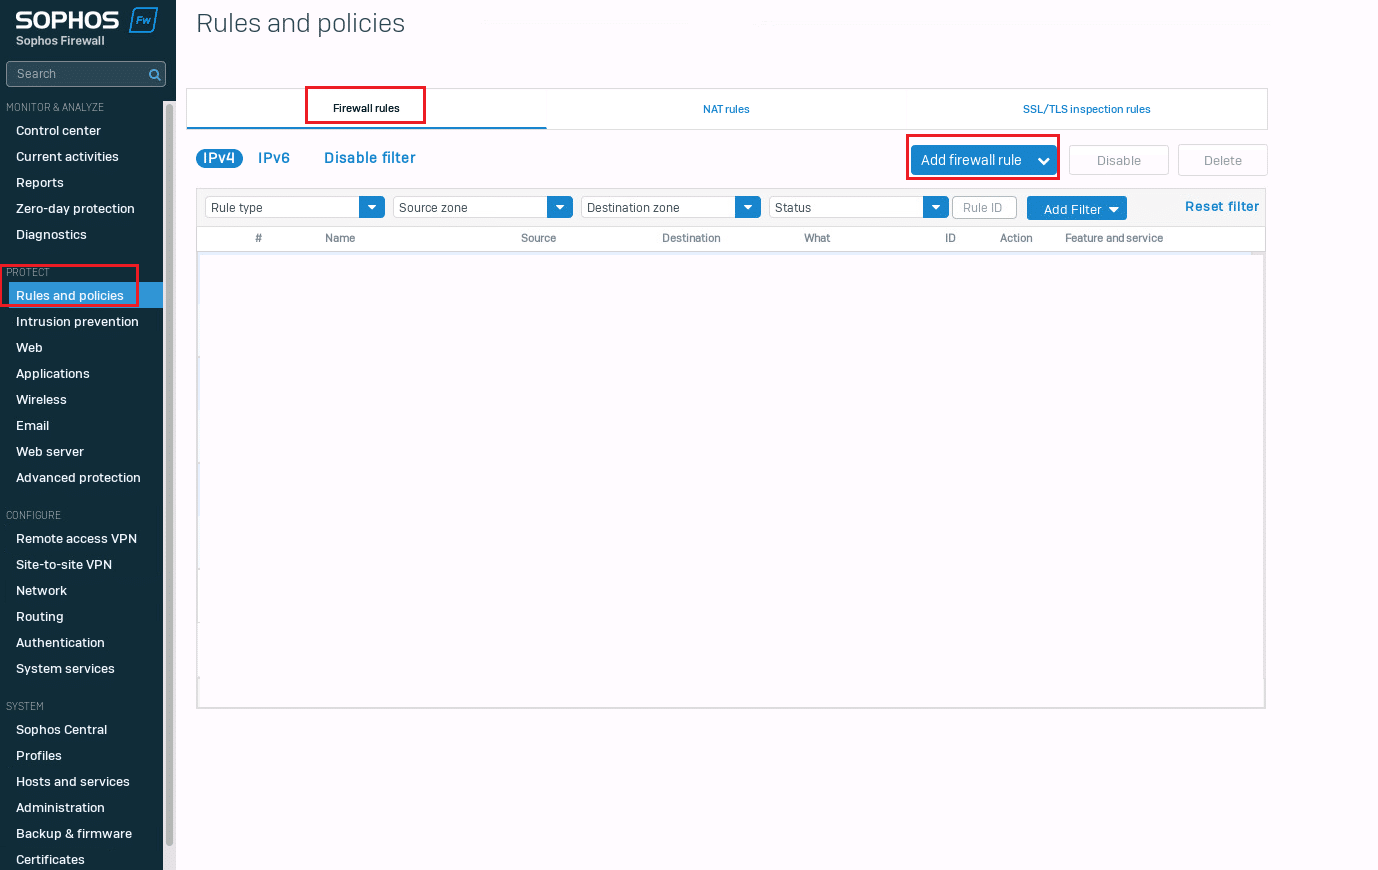
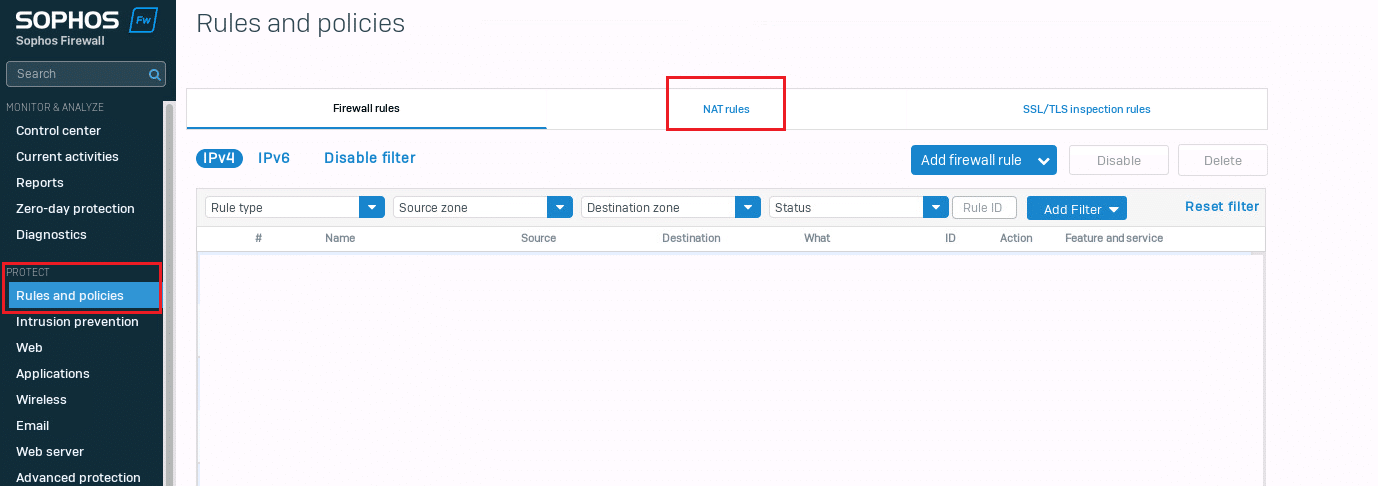
- Navigate to Protect > Rules and policies > Firewall rules.
- Click on Add Firewall rule → Choose new rule and fill in basic info:
- Rule name (e.g., LAN_to_WAN_Internet)
- Rule position: Top or bottom of list (order matters!)
- Enable rule: Toggle ON
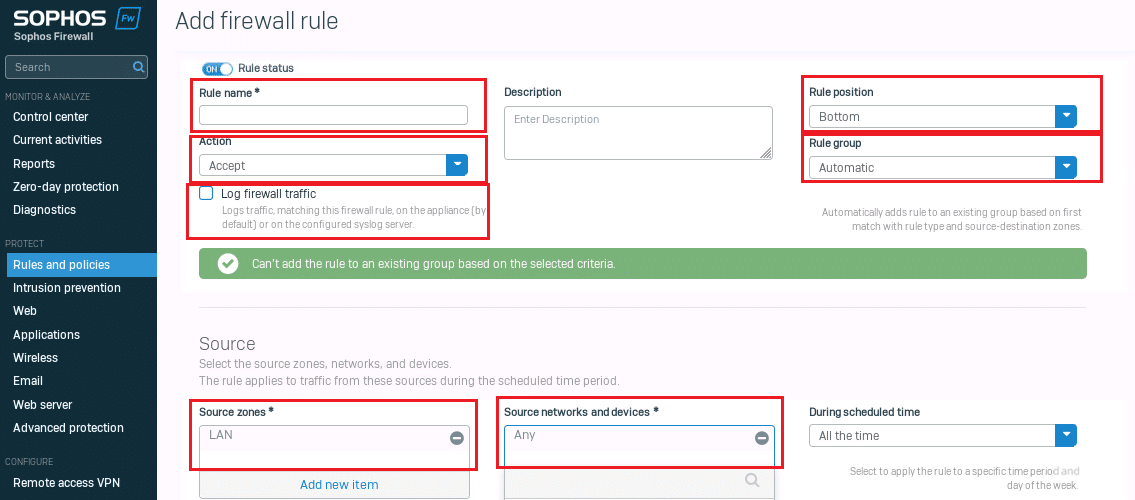
3. Set source zone and network:
- Source zone: LAN
- Source network: Any (or specify subnet/device) (Refer to the screenshot above)
- Set destination zone and network:
- Destination zone: WAN
- Destination network: Any
- Select services:
- E.g., HTTP, HTTPS, DNS (or ALL if you want full access)
- Security features (optional but recommended):
- Web filtering
- Malware scanning
- Application control
- Create Linked NAT rule. (See Basic NAT concepts below)
- Save the Rule.
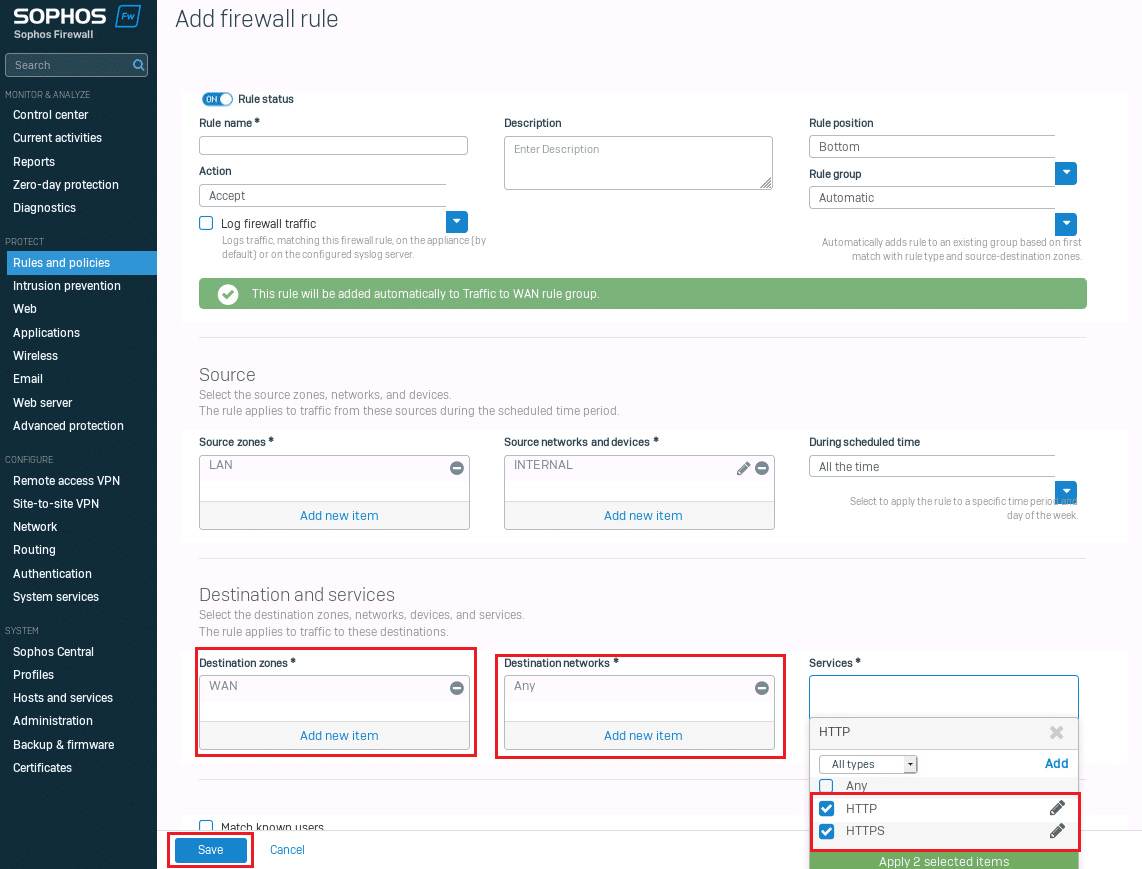
Note: Combined Screenshot for step 4, 5, and 7.
4. Basic NAT concepts
Network Address Translation (NAT) acts as a bridge between your private internal network and the public internet. It allows devices with private IP addresses on your LAN to communicate with external networks by translating those addresses into public IPs.
Sophos XG primarily utilizes two types of NAT:
- SNAT (Source NAT): Automatically applied via Masquerading (MASQ) when internal users access the internet.
- DNAT (Destination NAT): Used manually when you need to expose internal services, such as a web server or VPN, to the outside world.
A critical point to remember is that NAT rules in Sophos XG function in tandem with firewall rules. While the firewall rule determines if traffic is allowed to pass between zones, the NAT rule ensures the IP addresses are correctly translated so the traffic reaches its destination.
Creating a NAT rule
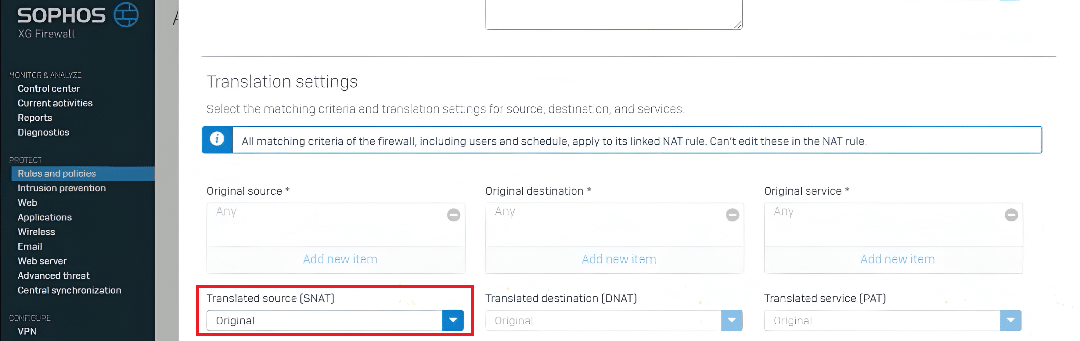
To set up a NAT rule, you can navigate to the NAT section directly while configuring a new firewall rule:
- Locate the NAT Section: Scroll down to the NAT portion of the firewall rule page.
- Configure Translation: In the pop-up window, ensure the Translated Source is set to Original (unless your specific configuration requires a different translation).
- Save: Click save without altering other parameters unless specifically required for your network setup.
Once saved, the configuration will be visible under the dedicated NAT Rules tab for future management.

5. VPN basics
A virtual private network (VPN) creates a secure, encrypted tunnel for communication between remote users or offices over the public internet. Sophos XG supports several VPN protocols to accommodate different business needs, including SSL VPN, IPsec, and L2TP. These are typically used for two main scenarios: remote access (connecting individual users at home to the office) and site-to-site (connecting two different office locations).
In the Sophos ecosystem, VPNs are tightly integrated with zones and firewall rules. When you configure a VPN, the incoming traffic is usually assigned to the VPN zone. You must then create specific firewall rules to manage this traffic, such as:
- Defining access: Granting permission for VPN users to reach resources on the LAN.
- Traffic control: Applying web filtering or bandwidth limits (traffic shaping) specifically to remote users.
- Security logging: Monitoring or restricting access based on specific security requirements.
In some cases, especially when dealing with overlapping subnets or complex routing, NAT rules are paired with VPN configurations to ensure IP addresses are translated correctly across the tunnel.
Final thoughts
The Sophos XG Firewall provides a robust framework for segmenting, securing, and controlling network traffic through the strategic use of zones, firewall rules, NAT, and VPNs. By organizing traffic into clearly defined zones based on trust and function, administrators can simplify complex network architectures while maintaining granular control.
As with any security system, clarity in design and consistency in rule implementation are essential for achieving optimal protection. Whether you are a new administrator setting up a first office or a professional refining an enterprise deployment, mastering these core building blocks ensures your Sophos environment remains aligned with your security goals and compliance requirements.