


This guide provides a comprehensive walkthrough for deploying and configuring an OPNsense firewall on a Kamatera server. By integrating OPNsense, users can transition from basic cloud networking to a robust, enterprise-grade security posture, enabling advanced traffic filtering, VPN capabilities, and granular network monitoring for their cloud resources.
Prerequisites
To start, you will need:
-
- A Kamatera account
- Network requirements:
- Dedicated Public IP (Static IP) for WAN.
- Private subnet for LAN (e.g., 192.168.0.0/24.)
Note: Each Kamatera server instance comes with one dedicated public IP address by default.
Create an OPNSense server
Create an OPNSense server by following these steps:
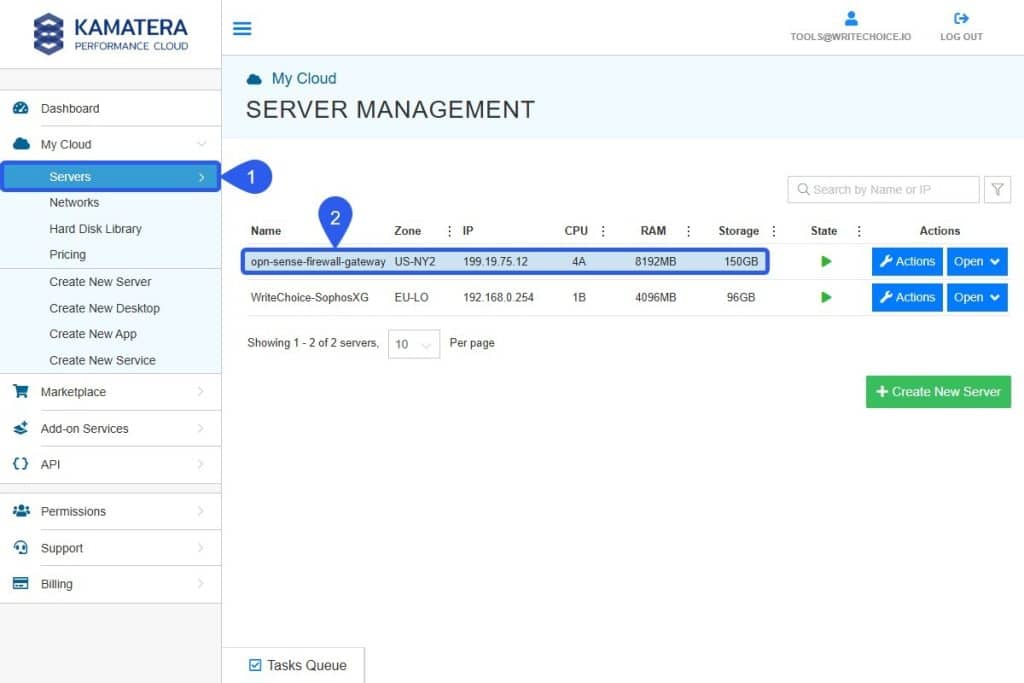
- From the sidebar select My Cloud > Create New Server.
- Choose the preferred Zone.
- Set the Data Center to host your server.

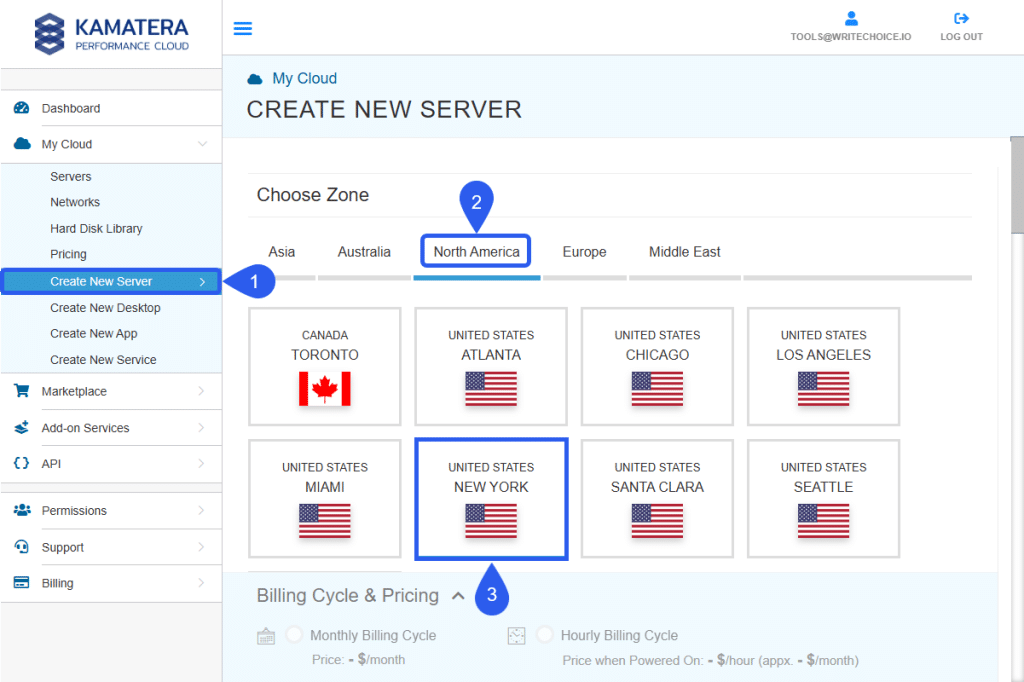
- Navigate to Service Images.
- Select OPNSense from the service list.
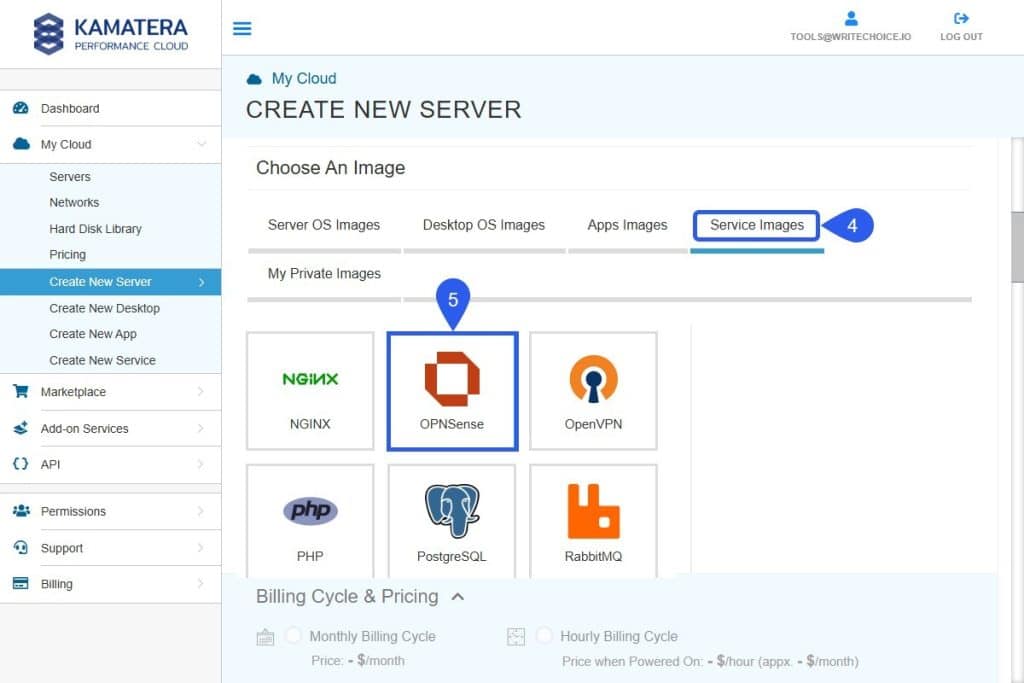
- Choose the OPNSense version.
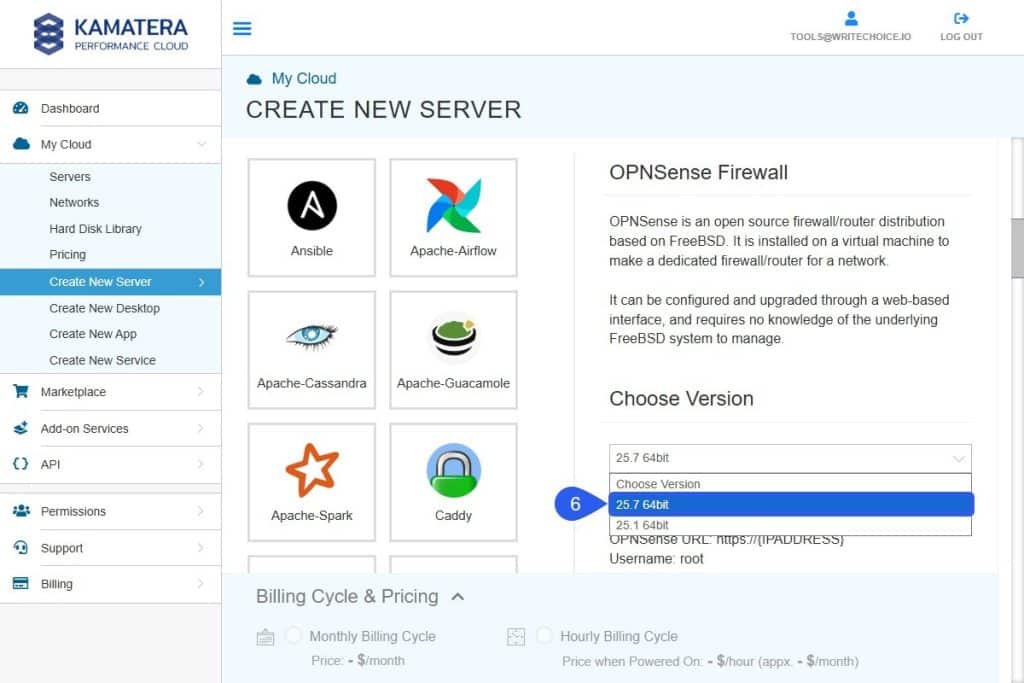
The 25.7 64bit version will be used for this tutorial. The requirements for an OPNSense server are:
| Component | Recommended requirements |
| Processor | 2 cores CPU |
| RAM | 3GB |
| Install target | 40GB SSD |
Network configuration
Set a Static IP and a Prefix to turn OPNsense into a gateway in order to enable access to the Internet by following these steps:
- Select Advanced Mode
- Click on the Add Network
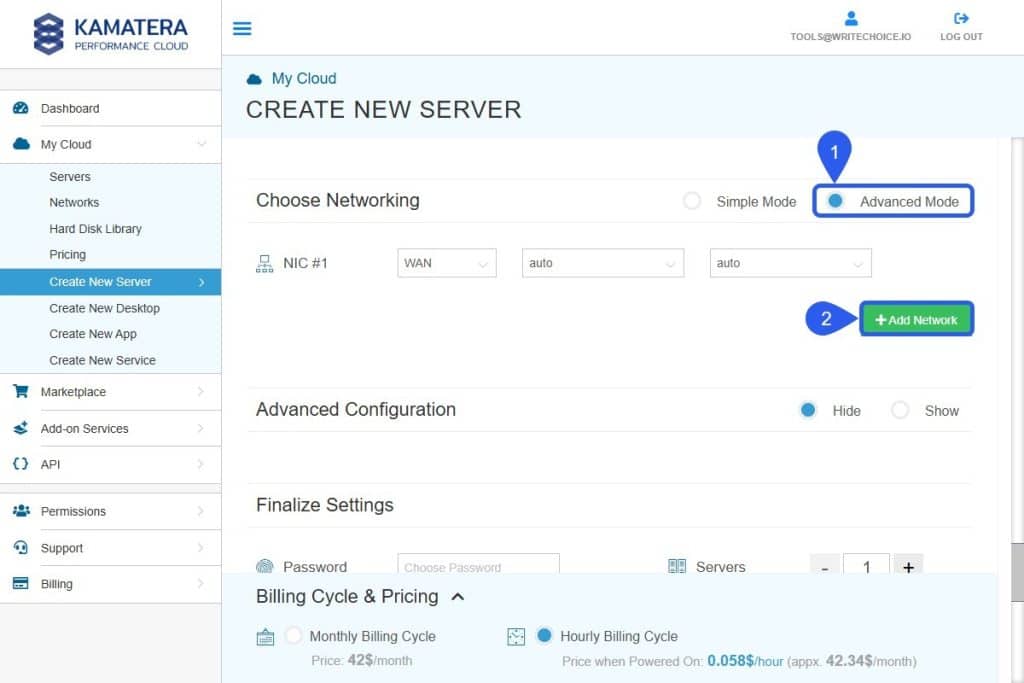
Note: It’s highly recommended to run a firewall server with a LAN network in addition to the WAN network to increase traffic security. New Lan provides the necessary options to set the OPNSense IP as a gateway automatically.
3. Setup OPNSense IP as a gateway:
| Field | Network/Subnet address | IP/prefix |
| WAN | Auto | Auto |
| New Lan | 192.168.0.0 | 24 |
| vlan-8181058 | Choose a Name | 192.168.0.254 |
Do not forget to switch the Set as a gateway button to ON.
- Set Admin Password, server Name, and leave the button Power On Servers untouched, unless you wish to deploy a turned off server.
- Set the preferred Billing Cycle as monthly or hourly.
- Select CREATE SERVER button to deploy.
After a couple of minutes and deploy process is finished, the newly created OPNSense server will be visible at the Servers tab.
Accessing the server console (optional)
It’s possible to connect directly to the server’s command-line interface to perform advanced troubleshooting or regain access if the OPNSense Web GUI ever becomes unreachable.
Note: In this tutorial, stick to the Web GUI version for convenience. You may access the CLI OPN Sense Initial Configuration Instructions if necessary.
- Select Actions > Console to open the CLI tab/window.
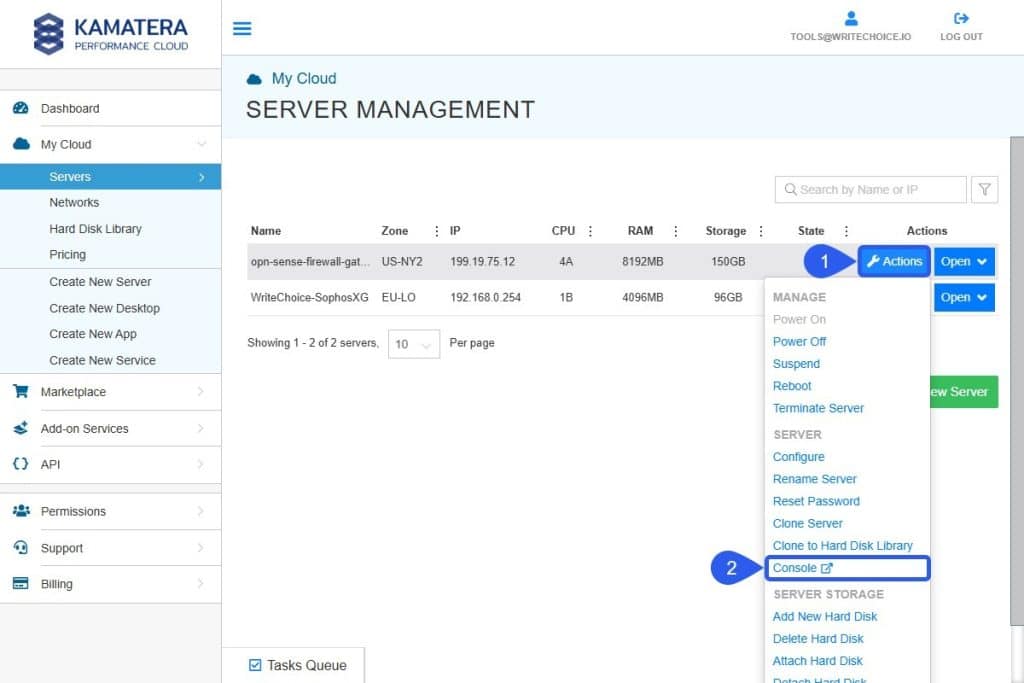
- Log in with root and the Admin password created previously.
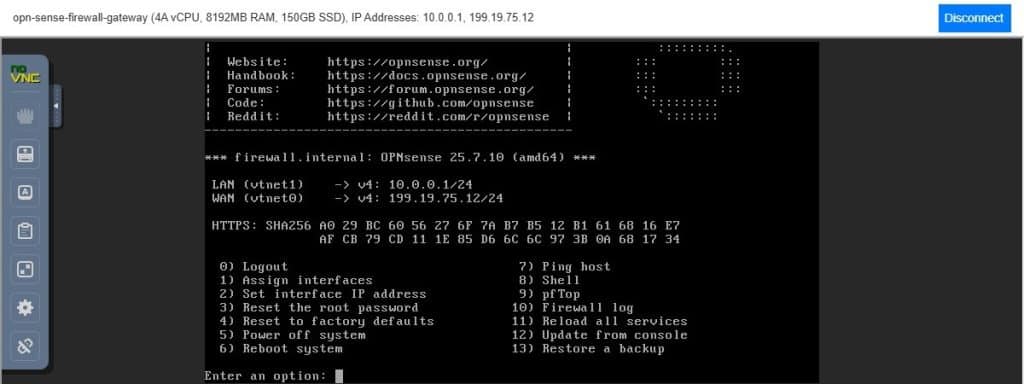
- This is what the OPNSense console menu looks like.
Initial steps at OPNSense Web GUI
Connect to the OPNSense panel to configure your server, firewall and VPN preferences:
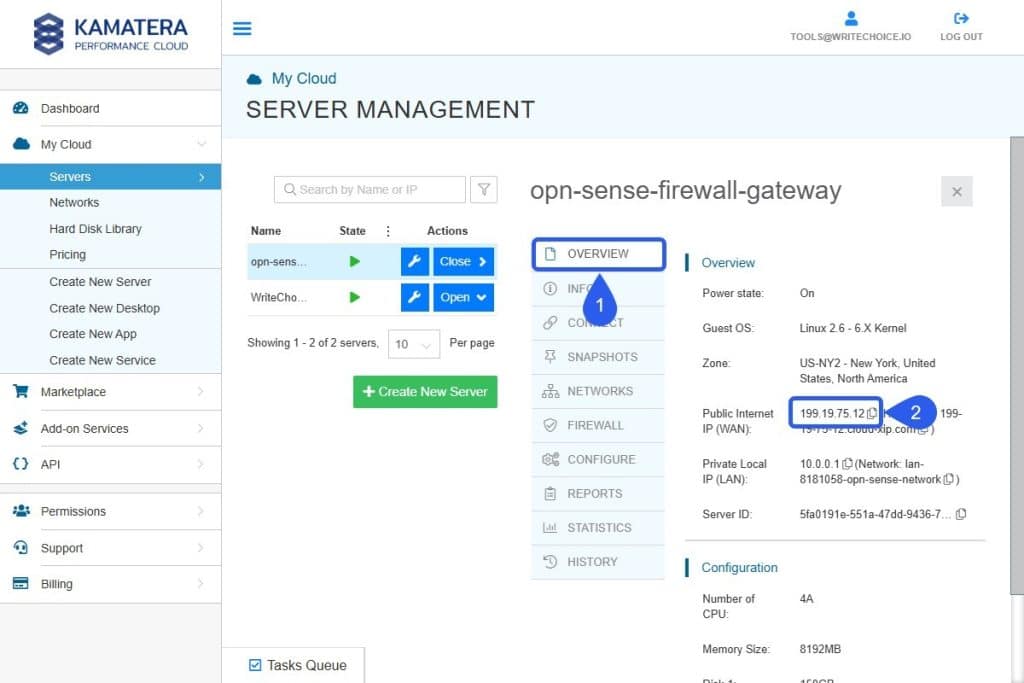
- Access the Overview Tab
- Copy the WAN Address and paste it to your browser URL field.
Your browser might emit a security warning for the lack of SSL certificate because you’re connecting to an IP instead of a domain name. You may ignore it and proceed bypassing the warning.

- Log in as root and use your server password from Kamatera:
- Check for Pending Updates on the OPNSense dashboard to make sure your firewall version is up to date.
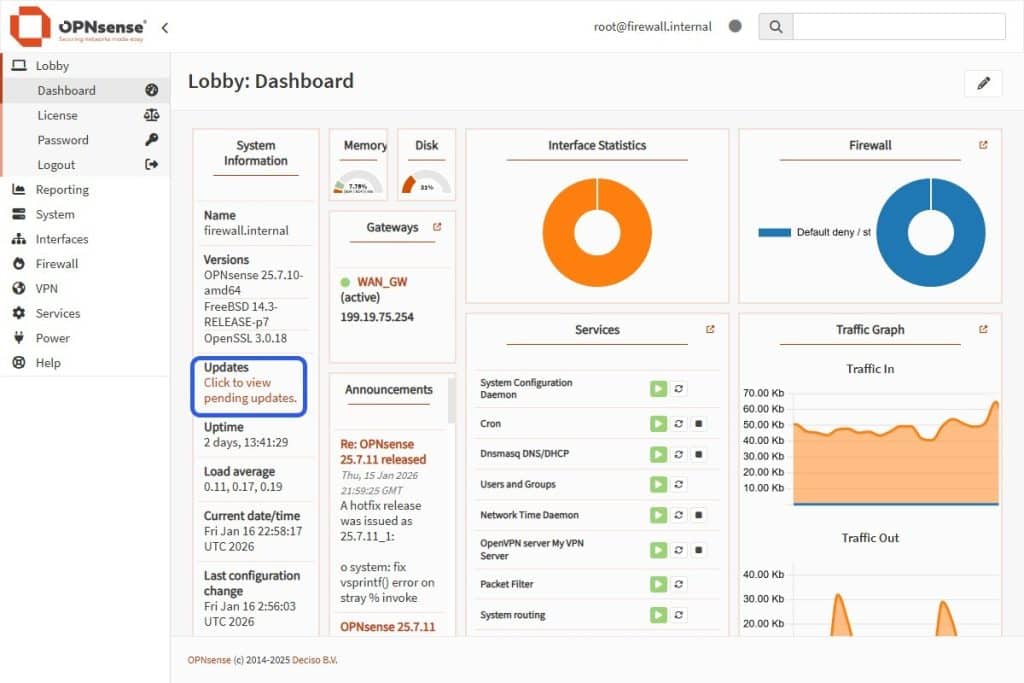
- The system will look for available updates and download them automatically.
- Select the Update button to install the updates. And then, hit OK to reboot the OPNSense firewall.
OPNSense general settings
Configure the General Settings to define your firewall’s identity (Hostname/Domain) and DNS servers, ensuring it can properly resolve internet names and validate security certificates.
- From the sidebar, select System > Settings > General and insert the following values:
| Field | Value |
| Hostname | something simple |
| Domain | internal |
| Time Zone | your time zone |
| Language | preferred language |
| DNS server | 8.8.8.8 |
| DNS server | 8.8.4.4 |
Use Gateway None for both DNS listed above
- In the same section, UNCHECK Allow DNS server list to be overridden by DHCP/PPP option in order to force the firewall to use a custom DNS, such as 8.8.8 and 8.8.4.4.
- Leave the DNS Gateway values set to None, since OPNsense will automatically route the DNS queries out through the default gateway (WAN).
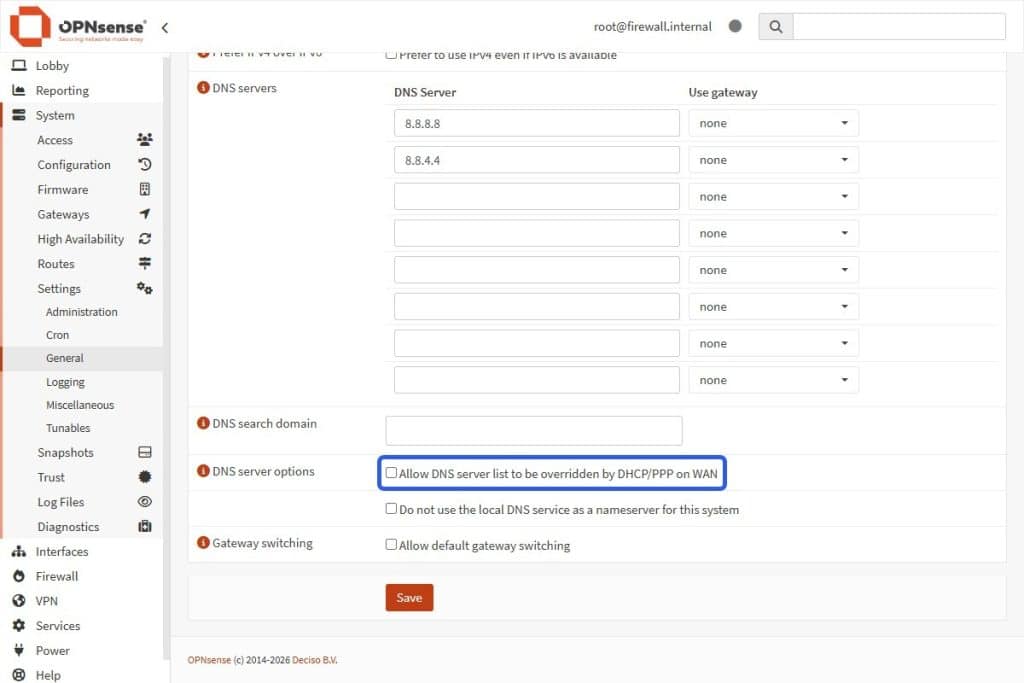
- After unchecking the DNS Override checkbox, hit the Save button to apply the changes.
Add firewall rules (LAN)
To implement or update IP exceptions to allow traffic, navigate from the OPNSense sidebar:
- Access Firewall > Rules > LAN
- Select the + Add Button in the LAN Rules card (top right).

- Setup the LAN Rule with the following parameters:
| Field | Value |
| Action | Pass |
| Interface | LAN |
| Direction | In (Traffic coming in from LAN.) |
| Protocol | Any (Select TCP/UDP or just Any.) |
| Source | LAN net (This allows anything from the 10.0.0.x network.) |
| Destination | Any (anywhere on the internet.) |
| Description | Allow LAN to Internet. |
- Select the Save button to apply the new Rule.
- Hit the Apply Changes button to apply the new rules you’ve just created.
Your OPNsense firewall is now fully operational.
Note: At this point, if you decide to run some tests, you may launch a new web server or database on your server. In this case, verify these two things when creating your item:
Network: Connect it only to the private LAN (192.168.0.0.)
Gateway: It should automatically pick up 192.168.0.254 (your OPNsense box) as its gateway.
That server will now be safe behind your firewall, but still able to download updates and communicate with the Internet.
OPNSense web GUI NAT setup
The ports for HTTP and HTTPS at Kamatera have been opened. Now you must tell OPNsense exactly where to send that traffic.
Warning: Prevent a port conflict (lockout risk)! By default, OPNsense uses Port 443 for its admin panel. Your web server also needs this port for secure HTTPS traffic. You must change the OPNsense admin panel to a different port (e.g., 8443) before creating your NAT rules. If you skip this, forwarding port 443 to your web server will cut off your admin access immediately. Browsers do not automatically use SSL on custom ports. You must explicitly type https:// followed by the IP and the new port:
# URL format after migrating OPNSense Panel Port:
https://<WAN_IP>:<NEW_PORT>
# e.g.
https://199.19.75.12:8443
With that in mind, if you decide to change the OPNsense admin port for the Web GUI, follow these steps exactly in this order:
- Go back to the Firewall Rules section on the Kamatera console and add a new Rule with the following values:
| Field | Value |
| Direction | IN |
| Interface | net0 (WAN) |
| Protocol | TCP |
| Source | Any |
| Destination | 199.19.75.12 (Swap this for your server WAN IP) |
| Port | 8443 |
| Action | ACCEPT |
| Position | 3 |
- Go to OPNSense System > Settings > Administration.
- Find the TCP port field and change the value to 8443.
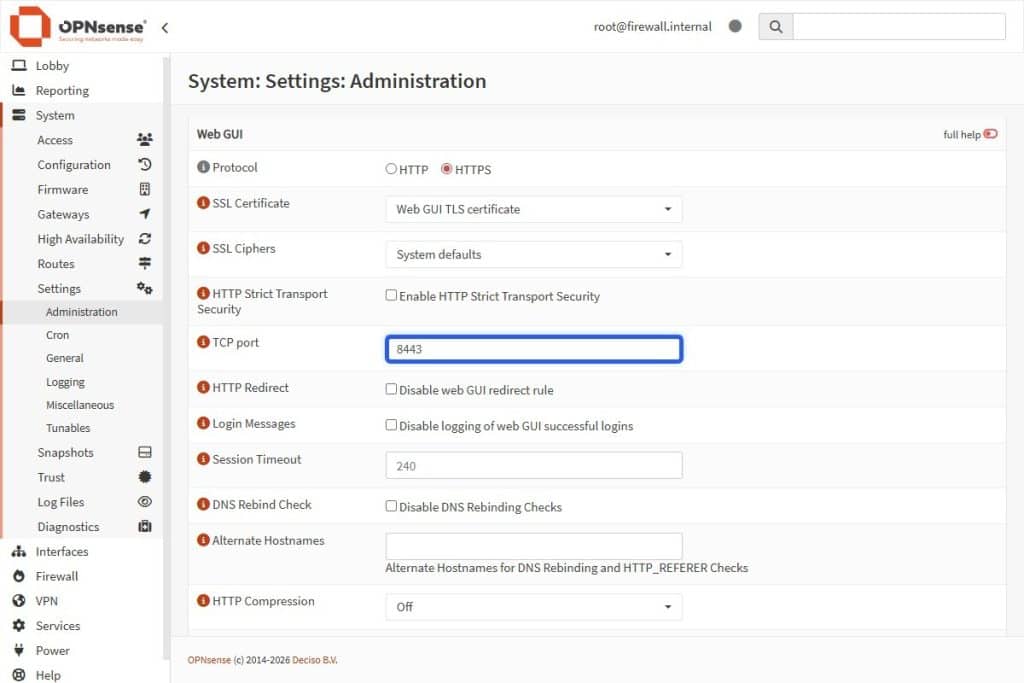
- Scroll down and select the Save button to apply the changes.
Important: The page will load for a while and then time out. > This is normal because the Port just changed.
- Log in on the new port 8443 by typing your server IP with the new port in your browser (e.g https://199.19.75.12:8443). After that, you should see your login screen again. Do not forget to manually include https:// before the IP.
OPNSense NAT rules
Now you need to create the OPNSense NAT rules (port forwarding) to direct incoming internet traffic to your internal web server, allowing the public to access your website. Note: This does not cover NAT 1:1.
- Head back to the OPNSense dashboard.
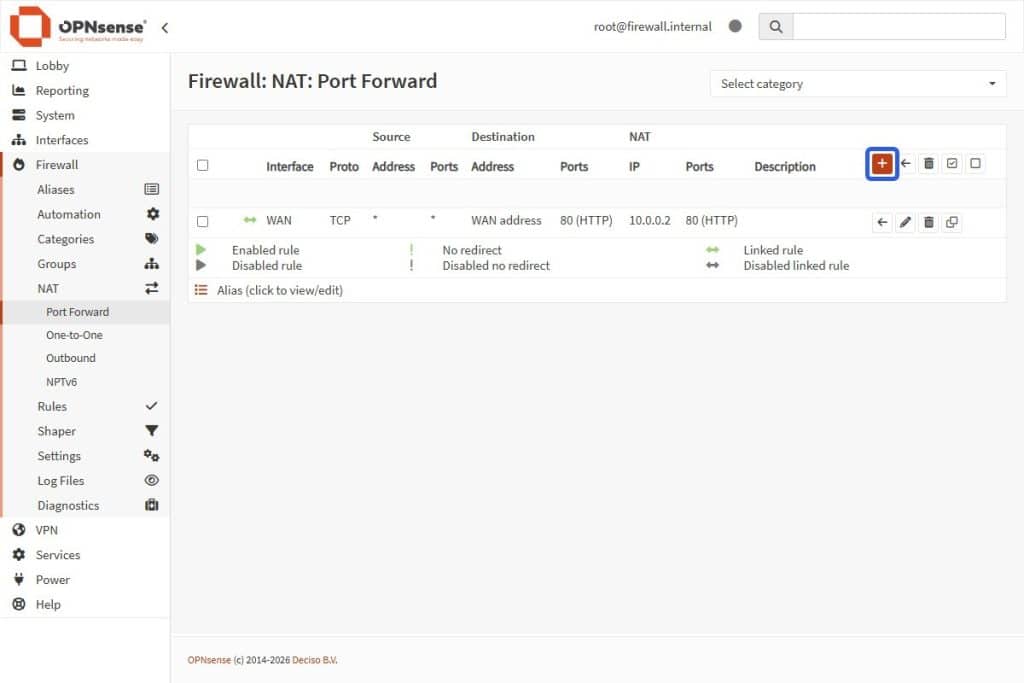
- Navigate to Firewall > NAT > Port Forward.
- Select the + Add Button in the NAT Rules card top-right.

Caution: Prevent a lockout. Before creating the HTTPS (Port 443) rule below, verify that you have successfully moved your OPNsense admin panel to port 8443 (as shown in the previous section). If your OPNSense admin panel is still on port 443 and you create this NAT rule, you will be locked out immediately because the firewall will forward your own login attempts to the (empty) web server instead of the admin panel.
- Fill in these specific fields for the HTTPS NAT Rule if you successfully moved your OPNSense Port from 443 to 8443 (leave the other fields as default):
| Field | Value |
| Interface | WAN |
| Protocol | TCP |
| Destination | WAN address |
| Destination Port Range | HTTPS to HTTPS |
| Redirect Target IP | Single host or Network |
| Redirect Target IP (2) | 10.0.0.2 (Or your Web Server IP) |
| Redirect Target Port | HTTPS |
| Filter Rule Association | Add associated filter rule |
Note: The setting Add associated filter rule ensures OPNsense automatically creates the permission rule to let the traffic in.
- Select the Save button to apply the changes.
- Create a second rule for the HTTP NAT by selecting the + Add Button in the NAT rules card top right.
Note: Keep everything the same, except for Destination Port Range and Redirect Target Port (Both fields must be set to HTTP).
| Field | Value |
| Interface | WAN |
| Protocol | TCP |
| Destination | WAN address |
| Destination Port Range | HTTP to HTTP |
| Redirect Target IP | Single host or Network |
| Redirect Target IP(2) | 10.0.0.2 (Or your Web Server IP) |
| Redirect Target Port | HTTP |
| Filter Rule Association | Add associated filter rule |
|
- After saving this rule, hit the Apply Changes button to update the new NAT rules.
Tip: Once you create your web server (e.g., at 10.0.0.2), you can test this by typing your Public WAN IP into your phone’s browser (using 4G/5G, not your own wifi). If it loads your website, your NAT is working.
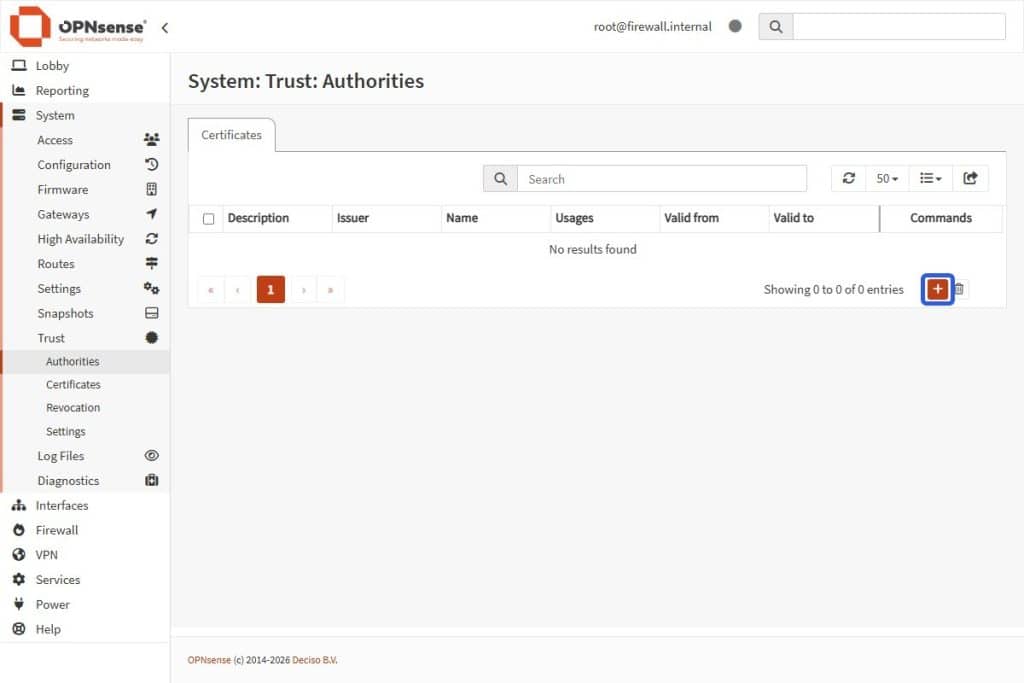
Create the Internal Certificate Authority
To make a VPN secure, your firewall needs to issue the certificates to prove who you are.
- Inside OPNsense, go to System > Trust > Authorities.
- Select the + Add Button in the Authorities card bottom-right.
- Fill in these fields:
| Field | Value |
| Method | Create an internal certificate authority |
| Description | OpenVPN-CA (or any description you prefer ) |
| Key type | RSA-2048 |
| Digest algorithm | SHA256 |
| Lifetime (days) | Set the lifetime in days e.g 3650 (10 years, so it doesn’t expire.) |
| Country code | Your country |
| City | Your city |
| State or province | Your state or province |
| Organization | Your organization or company name |
| Common name | OpenVPN-CA (This is important. If you leave this blank, it often fails.) |
- Select the Save button to apply the changes.
Create the server certificate
This is the “ID Card” the VPN server will show to your phone/laptop to prove it’s legitimate.
- Go to System > Trust > Certificates.
- Select the Add + button in the Certificates card bottom-right.


- Fill in these fields:
Field Value
| Method | Create an internal certificate |
| Descriptive name | VPN_Server_Cert (or any name you prefer) |
| Type | Server Certificate |
| Key type | RSA-2048 |
| Digest algorithm | SHA256 |
| Issuer | OpenVPN-CA (Select the CA you created previously) |
| Lifetime (days) | Set the lifetime in days e.g 3650 (10 years, so it doesn’t expire.) |
| Country code | Your country |
| State or province | Your state or province |
| City | Your city |
| Organization | Your organization or company name |
| Common name | vpn.server (Mandatory: gives the server a specific identity name.) |
- Hit the Save button to apply the changes.
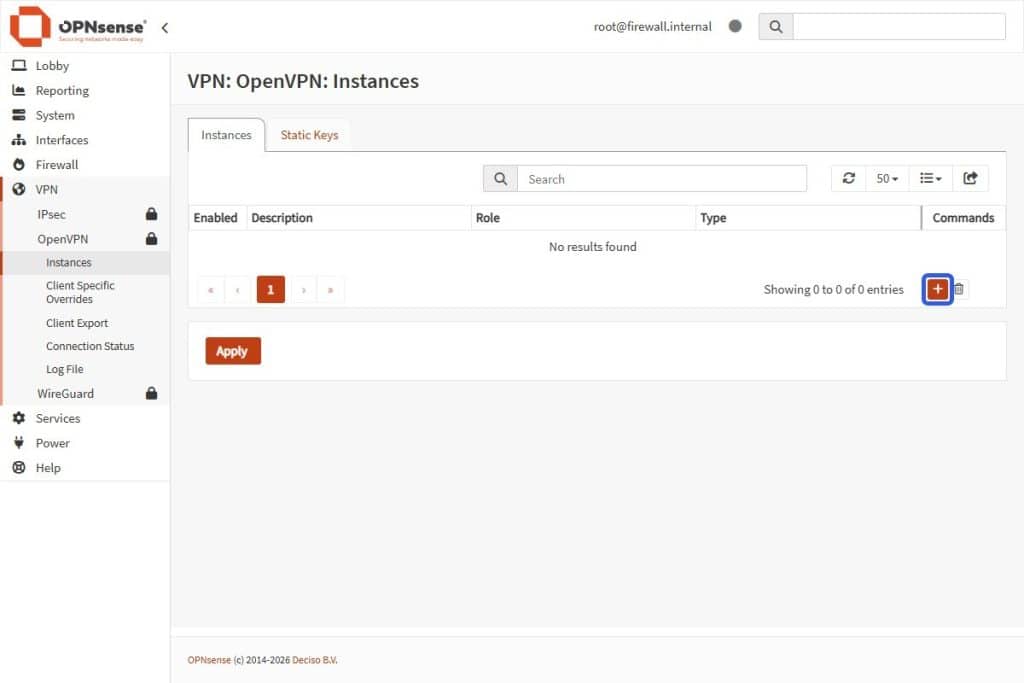
Set the OpenVPN instance
Now you need to configure the OpenVPN instance by defining the protocol, port, and encryption settings for the VPN Server to establish a secure tunnel for remote access.
- Go to VPN > OpenVPN > Instances.
- Select the + Add Button in the Instances card bottom-right. A big form will open.
- Toggle the Advanced Mode switch on the top-left corner of the form to see all options.
- Fill in the following fields with these values:
| Field | Value |
| Role | Server |
| Description | My VPN server |
| Enabled | ☑ Checked |
| Protocol | UDP |
| Port number | 1194 |
| Type | TUN |
| Server (IPv4) | 10.8.0.0/24 |
| Certificate | VPN_Server_Cert |
| Certificate authority | OpenVPN-CA |
| Verify client certificate | None |
| Authentication | Local Database |
| Strict User/CN Matching | No |
| Local network | 192.168.0.0/24 |
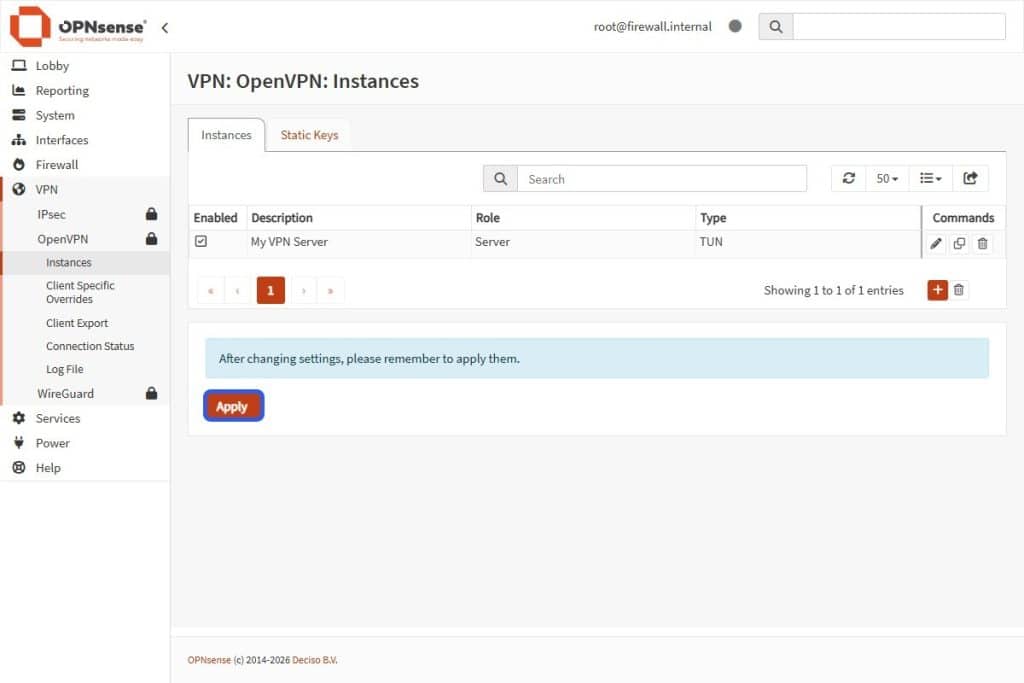
- Select the Save button to apply the changes.
- Hit the Apply button to update the changes, otherwise the OpenVPN instance will not show up in the firewall rules section.
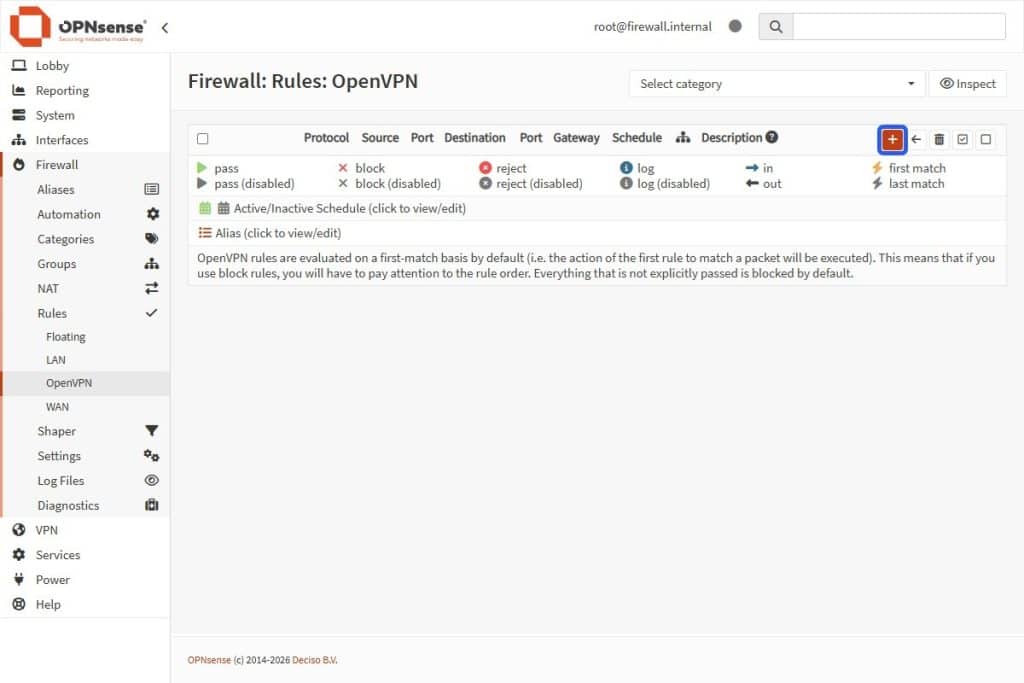
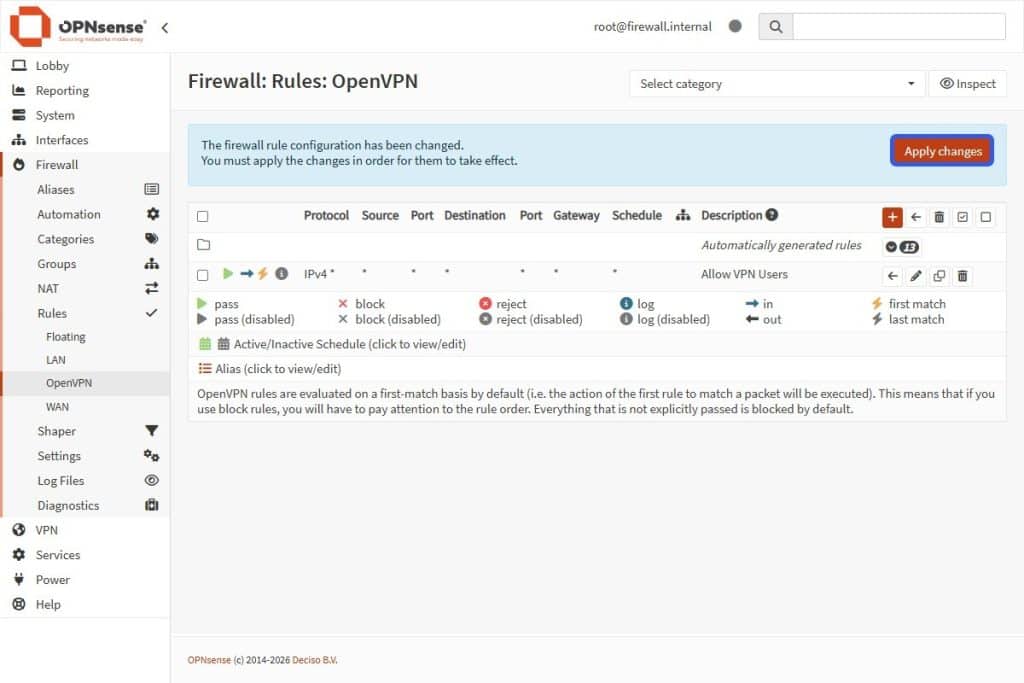
Set the OpenVPN rules
Configure firewall rules to explicitly allow traffic from connected VPN users to access your internal network or reach the internet.
- Go to Firewall > Rules > OpenVPN.
- Select the Add + button in the OpenVPN Rules card (top-right).
- Fill in these exact fields (leave the others as default):
| Field | Value |
| Action | Pass |
| Interface | OpenVPN |
| Direction | in |
| TCP/IP Version | IPv4 |
| Protocol | any |
| Source | any |
| Destination | any |
| Destination | Allow VPN users |
- Select the Save button to apply the changes.
- Hit the Apply Changes to validate the rule.
Create OpenVPN admin user
In order to create a VPN user, it’s necessary to create the account and issue a personal certificate for them at the same time.
- Go to System > Access > Users.
- Select the Add + button in the Users card bottom-right.

- Fill in these exact fields (leave the others as default):
| Field | Value |
| Username | admin_vpn |
| Password | (Your strong password) |
| Full name | (Optional) |
- Hit the Save button to apply the changes.
Create a certificate for the OpenVPN admin
Generate a unique User Certificate that acts as a digital key, allowing the administrator to prove their identity and connect to the VPN.
- Go to System > Trust > Certificates.
- Select the Add + button in the Certificates card bottom-right.
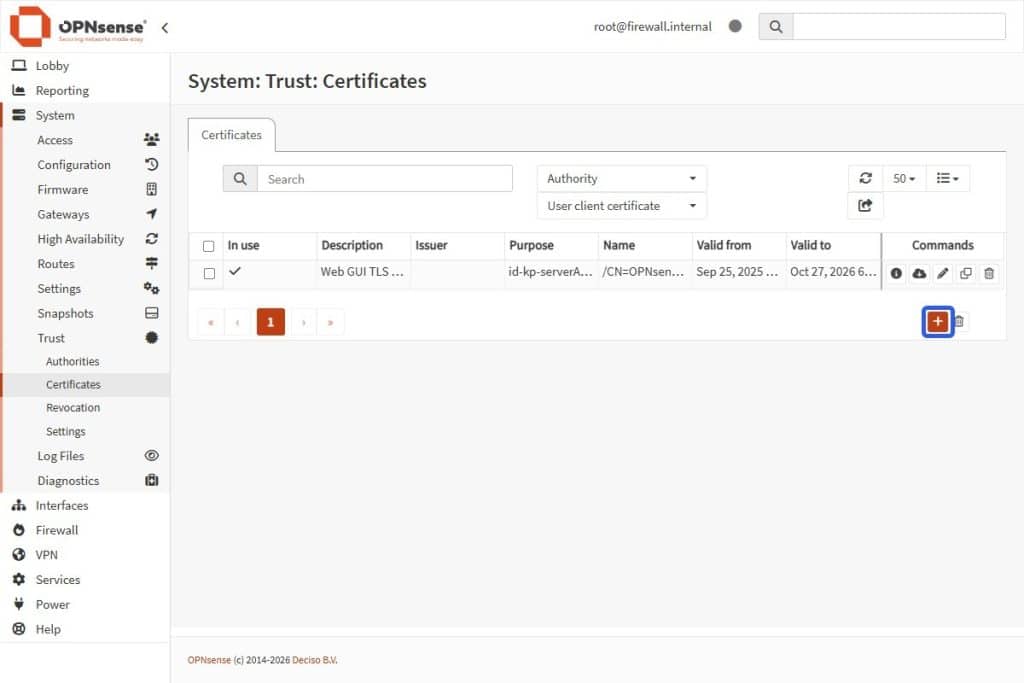
- Fill in these exact fields:
| Field | Value |
| Method | Create an internal certificate |
| Description | admin_vpn |
| Type | Client certificate |
| Key type | RSA-2048 |
| Digest algorithm | SHA256 |
| Issuer | OpenVPN-CA |
| Lifetime (days) | 3650 (Recommended: 10 years so it doesn’t expire) |
| Country code | Your country |
| State or province | Your state or province |
| City | Your city |
| Organization | Your organization or company name |
| Common name | admin_vpn (CRITICAL: Must match username exactly) |
- Select the Save button to apply the changes.
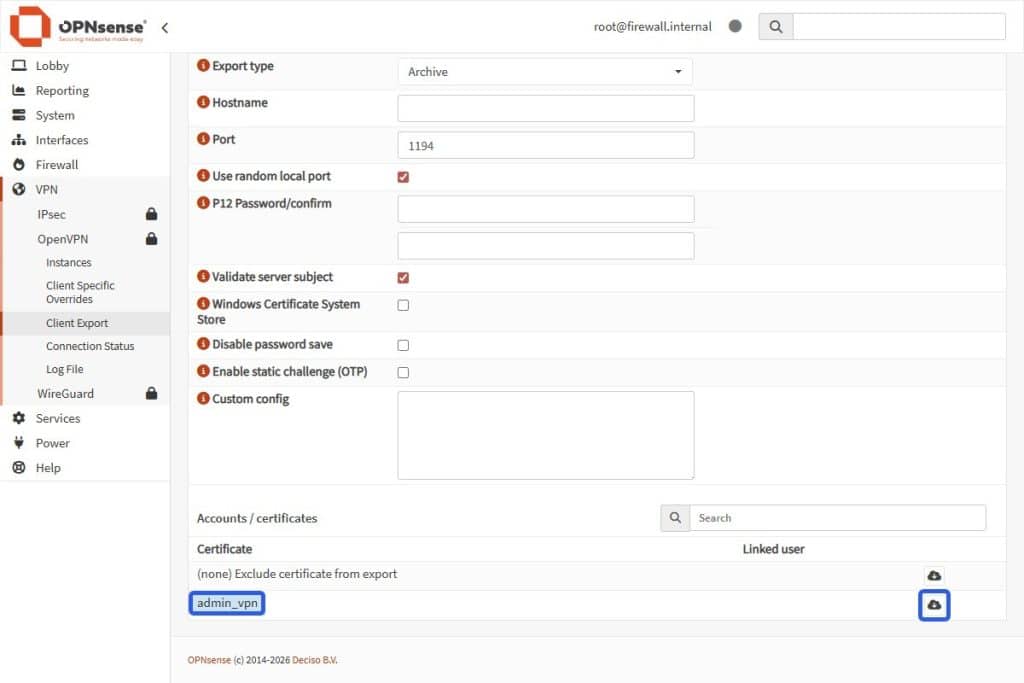
OpenVPN client export
Generate and download a ready-to-use configuration file that automatically installs the correct OpenVPN keys and settings onto your phone or laptop.
- Go to VPN > OpenVPN > Client export.
- Find admin_vpn in the list at the bottom.
- Click the Cloud download icon to get your .ovpn file.
Congratulations! You now have a fully-working OPNSense firewall service with NAT and VPN on your Kamatera server.