


An IPsec VPN on FortiGate lets you securely connect to private networks over the internet (site-to-site) and allows remote users to access internal resources (remote access). In cloud environments like Kamatera, setting up an IPsec VPN on FortiGate enables you to seamlessly extend or integrate your virtual networks with on-premises systems and remote teams, ensuring secure and reliable connectivity.
Note: If your usage does not require a 24-hour connection (ie, you only need protection when you are working) and if it is not between 2 big networks, then it is better to use SSL VPN (regular VPN).
This guide walks you through setting up an IPsec VPN on a FortiGate firewall, focusing on two key scenarios:
- Remote Access (Windows FortiClient to FortiGate)
A user from a Windows machine uses FortiClient to securely connect to a FortiGate firewall. After completing the VPN configuration, the Windows client should be able to reach devices inside the protected LAN. - Site-to-Site VPN (FortiGate to FortiGate)
Two FortiGate firewalls, each securing its local LAN- are interconnected via an IPsec site-to-site tunnel. This enables hosts on each LAN to communicate securely across the tunnel.
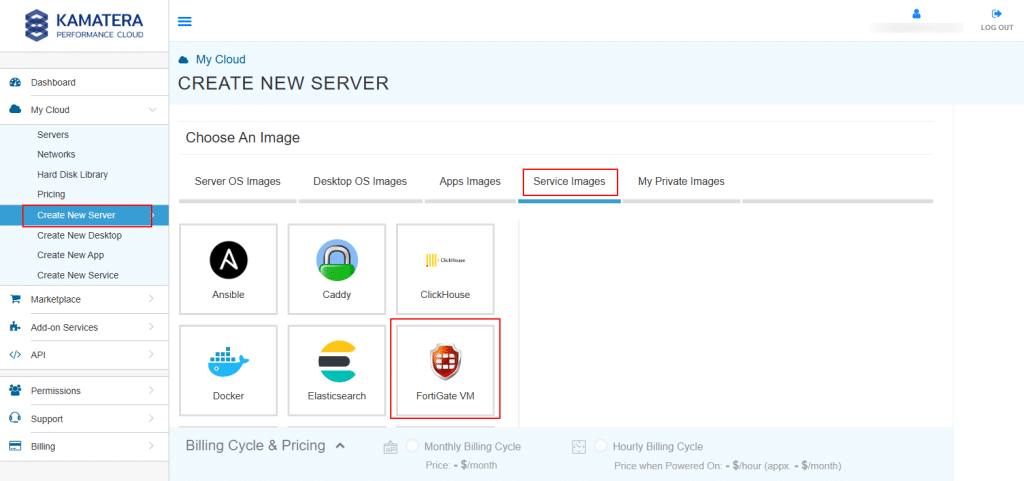
These scenarios are ideal for hands-on learning, especially within virtual environments like Kamatera. You’ll get practical exposure to configuring tunnel creation, user authentication, addressing, policy routing, and verification. For this guide, we are using the FortiGate service image provided by Kamatera. Here’s how to deploy a Kamatera server.
Remote Access IPsec VPN (Windows to FortiGate)
We are going to configure an IPsec VPN connection from a Windows machine to a FortiGate firewall. The goal is to enable connectivity from the Windows machine to a device on the remote network, allowing you to verify connectivity once the VPN connection is established.
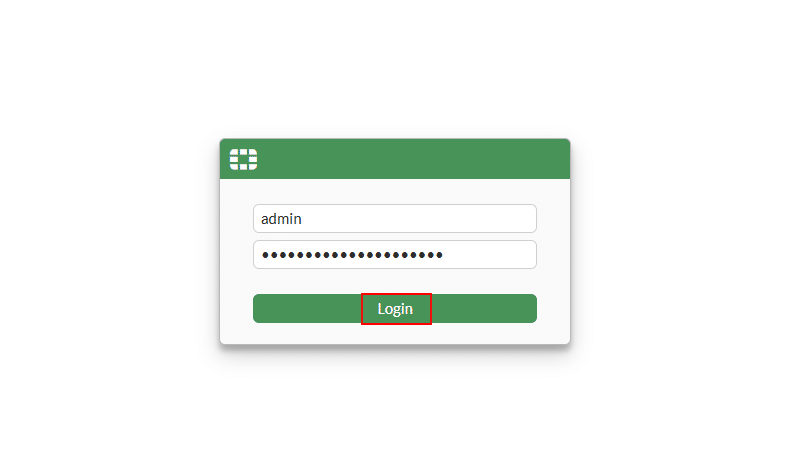
Log in to the FortiGate firewall by entering your administrator credentials.
Configuration steps:
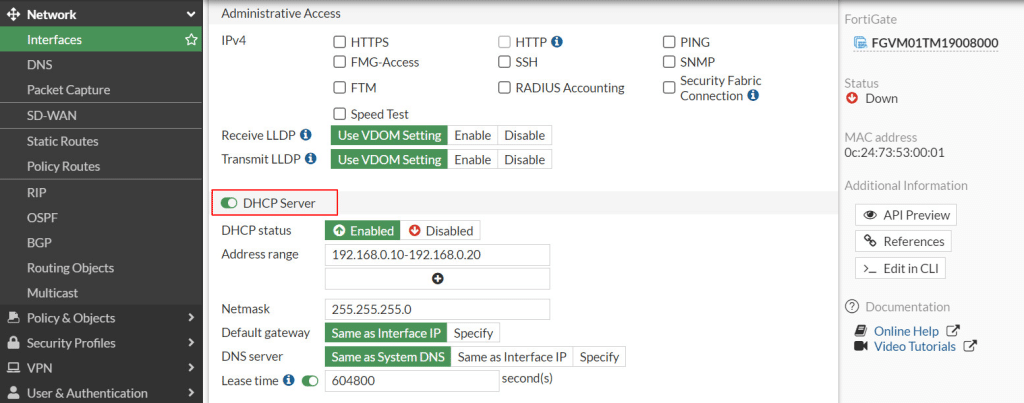
- Set up DHCP on FortiGate Port2 (LAN):
Go to Network-> Interfaces in the FortiGate dashboard.
- Select Port2 (LAN) and
Toggle the switch to ON in the DHCP Server section to enable the DHCP service.
- DHCP Status: Enabled (This allows FortiGate to assign IP addresses automatically to devices on the LAN).
- Address Range: 192.168.0.10 – 192.168.0.20 (Enter the Address Range for DHCP clients, this means devices will be assigned an IP in this range).
- Netmask: 255.255.255.0
- Default Gateway: Choose Same as Interface IP (The LAN interface IP will act as the gateway for client devices.)
- DNS Server: 4.2.2.4 (or choose Same as System DNS if you prefer to use FortiGate’s global DNS settings).
- Click OK to apply the configuration.
Now, any device connected to the LAN through Port2 will automatically receive an IP address, gateway, and DNS settings from the FortiGate DHCP server.
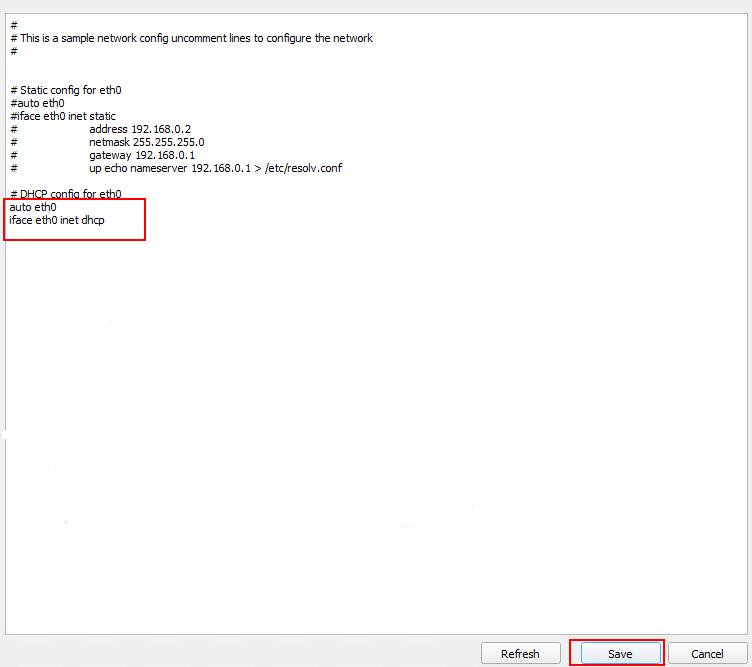
Now, edit the Network Configuration File to configure a Static IP. To use DHCP, make sure the following lines are present and uncommented (that is remove # symbols at the beginning of each line):
auto eth0
iface eth0 inet dhcp
After making changes, click Save and restart networking.
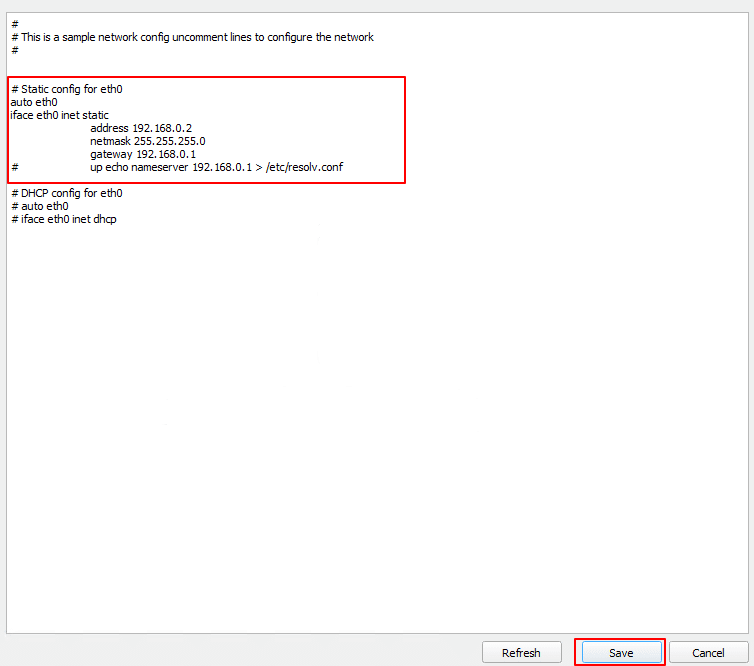
In the same network configuration file, locate the section labeled Static config for eth0. Remove the # symbols at the beginning of each line to enable the static configuration.
auto eth0
iface eth0 inet static
address 192.168.0.2
netmask 255.255.255.0
gateway 192.168.0.1
up echo nameserver 192.168.0.1 > /etc/resolv.conf
Save the changes and restart the networking service.
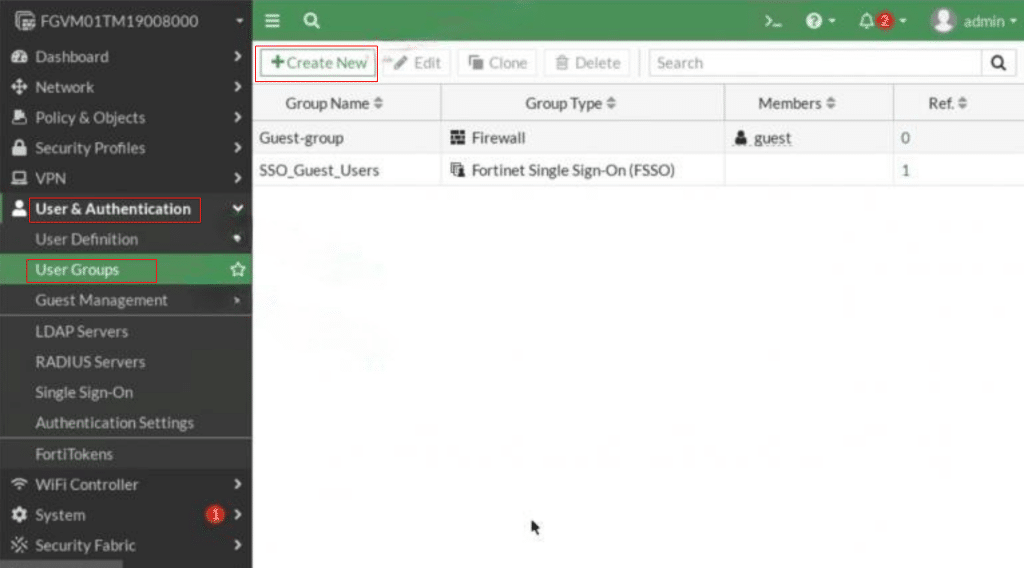
Create a user group and user (for VPN authentication)
To allow clients to log in to the VPN, you first need to create a user group and a local user account. In the FortiGate dashboard, from the left-side menu, navigate to the User & Authentication-> User Groups.
Then, click Create New.
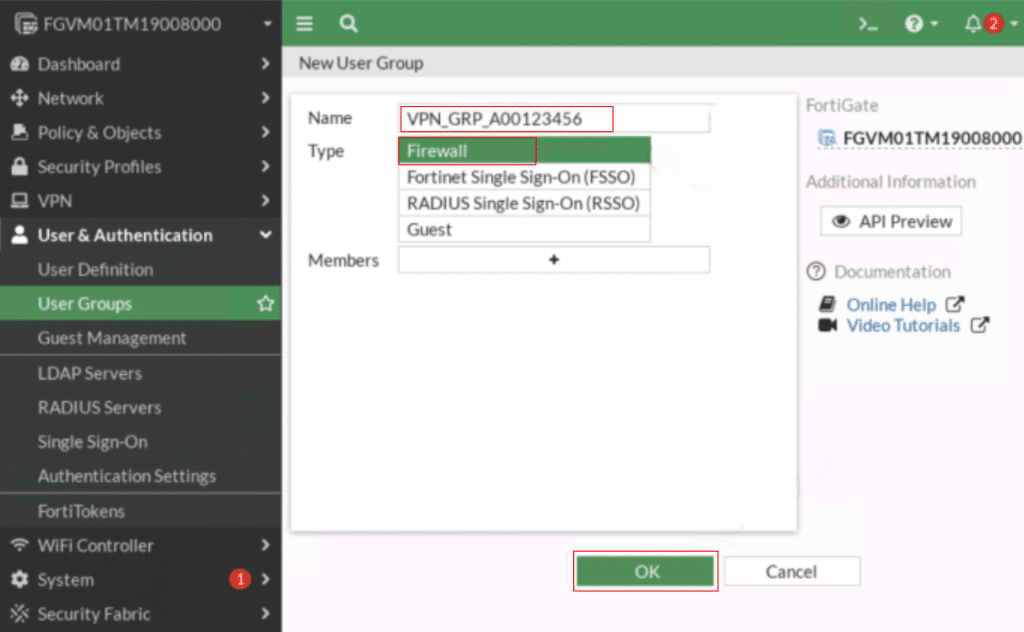
Enter a Name (e.g., VPN_GRP_A00123456) and Type (e.g., Firewall). Click OK to save the group.
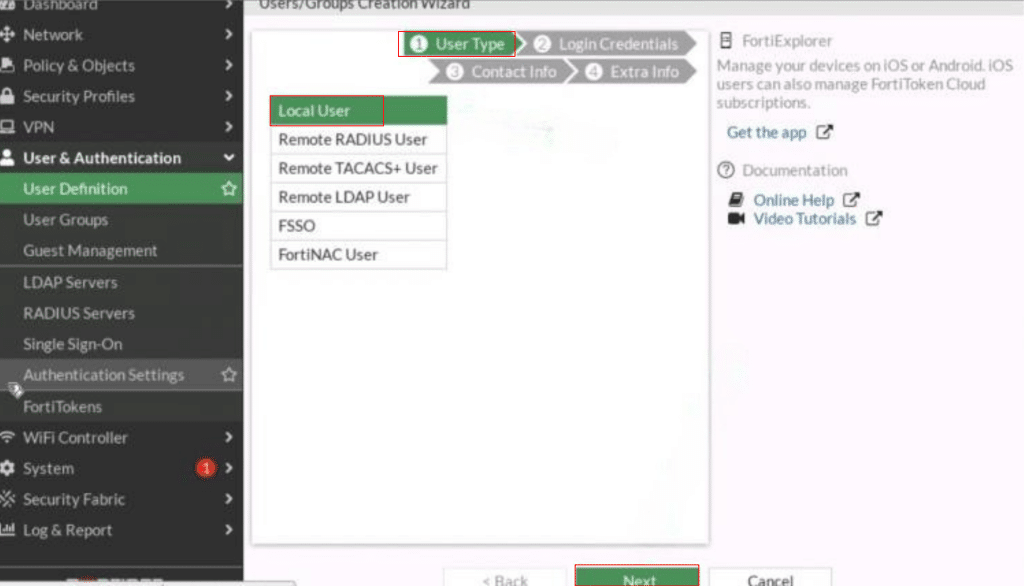
Next, go to User & Authentication-> User Definition. Click Create New to add a new user.
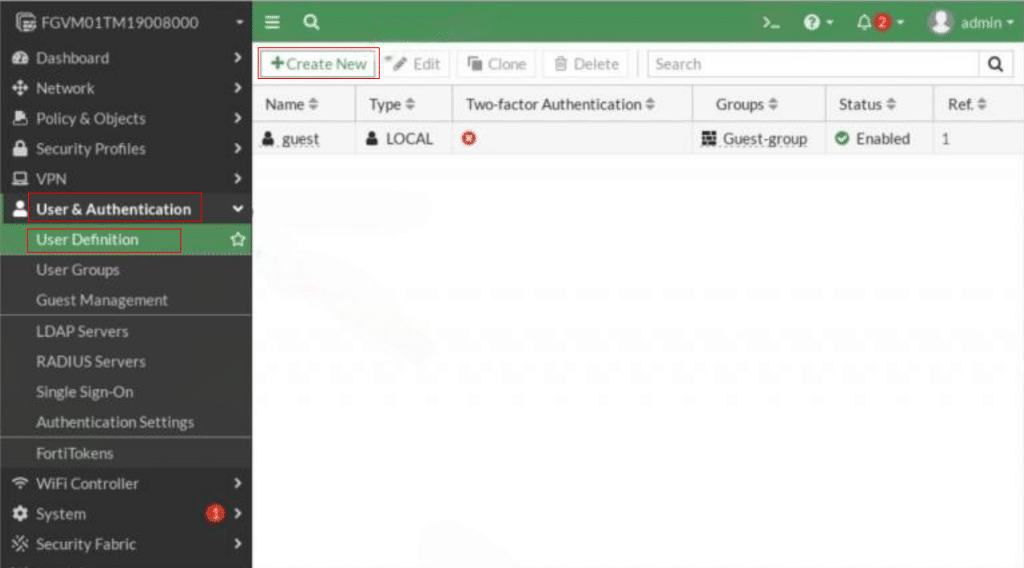
When the Users/Groups Creation Wizard opens, under User Type, select Local User and then click Next.
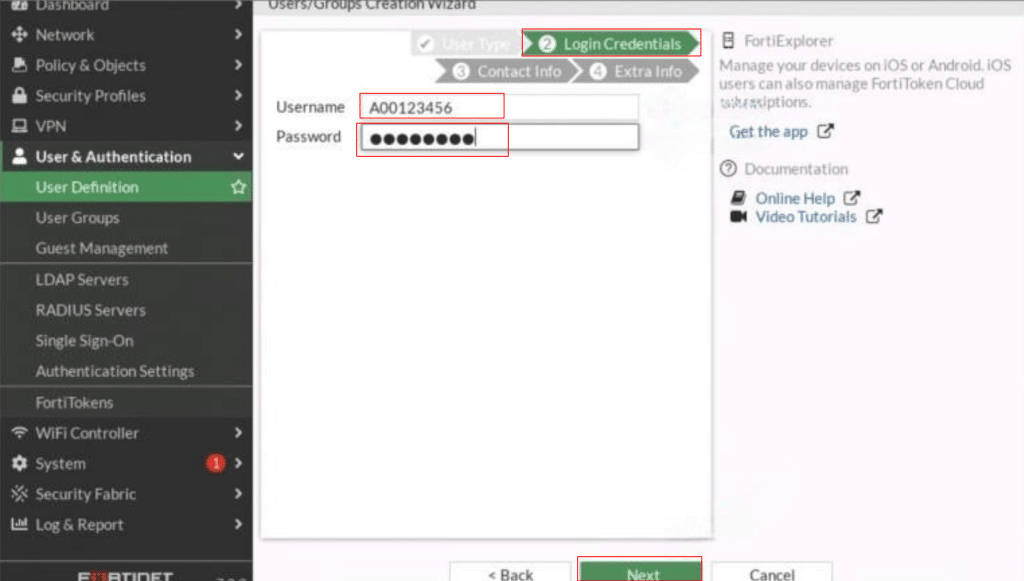
In the Login Credentials step, enter a Username and Password in the provided fields, then click Next.
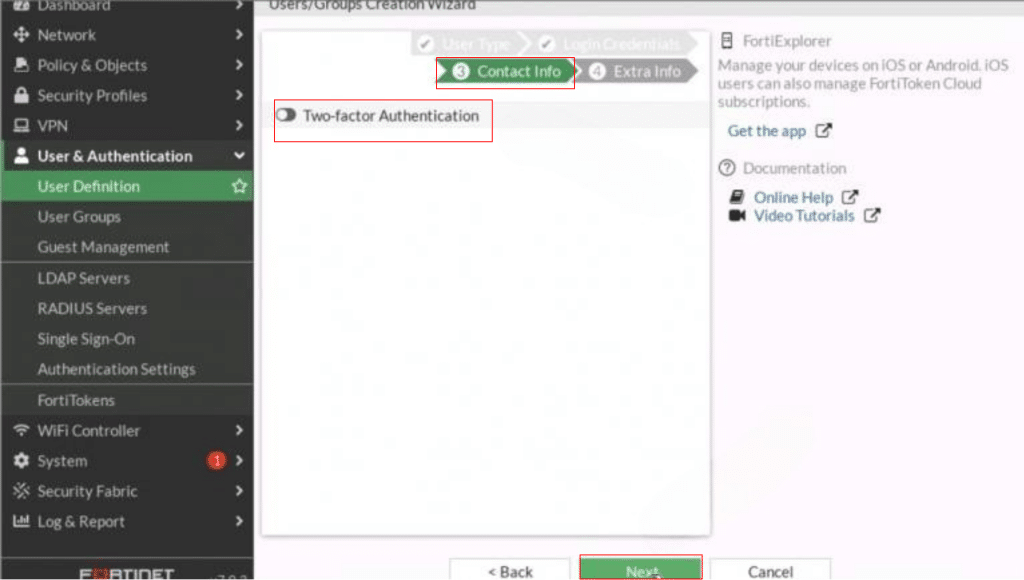
In the Contact Info step, disable Two-Factor Authentication by toggling the switch to Off, then click Next.
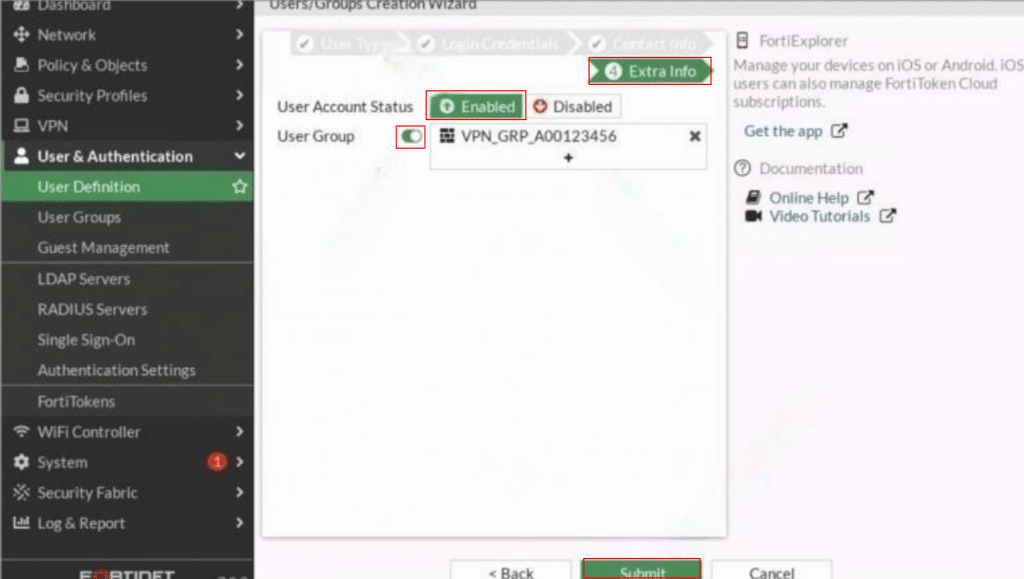
In the final step, Extra Info, set User Account Status to Enabled. Toggle the User Group option to On and select the appropriate User Group (e.g., VPN_GRP_A00123456) for the user profile. Then click Submit.
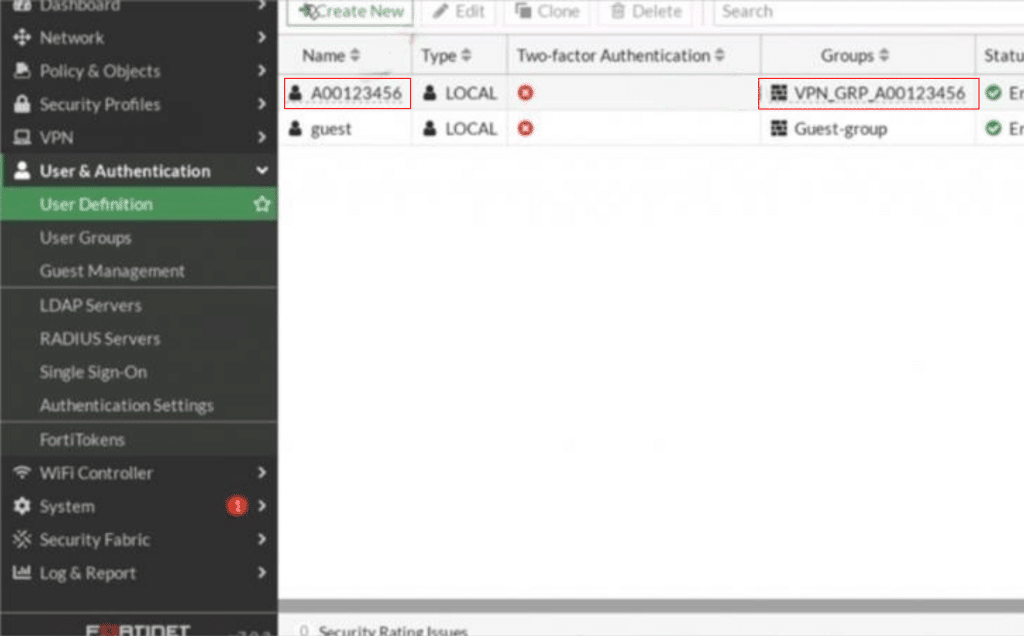
The newly created user group will now appear in the list of groups, as shown in the screenshot below. You can edit this group later to add more users or adjust its settings if needed.
Launch the IPsec wizard (Remote access setup)
FortiGate provides a built-in wizard to simplify creating a remote access VPN for FortiClient users.
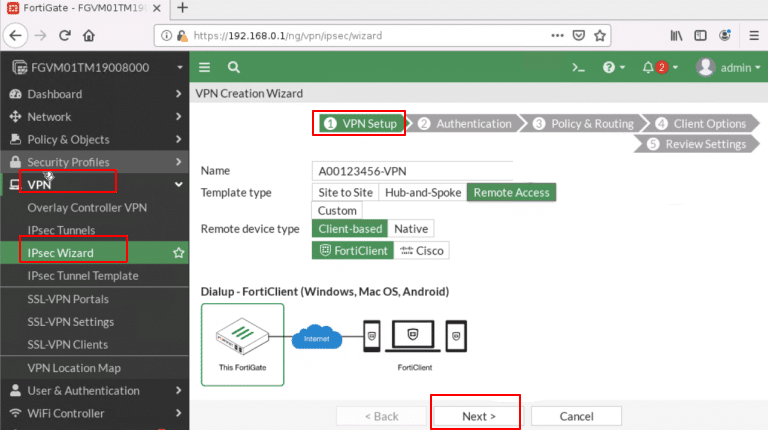
From the left-side menu, go to VPN-> IPsec Wizard.
When the VPN Creation Wizard opens,
- In the first step, VPN Setup, configure the following:
- Name: A0ID-VPN (replace A0ID with your student ID).
- Template Type: Remote Access.
- Remote Device Type: Choose Client-based and select FortiClient, since that’s the client software.
Now, click Next.
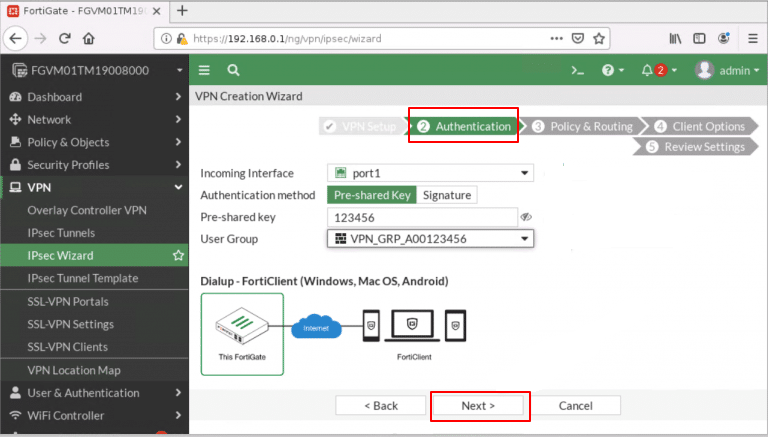
- In the second step, Authentication, configure the following:
-
- Incoming Interface: Choose your WAN port that is Port1 so clients can connect over the internet.
- Authentication Method: Select Pre-Shared Key (set a secure key that both FortiGate and FortiClient will use).
- Pre-Shared Key: Enter the key as a password.
- User Group: Select the group you created (VPN_GRP_A0123456).
Click Next.
- In the final step (Review Settings) of the VPN Creation Wizard, you will see a summary of all the configuration details before creating the VPN.
-
- Phase 1 interface: Displays the interface chosen for Phase 1 setup.
- Phase 2 interface: Displays the interface chosen for Phase 2 setup.
- Address: Shows the IP address range assigned to VPN clients.
- Remote to local policies: Lists the firewall policies that will control VPN traffic.
- Endpoint Registration: Shows the profile created for VPN client registration.
Once you’ve reviewed and confirmed all values, click Create to finalize the VPN configuration.

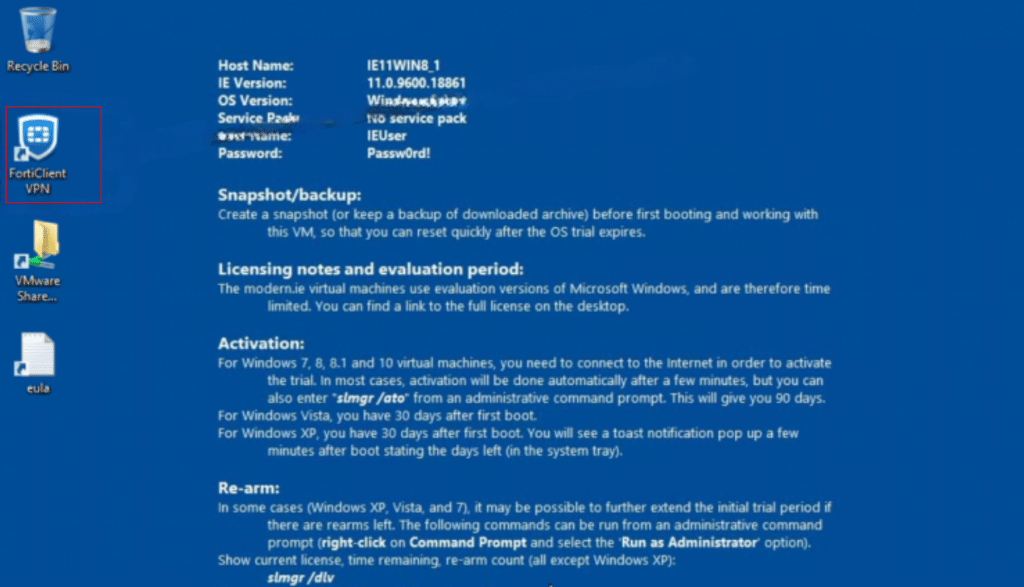
Install and configure FortiClient on Windows
Download FortiClient from the official Fortinet website (https://www.fortinet.com/products/endpoint-security/forticlient) and Install FortiClient on your Windows machine by following the installation wizard.
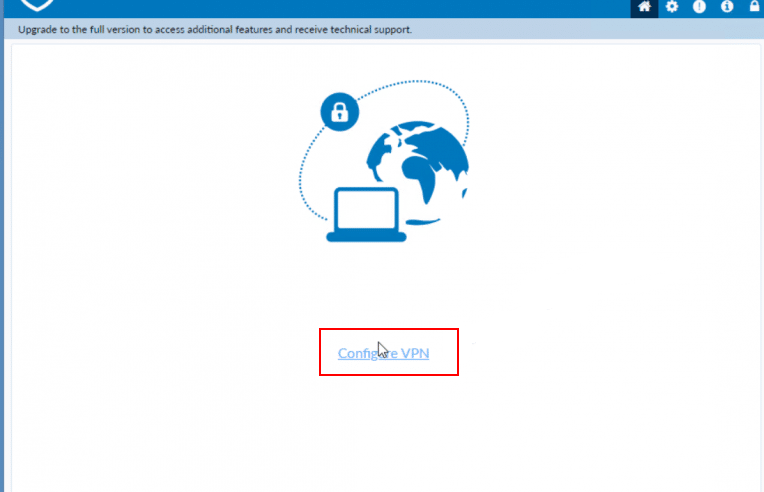
Click on Configure VPN to configure VPN in FortiClient.
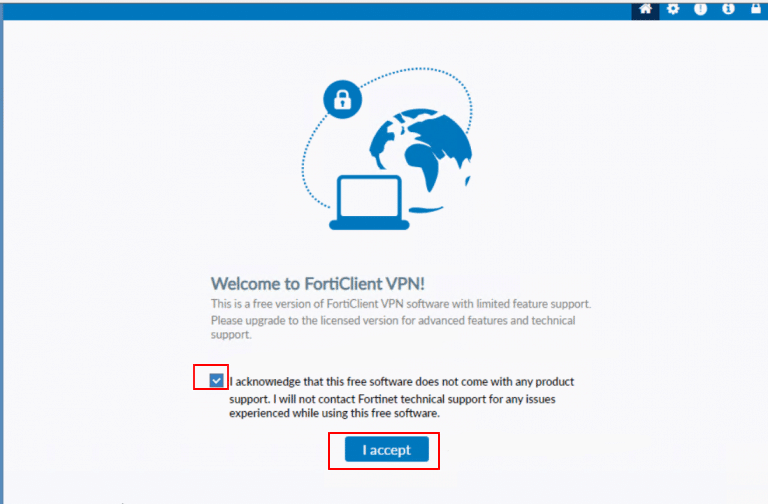
Check the box next to Acknowledgement and click on I accept to accept the FortiGate Free License.
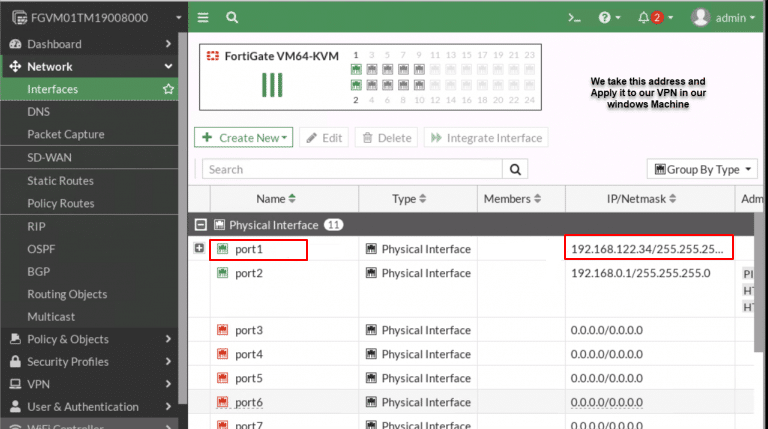
From your FortiGate device, copy the Port1 IP address.
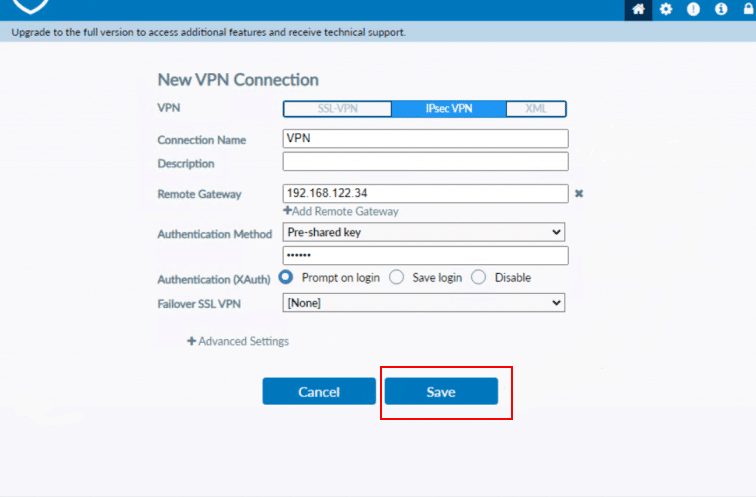
- In the New VPN Connection screen,
-
- VPN: Choose IPSec-VPN
- Connection Name: VPN
- Remote Gateway: enter the Port1 IP address of your FortiGate device and
- Authentication Method: From the drop-down menu, choose Pre-shared key and enter the key in the field provided.
- Authentication (XAuth): Choose Prompt on Login
- Failover SSL VPN: Select None.
Then, click Save.
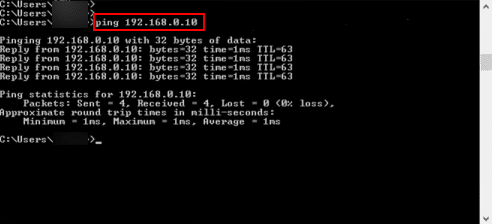
Verify connectivity
After completing the setup, verify that the VPN is working correctly: On your Windows machine, open Command Prompt, run a ping test to an IP address within your VPC.
Command:
ping <VPC_IP_ADDRESS>
If the configuration is correct, you should receive successful reply messages.
Site-to-Site IPsec VPN (FortiGate to FortiGate)
We are going to set up an IPsec VPN tunnel between Site 1 and Site 2. Each site has its own FortiGate firewall, and a client machine connected to the internal LAN. After configuring both firewalls through the IPsec VPN Wizard, we will verify connectivity by testing communication between the client machines at each site.
To validate the firewall licenses, we first connect both FortiGate devices to the Internet.
Configuration steps:
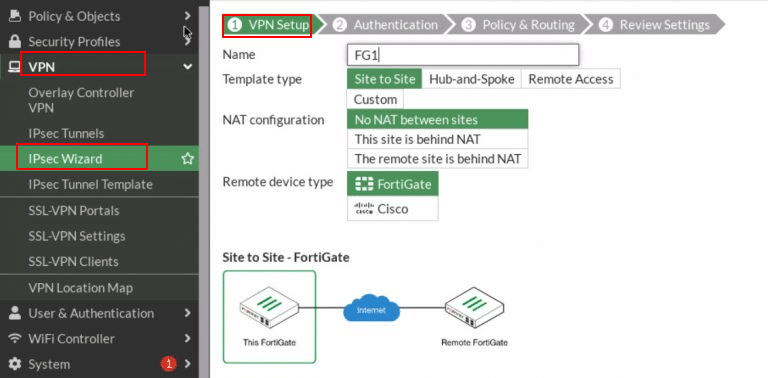
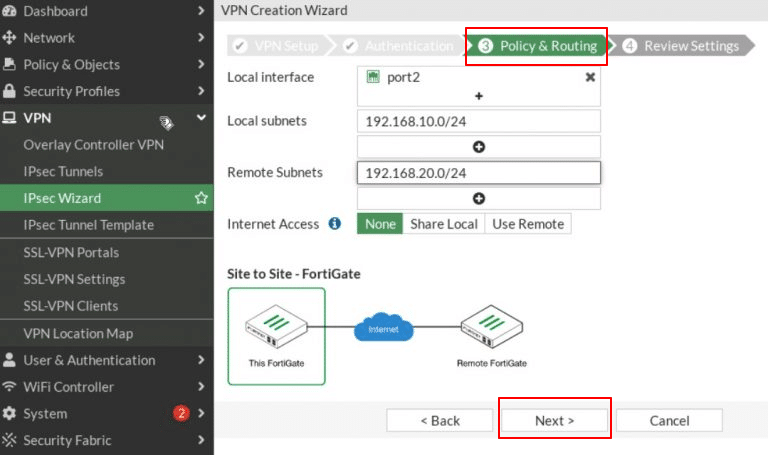
- On FortiGate 1 (FG1):
Navigate to VPN > IPsec Wizard. When the VPN Creation Wizard opens,
- Complete the first step, VPN Setup by entering the required details:
- Name: Enter a descriptive name for the tunnel (e.g., FG1).
- Template type: Select Site to Site (used for connecting two FortiGate devices or networks).
- NAT configuration: Choose No NAT between sites (use this if both sites have public IPs or direct connectivity).
- Remote device type: Select FortiGate (since the other device is also a FortiGate).
Click Next.
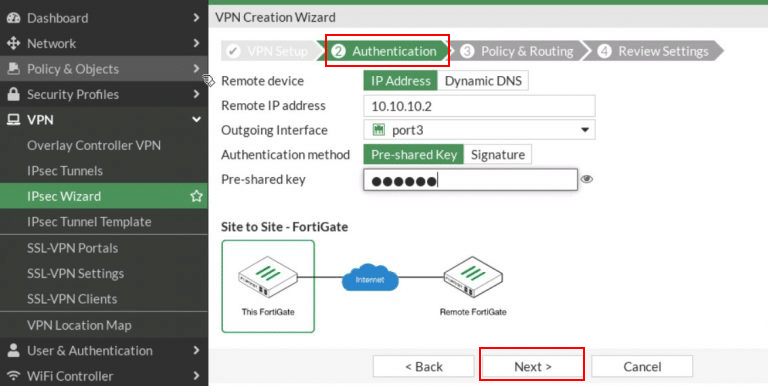
- In the second step, Authentication, configure the following:
-
- Remote Device: Select IP Address
- Remote IP address: Enter 10.10.10.2 (FG2’s WAN).
- Outgoing Interface: Choose port3 (WAN).
- Authentication Method: select Pre-shared key
- Pre-shared key: Enter the key
Click Next.
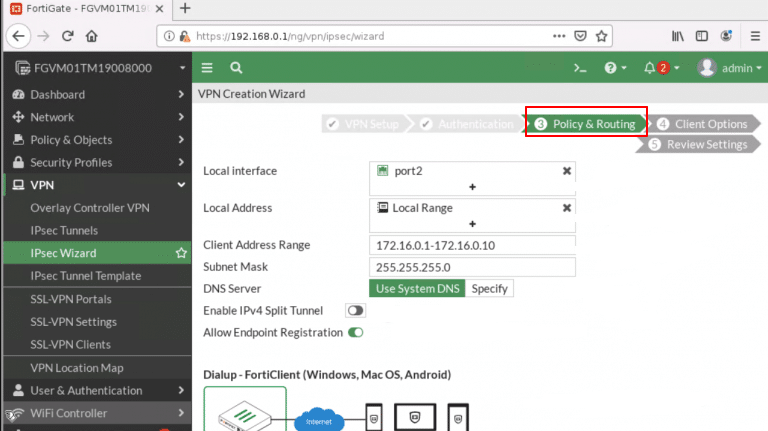
- In the third step, Policy and Routing, configure the following:
-
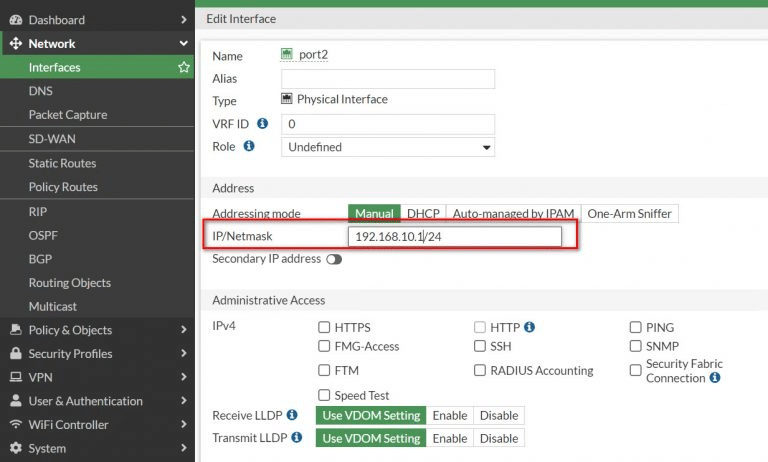
- Local Interface: port2
- Local Subnet: 192.168.20.0/24
- Remote Subnet: 192.168.10.0/24
- Internet Access: None
Click Next.
- In the final step, Review Settings, review the configuration and click Submit.
When you complete the wizard, FortiGate automatically creates two firewall policies and two static routes to enable traffic between the local and remote subnets.
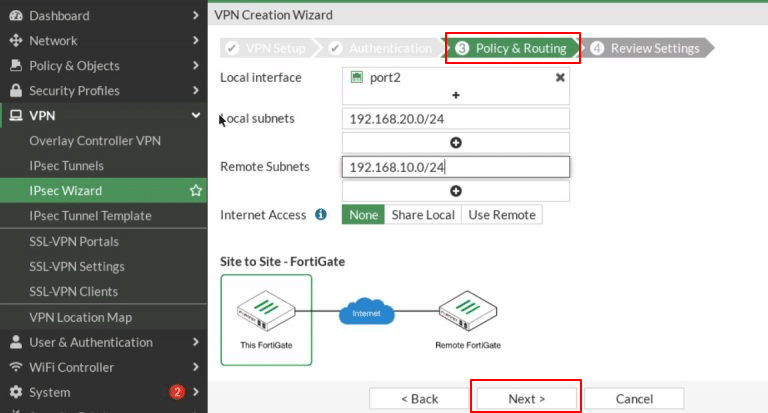
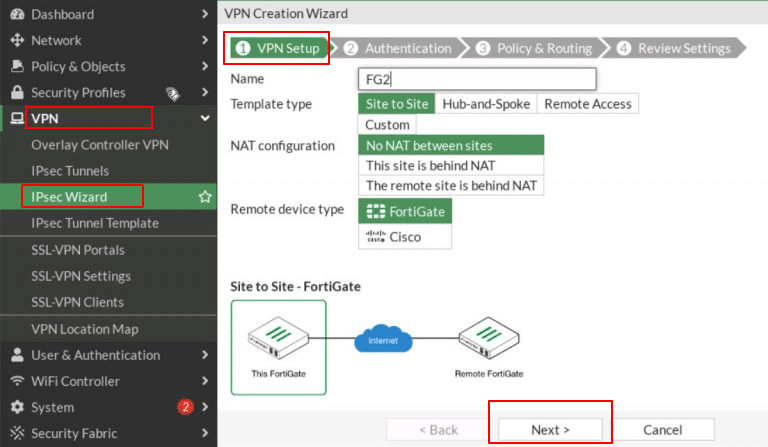
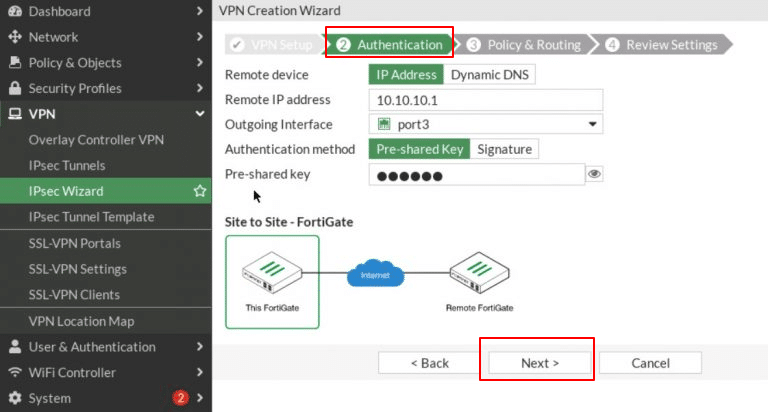
- On FortiGate 2 (FG2):
Navigate to VPN > IPsec Wizard. When the VPN Creation Wizard opens,
- Complete the first step, VPN Setup by entering the required details:
- Name: Enter a descriptive name for the tunnel (e.g., FG2).
- Template type: Select Site to Site (used for connecting two FortiGate devices or networks).
- NAT configuration: Choose No NAT between sites (use this if both sites have public IPs or direct connectivity).
- Remote device type: Select FortiGate (since the other device is also a FortiGate).
Click Next.
- In the second step, Authentication, configure the following:
-
- Remote Device: Select IP Address
- Remote IP address: Enter 10.10.10.1 (FG1’s WAN).
- Outgoing Interface: Choose port3 (WAN).
- Authentication Method: select Pre-shared key
- Pre-shared key: Enter the key
Click Next.
- In the third step, Policy and Routing, configure the following:
-
- Local Interface: port2
- Local Subnet: 192.168.20.0/24
- Remote Subnet: 192.168.10.0/24
- Internet Access: None
Click Next.
- In the final step, Review Settings, review the configuration and click Submit.
When you complete the wizard, FortiGate automatically creates two firewall policies and two static routes to enable traffic between the local and remote subnets.
- Now, Configure IPSec Tunnels.
Navigate to VPN->IPSec Tunnels.
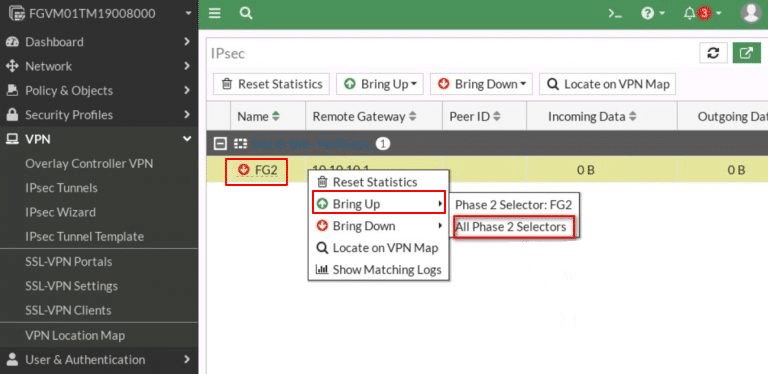
- Double click on Inactive as shown in the screenshot below.

Right-click on the VPN tunnel and select Bring Up-> All Phase 2 Selectors. Once completed, the tunnel should be active and operational.
- Now, verify the status of the tunnel.
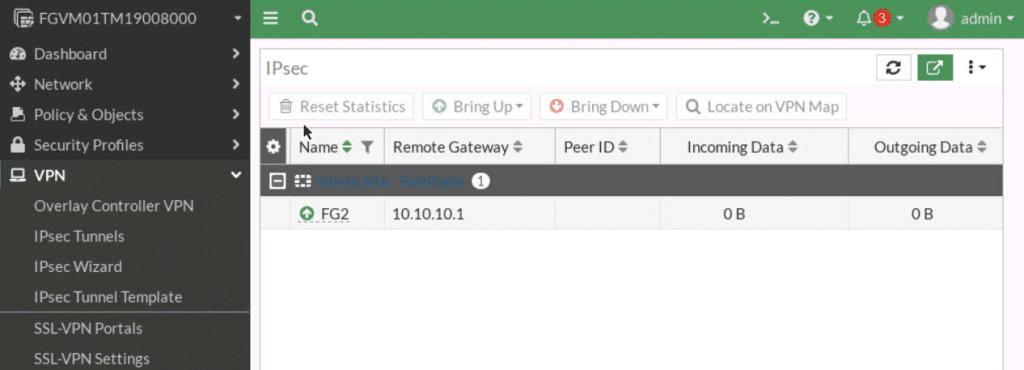
- Verify connectivity:
- Go to Logs & Reports-> Event-> VPN Event to verify the VPN configuration and ensure the tunnel is functioning correctly.
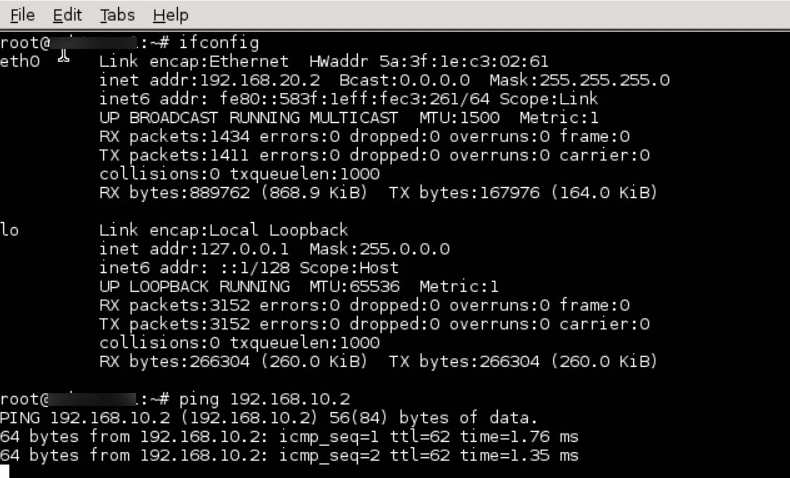
You should now be able to ping from the local host to the remote host to verify connectivity through the VPN tunnel.
You have now successfully configured IPsec VPN tunnels on a FortiGate firewall for both remote access and site-to-site connections. By following these steps, you’ve established a secure pathway for users to access internal resources and for two networks to communicate seamlessly over the internet.