


The DNS_PROBE_FINISHED_NXDOMAIN error indicates that the domain name system (DNS) was unable to resolve a website’s address. This typically means that the domain you’re trying to reach doesn’t exist (NXDOMAIN = Non-Existent Domain), or there is a problem with your network, DNS configuration, or browser cache.
This guide walks you through multiple solutions to resolve the issue on Windows and Linux systems. Kamatera’s high-performance cloud infrastructure ensures DNS resolution issues are rare, but when they occur, this guide will help you troubleshoot effectively.
1. Restart your computer and modem/router
Before diving into system configurations, restart your internet modem or router by powering off the device, waiting for 10-15 seconds, and then powering it back on. Once restarted, try accessing the website again.
2. Clear browser DNS cache
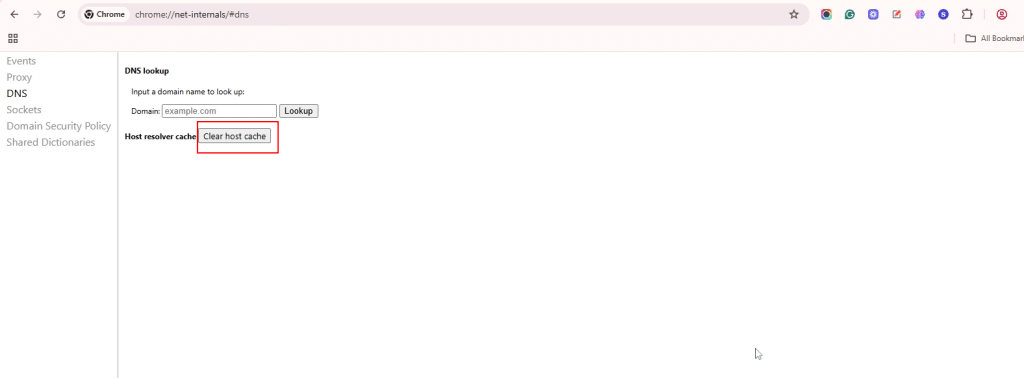
To clear the DNS cache in Google Chrome, open Chrome and in the address bar type chrome://net-internals/#dns, then click on Clear host cache. After that, restart the browser and try accessing the website again.
3. Clear browser cache and cookies
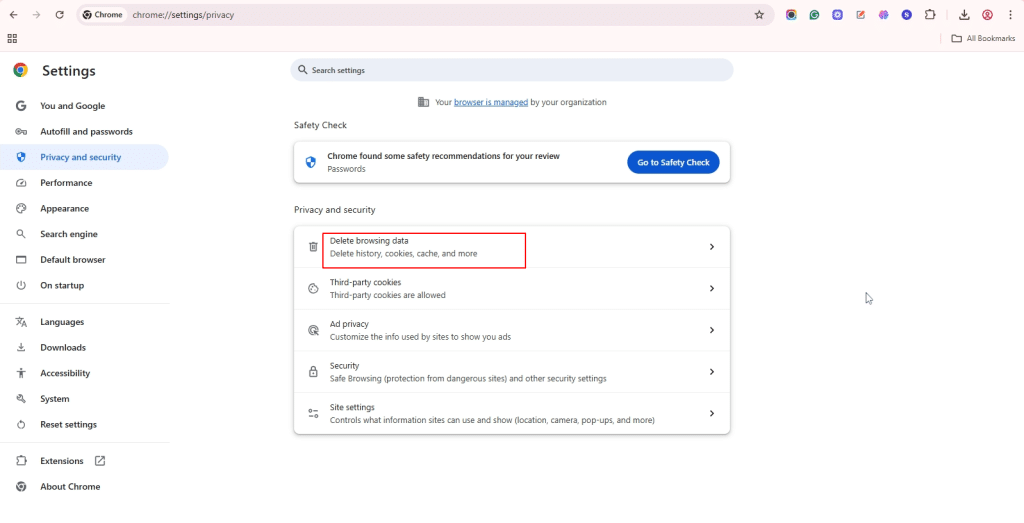
Sometimes, corrupted cache or cookies can interfere with DNS resolution. To clear them in Google Chrome address bar, type chrome://settings/privacy. Under Privacy and security section, click Delete browsing data. Alternatively, you can press Ctrl + Shift + Delete to open the Delete browsing data window directly.
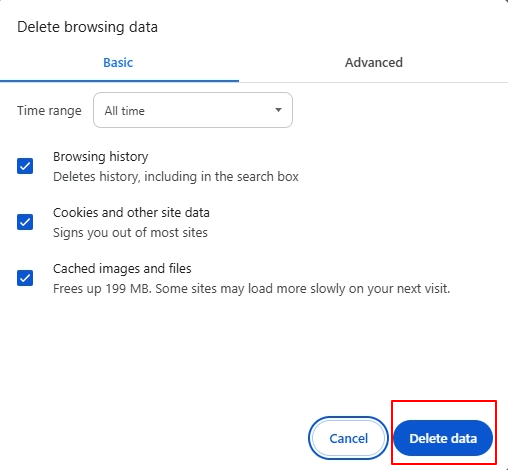
Beside Time range, use the drop-down menu to select All time. Then check Cookies and other site data and Cached images and files. Click Clear data, restart your browser, and try accessing the website again.
4. Reset Chrome flags
Google Chrome includes experimental features known as “flags” that users can enable or disable to test new functionalities. Occasionally, changing these settings can interfere with how Chrome handles DNS, causing errors like DNS_PROBE_FINISHED_NXDOMAIN.
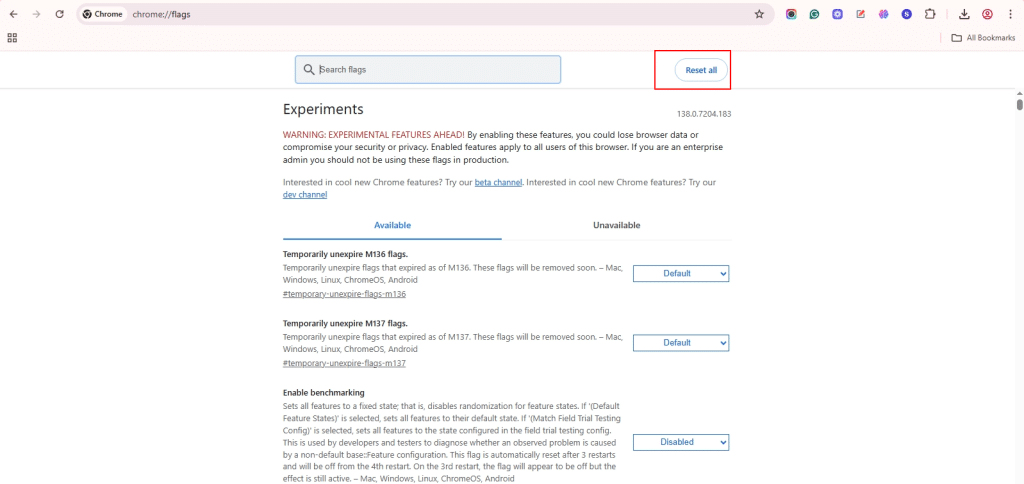
To reset Chrome flags, open Chrome and in the address bar, type chrome://flags. At the top-right, click the “Reset all” button, then restart Chrome.
5. Flush your system DNS cache
Over time, your system stores DNS records in a local cache to speed up domain resolution. However, if this cached data becomes outdated or corrupted, it can lead to errors like DNS_PROBE_FINISHED_NXDOMAIN. Flushing the DNS cache forces your system to discard old entries and fetch updated DNS information, often resolving the issue quickly.
On Windows
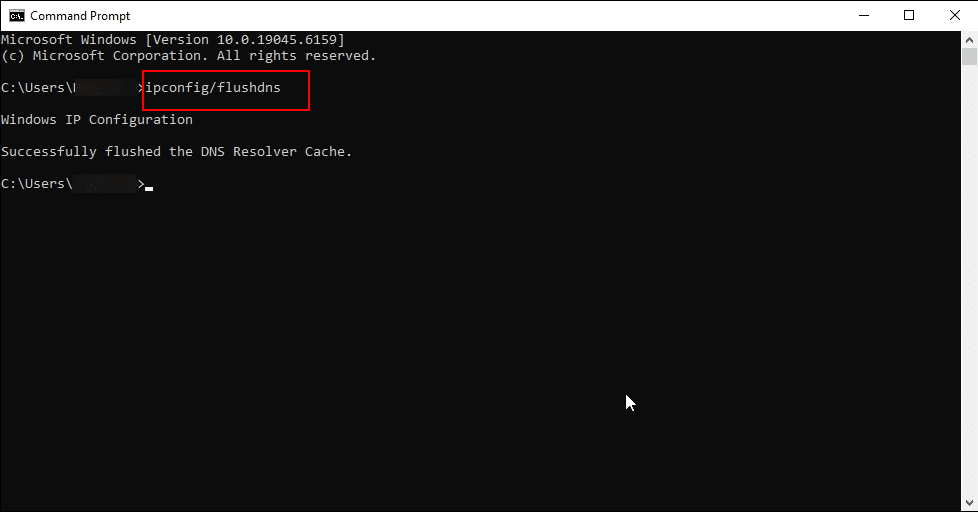
- Press Win + R, type cmd, and hit Enter.
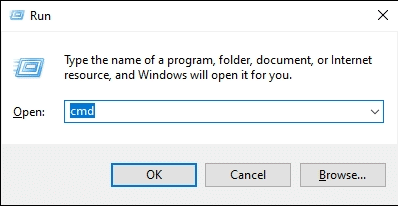
In the Command Prompt, type:
Command: ipconfig /flushdns
Press Enter and wait for the confirmation message.
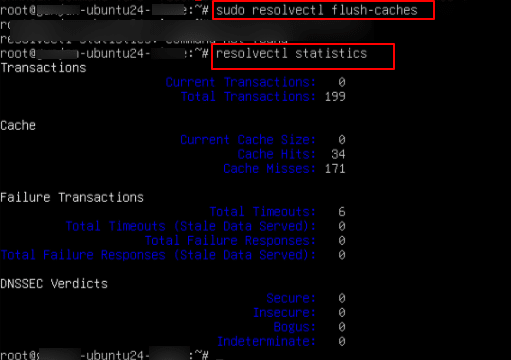
On Linux
Open your terminal, log in via SSH as the root user, and run the following commands:
If your system uses systemd-resolved for DNS resolution, you can check if the service is active by running:
Command: systemctl is-active systemd-resolved

If the service is active, use the following command to flush the DNS cache:
Command: sudo resolvectl flush-caches
To verify that the cache has been flushed, you can run:
Command: resolvectl statistics
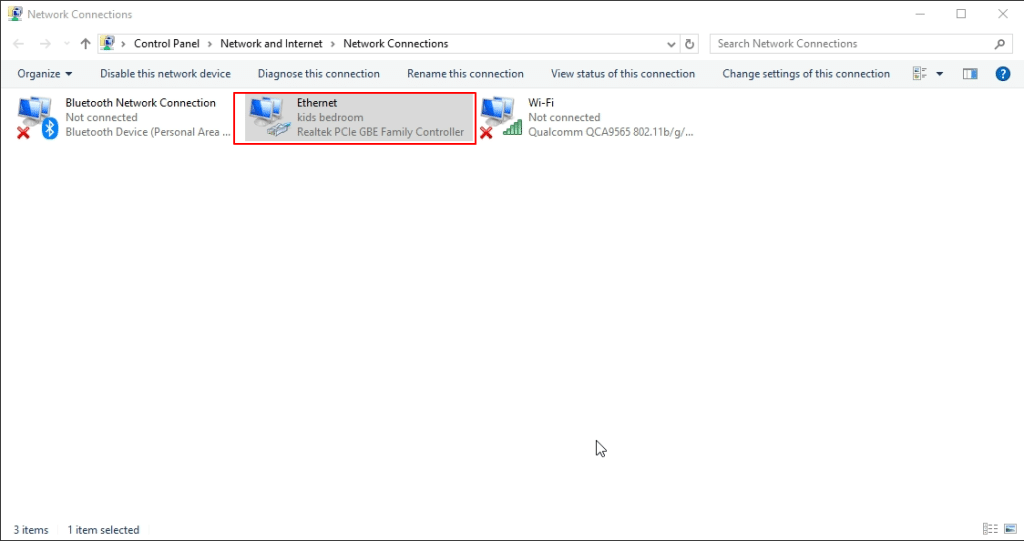
6. Change DNS server settings
Sometimes, your ISP’s DNS may fail to resolve domains. You can switch to a public DNS provider like Google.
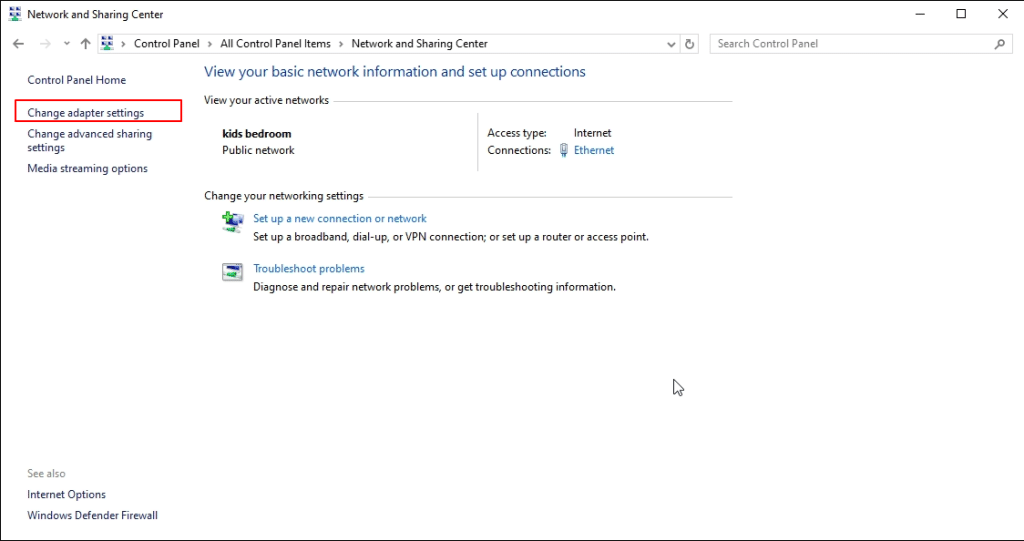
On Windows
- Go to Control Panel -> Network and Sharing Center -> Change adapter settings.
2. Right-click your active network adapter and select Properties.
3. Select Internet Protocol Version 4 (TCP/IPv4) and click Properties.
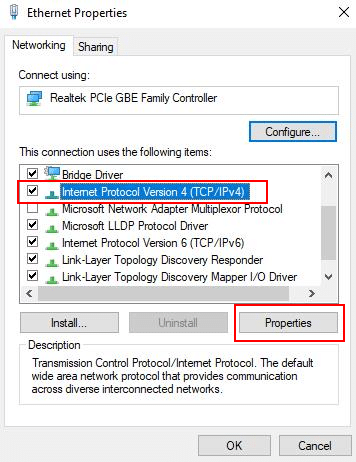
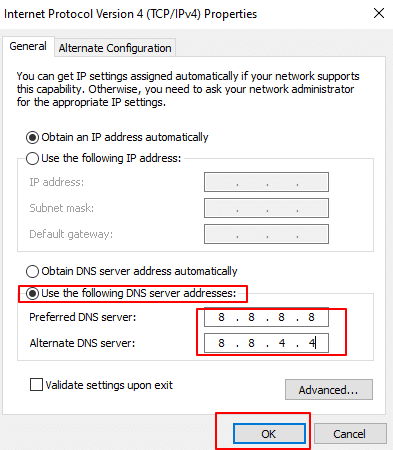
4. Choose Use the following DNS server addresses, and enter:
- Preferred DNS: 8.8.8.8
- Alternate DNS: 8.8.4.4 (Google)
- Click OK and restart your browser.
On Linux
Open your terminal, log in via SSH as the root user, and run the following commands:
- Edit the /etc/resolv.conf file (temporary change) by running the following command:
Command: sudo nano /etc/resolv.conf
Add the following lines:
nameserver 8.8.8.8
nameserver 8.8.4.4
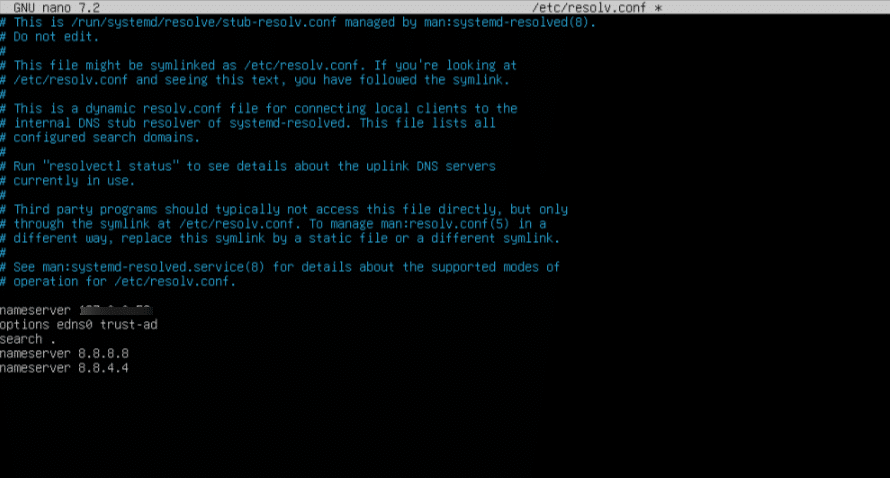
Save and exit by pressing Ctrl + X, then Y and Enter.
Note: You may see a line like nameserver 127.0.0.53- do not remove this manually.
This address is a local DNS stub resolver provided by systemd-resolved, which forwards queries to upstream servers (like 8.8.8.8) based on your system’s DNS configuration.
- Set DNS Using resolvectl (Recommended for systemd-resolved)
Run the following command to configure DNS servers:
Command: sudo resolvectl dns eth0 8.8.8.8 8.8.4.4
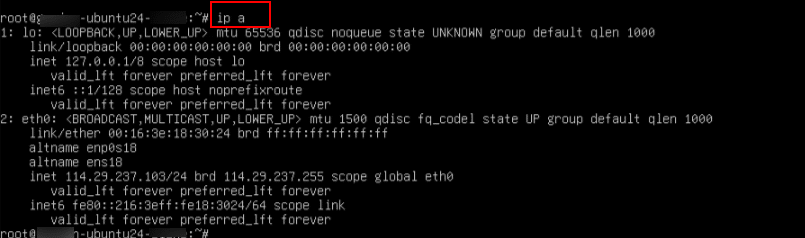
Note: Replace eth0 with your actual network interface
To know your network interface, run
Command: ip a
3. Use NetworkManager (if you’re on a desktop Linux)
If you’re using a desktop environment with NetworkManager, you can run
Command: nm-connection-editor
- Now, Go to your active connection → IPv4 Settings
- Set Method to Automatic (DHCP) addresses only
- Enter DNS: 8.8.8.8, 8.8.4.4
- Save and reconnect
Then apply the changes, by running the below command
Command: sudo systemctl restart NetworkManager
7. Disable VPN or proxy (if applicable)
A VPN or proxy may route your traffic through DNS servers that are misconfigured.
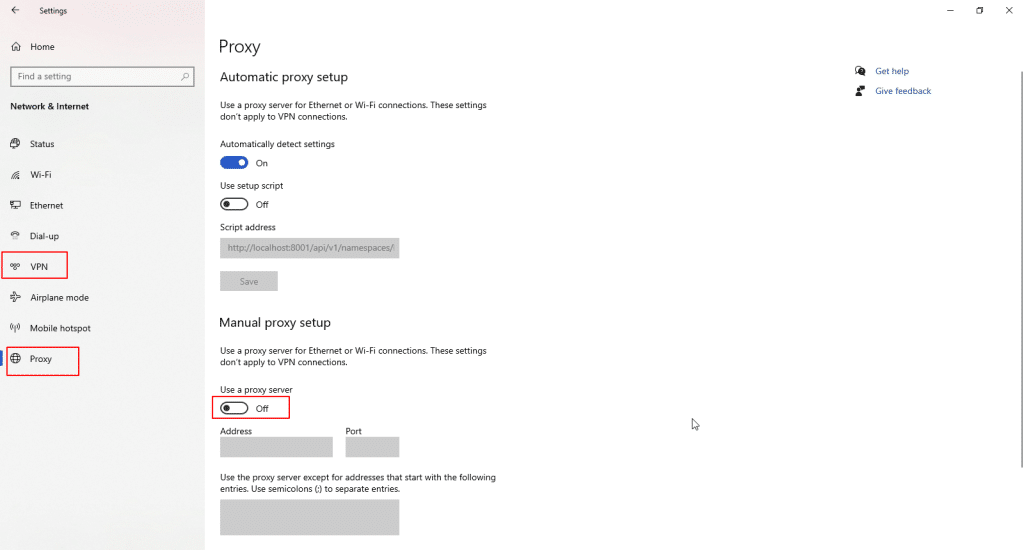
On Windows
Go to Settings -> Network & Internet -> Proxy (or) Settings -> Network & Internet -> VPN and disable any active proxy.
On Linux
Check for proxy settings in environment variables or network configuration tools.
8. Disable antivirus or firewall temporarily
Some security software may block DNS queries.
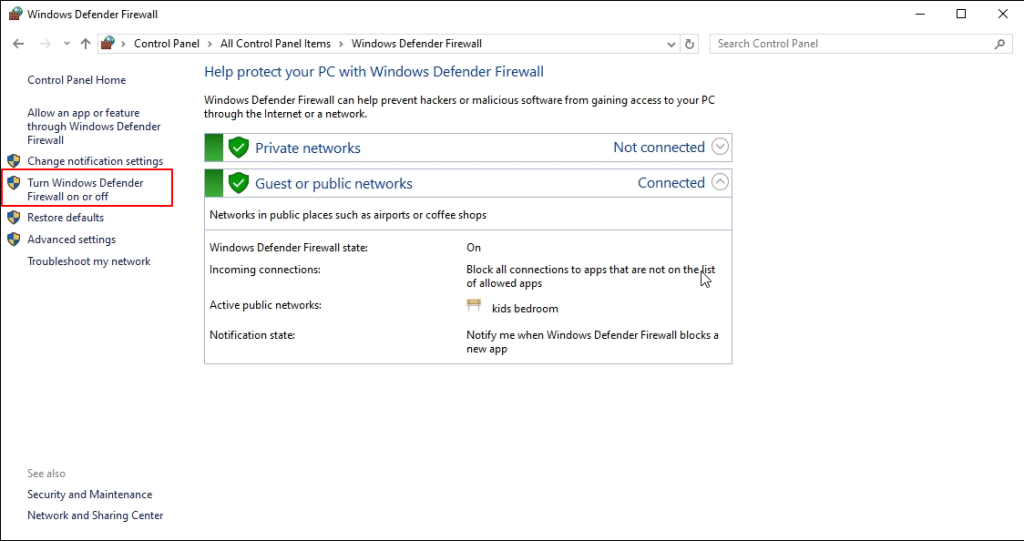
Disable Windows Defender Firewall
Press Win + R, type control, and hit Enter to open Control Panel. Go to System and Security/ Windows Defender Firewall. In the left menu, click Turn Windows Defender Firewall on or off.
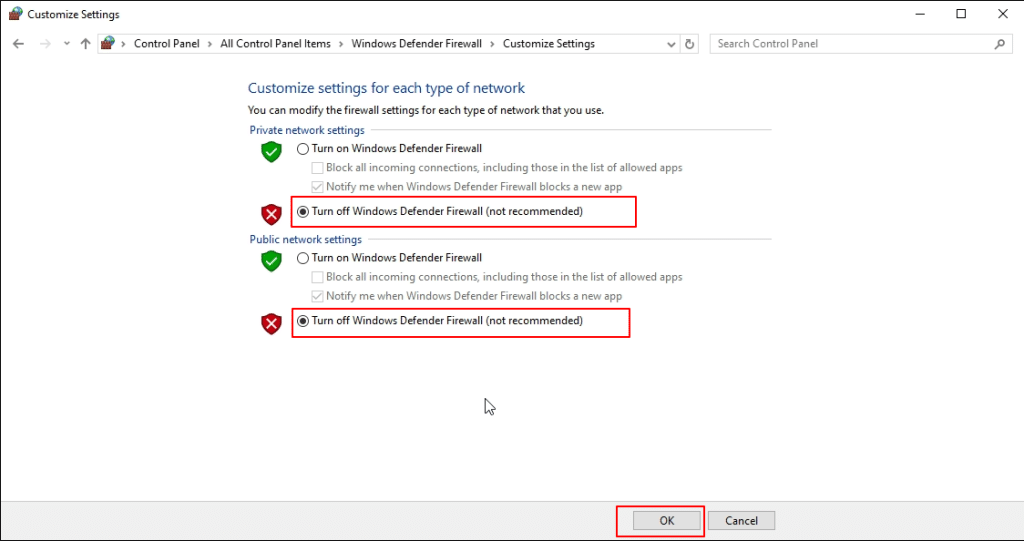
Under both Private and Public network settings, select Turn off Windows Defender Firewall (not recommended). Click OK and test your connection.
For Third-Party Antivirus (e.g., Avast, Norton, McAfee)
Locate the antivirus icon in the system tray at the bottom-right corner of the taskbar. Right-click the icon (as shown for McAfee in your screenshot) and explore the available options. Look for additional menus or settings within the antivirus dashboard that allow you to temporarily disable protection, pause real-time scanning, or turn off the antivirus.

Note: After testing, be sure to re-enable both your antivirus and firewall to maintain system security.
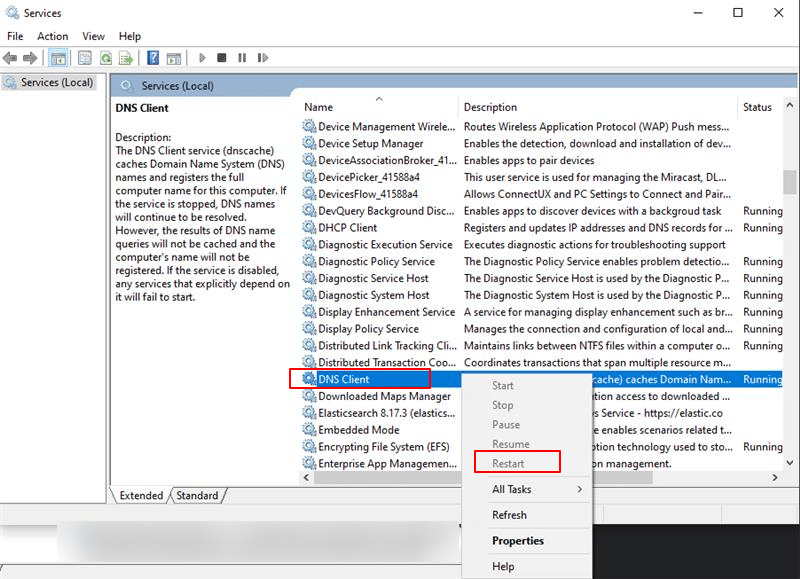
9. Restart DNS client service (Windows only)
The DNS Client service in Windows helps cache and resolve domain names for quicker access to websites. If this service encounters issues or becomes unresponsive, it can lead to errors like DNS_PROBE_FINISHED_NXDOMAIN. Restarting the DNS Client can refresh the DNS cache and restore proper domain resolution. This is a quick and safe troubleshooting step.
On Windows
Press Win + R, type services.msc, and press Enter. Scroll to DNS Client, right-click it, and choose Restart. Then, try accessing the site again.
On Linux
Open your terminal, log in via SSH as the root user, and run the following commands:
If you’re using systemd-resolved, restart the systemd-resolved service by running the below command.
Command: sudo systemctl restart systemd-resolved
To check status, run
Command: systemctl status systemd-resolved

IMAGE
10. Check the domain name
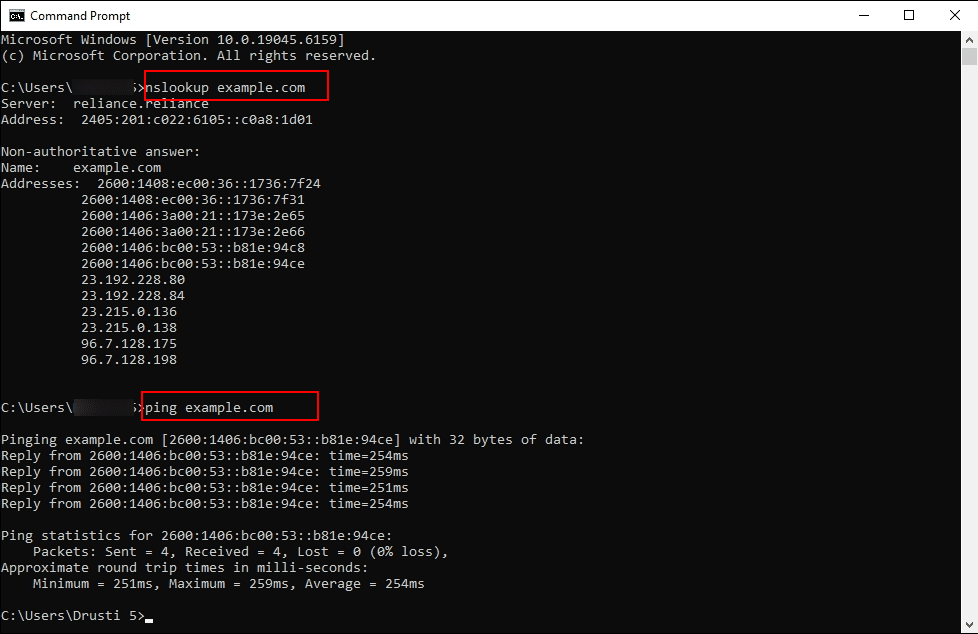
Sometimes, the DNS_PROBE_FINISHED_NXDOMAIN error occurs simply because of a typo in the URL or because the domain genuinely doesn’t exist. To verify whether the domain can be resolved correctly, you can use basic networking commands from the command line.
On Windows
Press Win + R, type cmd, and press Enter to open the Command Prompt.
Use the following commands:
- To check DNS Resolution, run
Command: nslookup example.com.
Note: This checks whether the DNS server can resolve the domain name. If you see an IP address in the output, the domain exists.
- Check network connectivity to the domain, run
Command: ping example.com
Note: This tests if your system can reach the domain’s server. A successful response indicates that the domain is live and reachable.
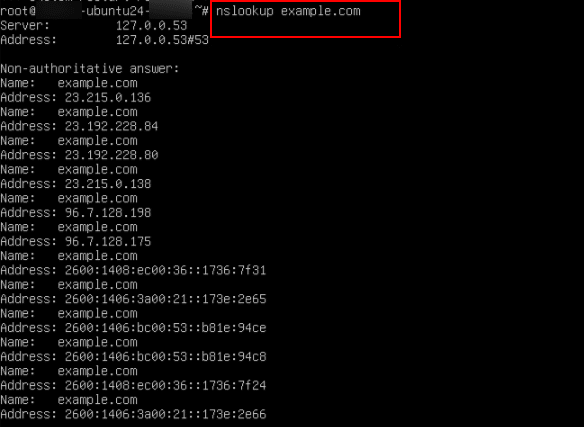
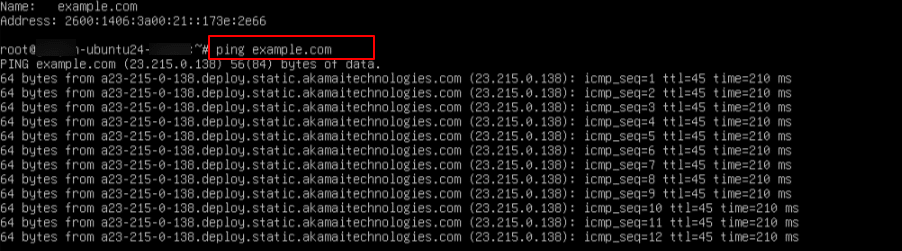
On Linux
Open your terminal, log in via SSH as the root user, and run the following commands:
Command: nslookup example.com
Command: ping example.com
This concludes our list of all the ways you can spot a a DNS_PROBE_FINISHED_ NXDOMAIN error and how to troubleshoot them.