SSH (Secure Shell) is the most common way to securely access and manage remote servers in cloud environments. However, when SSH connectivity fails, it can prevent critical administration and disrupt workflows. This article will help you identify and resolve SSH issues, from network reachability to configuration errors.
Here is a list the most common SSH connectivity issues and the steps to take to troubleshoot them.
Verify basic connectivity
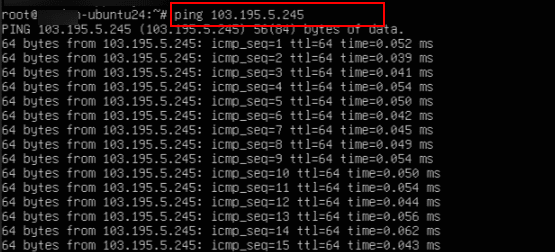
Verify basic connectivity to ensure the server is reachable over the network. We are using a Kamatera-provided Ubuntu server image, so we start by pinging the server’s IP address to check if it responds.
ping <server_ip>
Note:
Replace server_ip with your IP address.
If ping fails, the server might be down or unreachable.
The default SSH port is 22, so check the port connectivity by running the below command.
telnet <server_ip> 22
The output in the above screenshot tells us that SSH is working properly on the server side.
Or you can also run the below command
nc -zv <server_ip> 22
Note: If the port connectivity fails, port 22 may be blocked or SSH may not be listening.
Check the SSH client output
To get more information about the connection attempt, use -v.
The -v option in the ssh command enables verbose mode, which provides detailed debugging output about the SSH connection process. This is useful for troubleshooting connection issues.
It tells the SSH client to print detailed logs as it tries to resolve the hostname, authenticate using keys or passwords, negotiate encryption protocols, and establish a session. This helps you see exactly where the connection is failing.
ssh -v user@server_ip
Note:
Replace user with your actual username (e.g., root), depending on your server configuration and replace server_ip with your IP address.
You can increase the verbosity level:
-v: basic debug
-vv: more detailed
-vvv: maximum debug (useful for advanced troubleshooting)
From this screenshot, we see that the SSH client found your config, tried connecting to IP, and succeeded.
It will give you a prompt:
“Are you sure you want to continue connecting (yes/no)?”: Type Yes
This means it was the first time your machine contacted this host, and the server’s SSH key was added to your ~/.ssh/known_hosts.
But it failed with: “ssh_dispatch_run_fatal: Connection to server_ip port 22: Broken pipe” (you can see this line at the end of the above screenshot).
Check Server-side SSH service
If the client output shows issues like “Broken pipe,” “Connection refused,” or “Permission denied,” the problem may lie with the SSH service on the server.
Broken pipe indicates that the SSH client successfully initiated the connection, but the session was unexpectedly terminated during the handshake or data exchange likely before authentication was completed.
Double-check you’re using the right username by running the below command.
ssh -v root@<server_ip>
Then, you will get a message “debug1: Next authentication method: password”, this means:
You connected to the server successfully
The SSH service on the server did not accept any SSH key you tried
SSH is now falling back to password authentication
But then (most likely), the server either:
Rejected the password login
Closed the connection
Or you weren’t prompted to enter a password at all
Note: In the screenshot below, you will see “Connection closed by server_ip port 22” at the end.
When you get a message like this: “Connection closed by server_ip port 22” at the end.
Then, edit the SSH configuration file by running the below command:
sudo nano /etc/ssh/sshd_config
When the nano editor opens, find the line and make sure to remove # (hashtag symbol) and set PasswordAuthentication to yes as shown below:
PasswordAuthentication yes
Now, to save and exit from the nano editor press Ctrl+X, yes, Enter.
Now, run the below command to restart ssh:
sudo systemctl restart ssh
If the command ran without any error and just returned to the next line, that means the SSH service was restarted successfully.
Confirm it’s running by checking the status:
sudo systemctl status ssh
Then, you should see active (running) as shown on the screen below.
Now you can try reconnecting from your local machine by running the below command:
ssh root@your_server_ip
Enter the password when prompted.
Note: You will see, now you are connected. Use
ssh root@server_ip
when you’re just logging in.
Run the below command:
ssh -v root@server_ip
when:
You’re troubleshooting a connection issue
You want to see which auth method is used (key or password)
You want to inspect SSH handshake details
Enter the password when prompted; If authentication is successful, you will see a message like: Authenticated to <server_ip> ([<server_ip]:22) using “password”.
This indicates that the SSH connection to the server has been established.
Note: If you find“Connection refused”, then SSH service is not running. If you see “No route to host”, then there is network/firewall issue. If you see the message “Permission denied”, then there is auth/key issue. If you find “Connection timed out”, then there is firewall issue, host down, or wrong IP.
Firewall and security group rules
The command below is used to check the status of the firewall on a Linux system that uses UFW (Uncomplicated Firewall), a user-friendly front-end for managing firewall rules. It helps determine whether the firewall is active and which ports are allowed or blocked. This is particularly useful for verifying if port 22, which is used by SSH, is open; if it is not, SSH connections to the server will fail.
sudo ufw status
If it says Status: inactive (as shown in the screen below after running the command: sudo ufw status), that means the firewall is currently disabled, so it’s not blocking or allowing anything explicitly.
If you want to enable the firewall then allow SSH first, by running the below commands one-by-one.
Commands:
sudo ufw allow ssh # Opens port 22
sudo ufw enable # Turns on the firewall
sudo ufw status verbose # Confirms status
After running the commands, you will see the message as “Status: active”
In cloud security groups, ensure that port 22 is open to your IP address or IP range to allow SSH access. Learn how to set up and configure firewall rules on a Kamatera server.
Check authentication
Ensure you are using the correct username.
If you are using SSH-key based authentication, verify that:
The private key exists and is readable.
The key has the correct permissions.
Set correct permissions on your private key (on your local machine):
chmod 600 ~/.ssh/id_rsa
As you currently do not have a private key file (id_rsa) on the server, which is why chmod 600 ~/.ssh/id_rsa gave this error: chmod: cannot access ‘/root/.ssh/id_rsa’: No such file or directory
Run the below command to see the list of files in .ssh directory
ls -l /root/.ssh
From the above output, your .ssh directory contains only:
authorized_keys: contains public keys allowed to connect.
known_hosts and known_hosts.old: track previously connected hosts for SSH.
Since private keys should only exist on your local machine, you should generate the SSH key pair on your local machine (not on the server) .
On your local machine:
Generate SSH key pair (if not already generated), by running the below command:
If the public key matches, authentication succeeds and you are logged into the server without needing a password, giving you command-line access as the root user. If all is set up correctly (key pair, permissions, firewall rules, etc.), you will see a terminal prompt like:
root@your_server_ip:~#
This means you are nowlogged into your Kamatera server via SSH.
Note: If the key is missing, permissions are incorrect, or the firewall blocks access, you may see errors like “Permission denied (public key)” or “Connection timed out.”
Look at logs
On client, run the below command:
ssh -vvv user@host
You will be prompted to enter the password, after which you will get detailed message about the errors.
On server (via console or another method):
sudo tail -f /var/log/auth.log # Debian/Ubuntu
Advanced troubleshooting steps
Check for DNS issues: Try connecting via IP instead of hostname.
Ensure no IP blocks in /etc/hosts.deny or allow-only rules in /etc/hosts.allow.
Check /etc/nologin (prevents non-root logins).
Test from another client or network to rule out local issues.
Those are the most popular steps you can take to troubleshoot common issues that may come up with your SSH connectivity.